


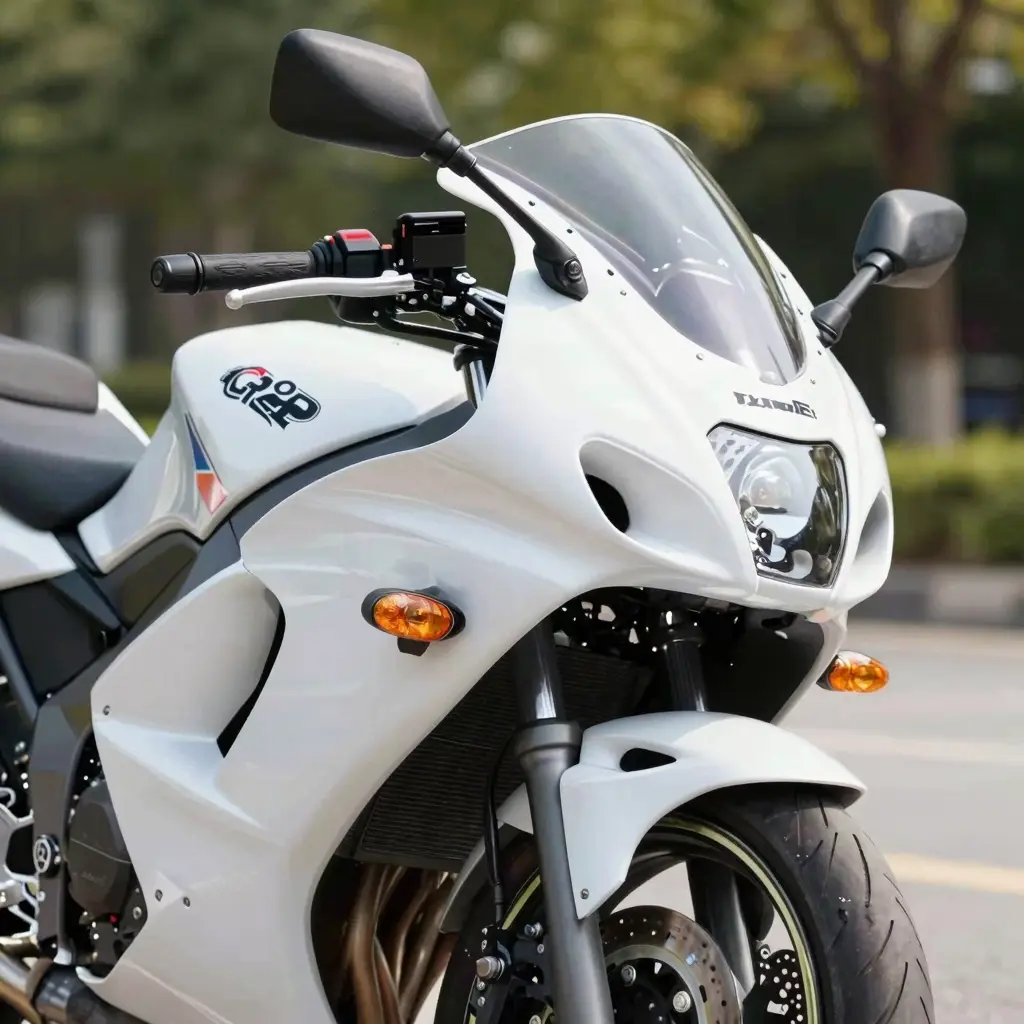
Введение в ремонт мотоциклетных обтекателей для моделей Kawasaki
Ремонт мотоциклетных обтекателей является важной частью технического обслуживания мотоциклов, особенно для моделей Kawasaki. Обтекатели — это защитные внешние оболочки мотоцикла, предназначенные для защиты внутренних компонентов от элементов, а также для улучшения общего вида. Обеспечение того, чтобы эти обтекатели были хорошо обслуживаемыми и отремонтированными, не только сохраняет внешний вид вашего мотоцикла, но и помогает сохранить его стоимость со временем.
Для владельцев Kawasaki поддержание обтекателей критически важно, так как они играют значительную роль в аэродинамике и комфорте езды. Пренебрежение ремонтом может привести к дальнейшему повреждению, влияющему на производительность и безопасность. К счастью, с ростом самостоятельного ремонта мотоциклов, многие энтузиасты выбирают самостоятельно выполнять задачи по ремонту обтекателей, что может привести к значительной экономии средств.
Участие в этих ремонтах позволяет водителям настраивать обтекатели Kawasaki под свой личный стиль, одновременно обеспечивая целостность конструкции своего мотоцикла. Изучая методы и техники самостоятельного ремонта, владельцы мотоциклов могут эффективно решать царапины, трещины и другие недостатки. Не только это придает профессиональный вид, но и вызывает чувство гордости за уход за своим транспортным средством. В этой статье мы расскажем о эффективных способах ремонта мотоциклетных обтекателей для моделей Kawasaki и подчеркнем преимущества самостоятельного выполнения этих ремонтов.
Независимо от того, являетесь ли вы опытным водителем или новичком, обучение тому, как ремонтировать мотоциклетные обтекатели Kawasaki, — это навык, который может повысить как ваше вождение, так и долговечность вашего мотоцикла.
Распространенные проблемы с обтекателями Kawasaki
Мотоциклетные обтекатели важны как для эстетики, так и для производительности, но со временем они могут сталкиваться с различными проблемами. Вот список распространенных проблем, встречающихся с обтекателями Kawasaki, вместе с их симптомами:
-
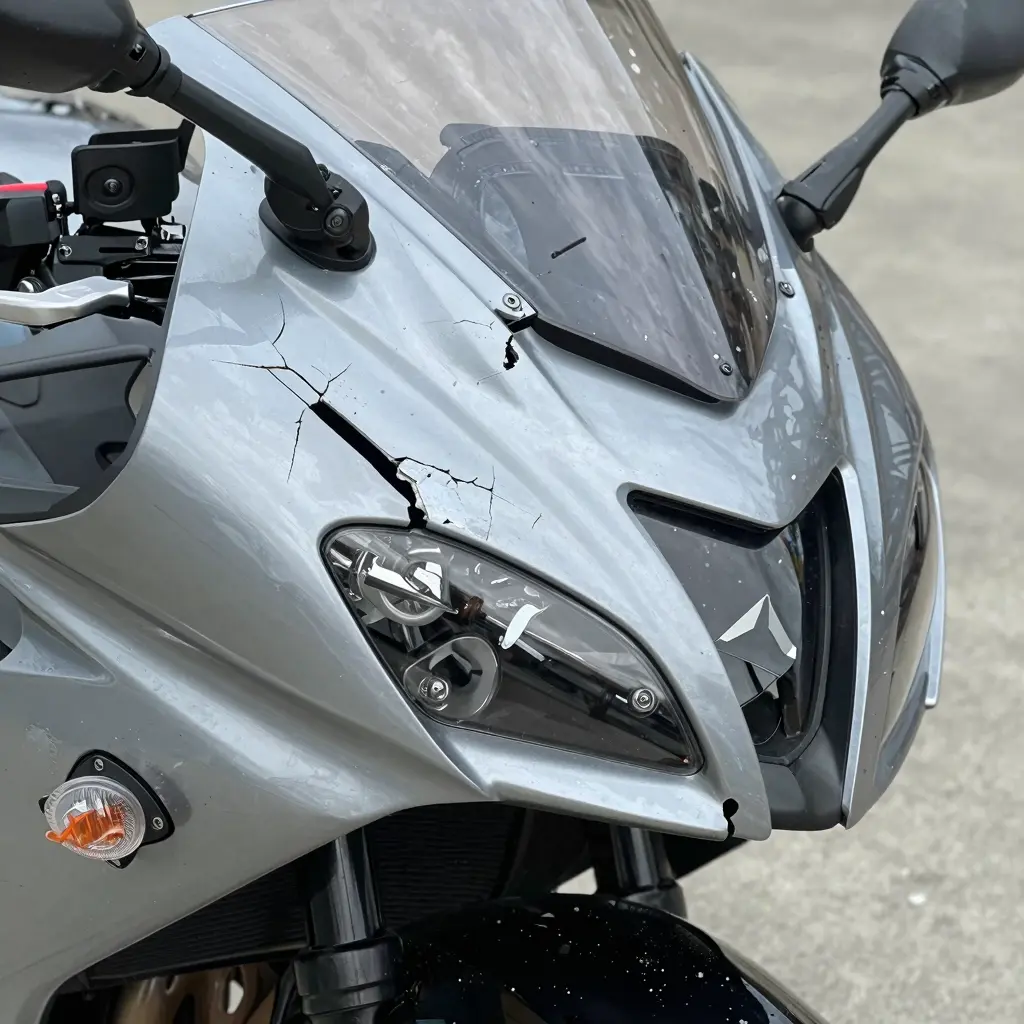
Трещины
Трещины обычно возникают из-за удара или напряжения на обтекателях. Симптомы включают видимые разрывы на поверхности и потенциальную потерю структурной целостности, что может привести к дальнейшему повреждению, если не будет своевременно решено. -
Царапины
Царапины могут возникнуть из-за мусора на дороге, неправильных методов чистки или небольших падений. Они ухудшают внешний вид мотоцикла и могут также повлиять на покраску, приводя к коррозии или облупливанию, если не управлять ими. -
Неправильная установка
Неправильно установленные обтекатели часто возникают из-за неправильной установки или износа со временем. Симптомы включают зазоры между компонентами обтекателя, шумы во время езды или неровные поверхности, которые могут нарушать воздушный поток. -
Fading and Discoloration
Воздействие солнца и окружающей среды может выцветать цвет обтекателей. Симптомы включают тусклый вид, потерю блеска и изменения цвета, которые делают мотоцикл выглядящим изношенным. -
Вибрации
Избыточные вибрации могут указывать на ослабленные или неправильно затянутые компоненты обтекателей. Водители могут замечать шумы или чувство нестабильности во время езды, что может быть как неприятным, так и опасным. Обсуждение распространенных проблем с вибрациями на мотоциклах Kawasaki. -
Поврежденные точки крепления
Обтекатели удерживаются несколькими точками крепления, которые могут трескаться или изнашиваться. Симптомы включают ослабленные обтекатели, которые колеблются во время езды или даже полностью падают, представляя значительные риски для водителя. -
Плохая посадка
Это происходит, когда после-market обтекатели не подходят правильно к оригинальному раме мотоцикла. Водители часто испытывают такие проблемы, как избыточный шум ветра или воздушные карманы, которые могут повлиять на работу мотоцикла. Для настраиваемых вариантов, проверьте нашу коллекцию кастомных обтекателей для Kawasaki.
Решение этих распространенных проблем с обтекателями Kawasaki не только обеспечивает безопасность, но и поддерживает эстетическую привлекательность и производительность вашего мотоцикла. Регулярные осмотры и обслуживание являются ключевыми для увеличения срока службы и наслаждения плавной ездой.
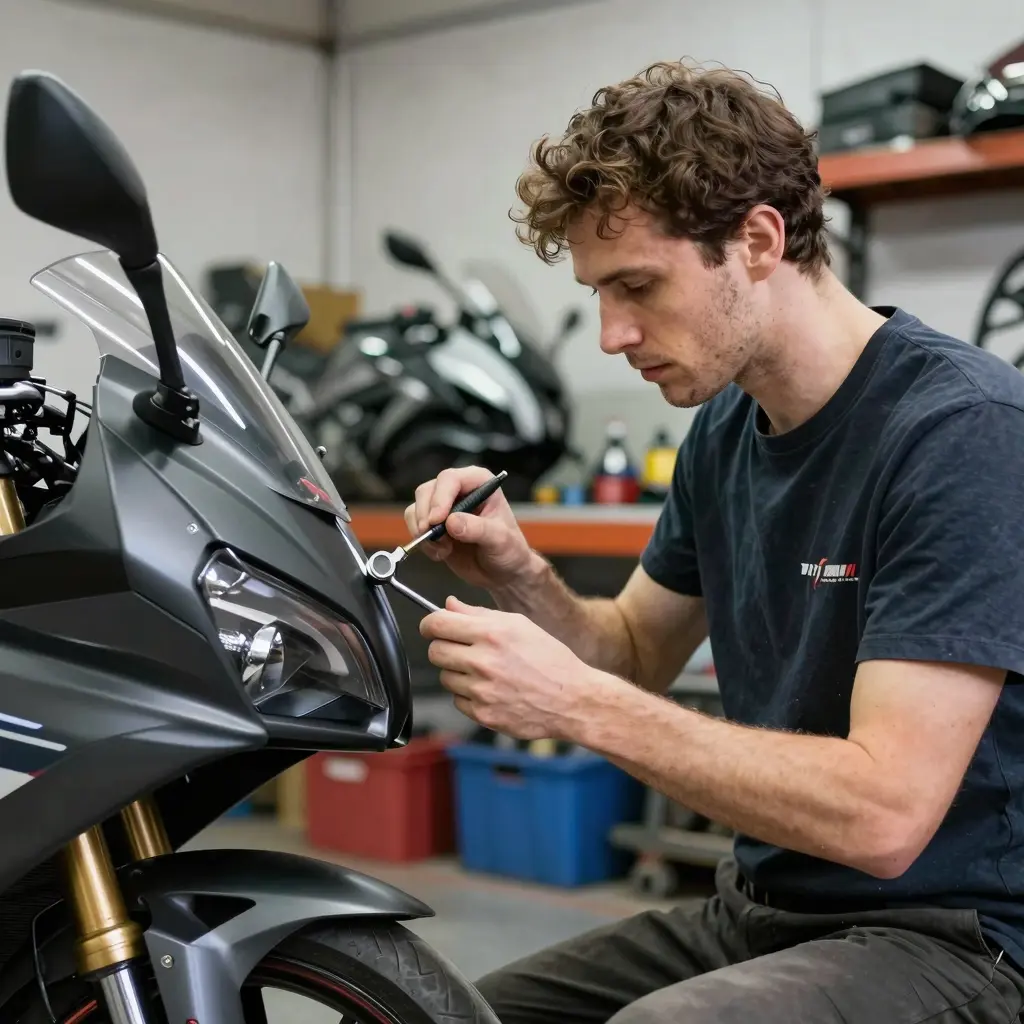
Как отремонтировать мотоциклетные обтекатели Kawasaki
Ремонт мотоциклетных обтекателей, особенно для моделей Kawasaki, может быть приятной задачей для владельцев бизнеса и энтузиастов. Правильные техники и материалы могут обеспечить прочность и эстетическую привлекательность после ремонта. Вот подробное руководство, как эффективно отремонтировать мотоциклетные обтекатели.
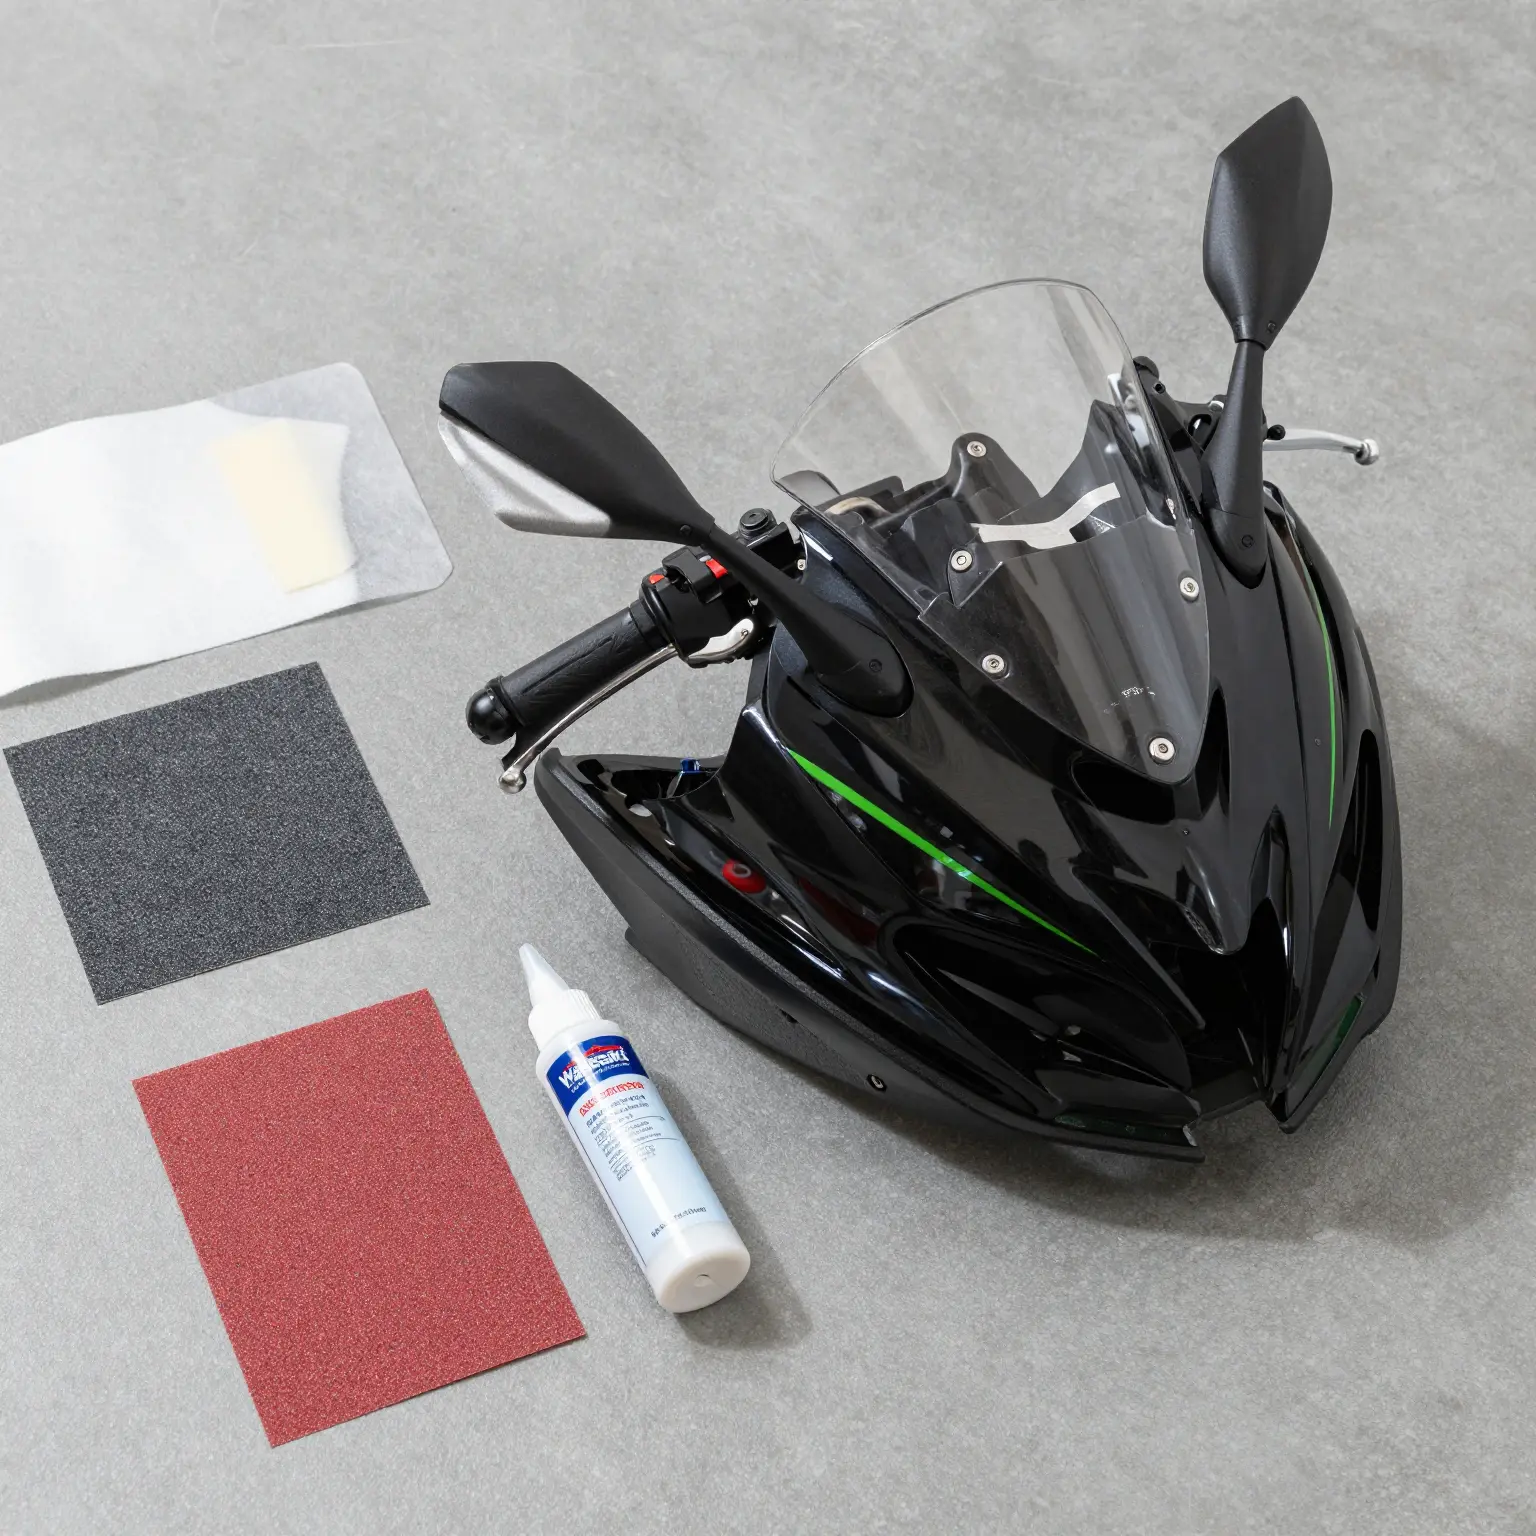
Materials Needed
Перед началом процесса ремонта соберите следующие инструменты и материалы:
| Материал/Инструмент | Description |
|---|---|
| Пластины из стекловолокна | Используются для ремонта трещин и сколов на обтекателях. |
| Эпоксидная смола | Клей для соединения стекловолокна и пластика. |
| Инструменты для шлифовки | Для выравнивания краев и подготовки поверхностей к окрашиванию. |
| Средства индивидуальной защиты | Перчатки, маски и очки для защиты. |
| Paint | Для завершения ремонта и восстановления цвета. |
| Heat Gun | Используется для перформинга пластика обтекателей во время ремонта. |
| Пластиковый заплаточный материал | Заполняет глубокие царапины или дефекты. |
| Primer | Подготавливает поверхности для покраски над отремонтированными участками. |
| Clear Coat | Конечный защитный слой для достижения глянцевого вида. |
| Инструменты для резки | Ножницы или роторные инструменты для формирования материалов. |
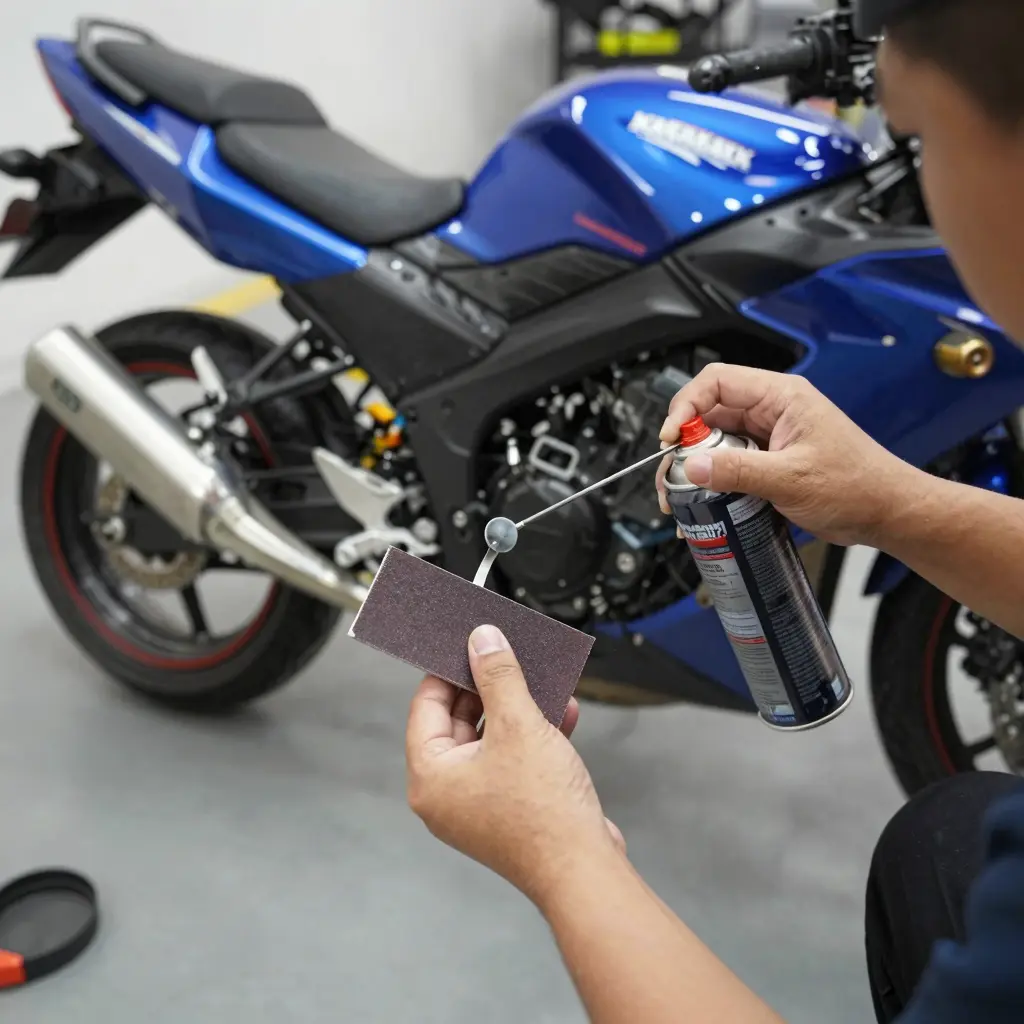
Repair Techniques
- Первичная оценка: Начните с оценки степени повреждения. Определите трещины, сколы или разломы, которые требуют ремонта.
- Cleaning: Тщательно очистите поврежденный участок. Дегрейсер может быть полезен для удаления любого грязи или масла, которое может повлиять на адгезию.
- Sanding: Используйте инструменты для шлифовки, чтобы выровнять поврежденный участок, убедившись, что поверхность ровная. Это подготовит поверхность к нанесению материалов для ремонта.
- Нанесение пластиковых заплат: Cut the fiberglass patch to size and mix epoxy resin thoroughly. Apply the resin to the patch and adhere it to the damaged area, ensuring a strong bond.
- Smoothing and Filling: Once the patch has cured, use body filler to even out any remaining imperfections. Sand again once the filler is dried.
- Painting: Apply primer, followed by the paint. Match the motorcycle’s color for the best results. Finally, add a clear coat for protection.
Tips for Durable Repairs
- Safety First: Always wear safety equipment when sanding or using chemicals to protect yourself.
- Temperature Matters: Use a heat gun carefully to reshape plastic fairings if they have warped due to impact.
- Patience is Key: Allow sufficient time for each layer of adhesive, filler, and paint to fully cure before proceeding to the next step.
- Practice Makes Perfect: If new to fairing repairs, practice on less valuable pieces before attempting significant repairs on Kawasaki models.
For more comprehensive resources regarding motorcycle fairing repair, you can check out Kawasaki fairing options.
Image Representation: Here’s an informative image highlighting the key tools and materials required for fairing repairs:
Conclusion
Properly learning how to repair motorcycle fairings on Kawasaki models not only extends the lifespan of the vehicle but can also enhance its appearance. By ensuring all steps are followed carefully and using the right materials, your repairs can be both durable and aesthetically pleasing. For a wide range of fairing solutions, visit our featured products.
Essential Tools for Kawasaki Motorcycle Fairing Repairs
Repairing Kawasaki motorcycle fairings requires a specific set of tools to ensure that the job is done correctly and efficiently. Below is a list of essential tools that every motorcycle repair business should have on hand before starting the repair process.
1. Screwdrivers
A set of screwdrivers, including Phillips and flathead types, is fundamental. These tools are crucial for removing and attaching the fairing panels. Opt for a set with various sizes to accommodate different screws found in Kawasaki motorcycles.
2. Plastic Welder
For cracks and breaks in the fairing, a plastic welder is indispensable. This tool melts the plastic and allows it to fuse back together, providing a strong bond. It’s an effective solution for restoring the structural integrity of the fairings without the need for replacements.
3. Sandpaper
Sandpaper in various grits (from coarse to fine) is necessary for surface preparation. Before applying any adhesive or paint, it is essential to smooth out the damaged areas and ensure proper adhesion. Fine grit is particularly useful for finishing touches after repairs.
4. Fiberglass Repair Kit
A fiberglass repair kit should include fiberglass cloth, resin, and hardener. This kit is useful for reinforcing repaired areas and filling in gaps, providing additional strength to the fairing.
5. Paints and Primers
Matching paints and primers are crucial for restoring the aesthetic appeal of the fairings. A high-quality spray paint specifically designed for plastics will help deliver a smooth and professional finish. Consider using a primer that adheres well to plastic materials for the best results.
6. Adhesives and Sealants
High-strength adhesives, such as epoxy or super glue, will aid in securing smaller pieces or reinforcements that need to be mounted after repairs. Sealants can help protect against moisture and further damage after the repair is complete.
7. Heat Gun
A heat gun can be very useful for reshaping plastic fairings and making them more pliable during repairs. This tool can also assist in removing old paint or complete restoration of parts.
Collecting these motorcycle repair tools before starting your fairing repair will ensure that the process runs smoothly. Don’t forget to check out custom fairings for any replacements you may need.
Step-by-Step Guide for Simple Fairing Repairs on Kawasaki Motorcycles
Repairing motorcycle fairings can seem daunting at first, but with the right approach, it can be a manageable DIY task. Below is a detailed ordered list to guide business owners through the process of repairing common fairing issues on Kawasaki motorcycles.
1. Preparation
-
Gather Necessary Tools and Materials: Start by collecting all the tools you’ll need. This includes:
-
Screwdrivers (Philips and flat)
-
Pliers
-
Sandpaper
-
Plastic repair kit or fiberglass repair kit
-
Paint and primer (Kawasaki color matched if possible)
-
Clean cloths and rubbing alcohol
-
Safety gear (gloves, goggles)
-
Clean the Area: Before starting the repair, clean the fairing thoroughly with soap and water, followed by a wipe-down with rubbing alcohol to remove any oils or dirt.
2. Assess Damage
- Identify the Problem: Examine the fairings for cracks, scratches, or dents. Understanding the extent of the damage is crucial for determining the best repair method. Common issues include:
- Hairline cracks
- Deep scratches
- Missing pieces
- Consult References: For further insights on types of damages and repairs, check out this complete guide to restoring motorcycle fairings.
3. Repair Actions
-
For Hairline Cracks:
-
Clean the crack with a file or sandpaper.
-
Apply a plastic repair kit according to the instructions.
-
Allow it to cure completely.
-
For Deep Scratches:
-
Sand down the area around the scratch to smoothen it.
-
Use a plastic filler if necessary to fill in the scratch, then sand again for a smooth finish.
-
For Missing Pieces:
-
Use a fiberglass repair kit to create a mold for the missing area.
-
Apply fiberglass cloth, layer by layer, ensuring it fits snugly. Allow it to cure completely.
4. Finishing Touches
- Sanding: Once repairs are complete, sand the affected area smoothly, starting with a coarse grit and moving to finer grits.
- Painting: After sanding, apply a coat of primer followed by the appropriate color of paint. Consider using a spray can for an even coat. Allow adequate drying time between layers.
- Sealant: Finally, consider applying a clear sealant to protect the repairs and give the fairing a polished look.
Summary
Repairing motorcycle fairings is not only critical for aesthetics but also for maintaining the integrity of the motorcycle. For specific Kawasaki fairing kits, visit Summit Fairings’ catalog of ready-to-ship fairings. With patience and the right materials, you can achieve professional-looking results on your own Kawasaki models.
Comparing Fairing Repair Materials
Here’s a comprehensive comparison of popular fairing repair materials, highlighting their pros and cons:
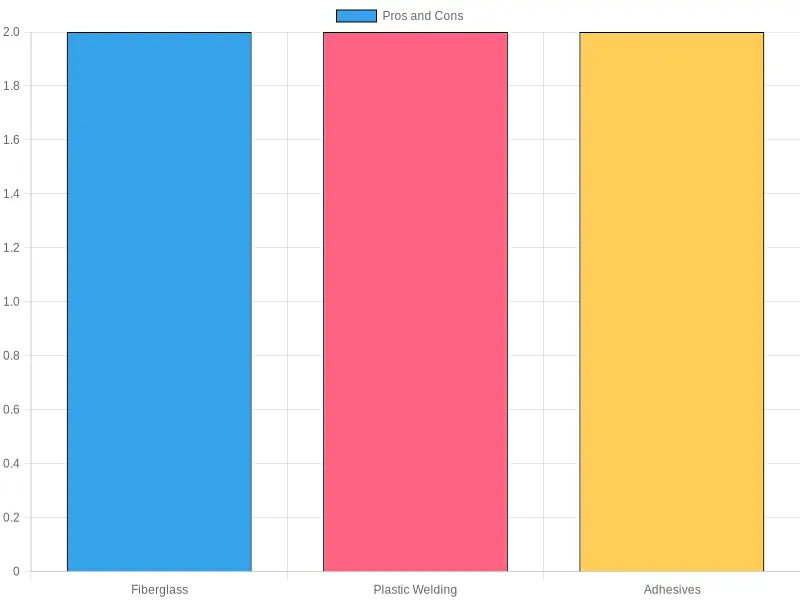
Materials Overview
| Material | Pros | Cons |
|---|---|---|
| Fiberglass | Strong bonding, durable | Difficult to work with, prone to cracking |
| Plastic Welding | Easy to manipulate, quick fixes | May not provide durability like fiberglass |
| Клеи | Simple to apply, versatile | Less strong than fiberglass |
For more insights on motorcycle fairing repairs, check out our detailed guide on fairing repairs.
Tips for Maintaining Kawasaki Motorcycle Fairings
Maintaining your Kawasaki fairings is crucial for preserving the aesthetic appeal and durability of your motorcycle. Here are some actionable tips to keep your fairings in excellent condition:
1. Regular Cleaning
- Use Mild Soap and Water: Clean your fairings regularly with a solution of mild soap and water. Avoid harsh chemicals that may damage the paint or material.
- Microfiber Cloth: Use a microfiber cloth to gently wipe down the fairings. This can help prevent scratches and swirl marks on the surface.
- Dry Properly: After washing, dry the fairing immediately to avoid water spots and corrosion.
2. Protection from Weather
- Use a Quality Cover: When not in use, protect your Kawasaki with a motorcycle cover. This shields against sun exposure, rain, and debris.
- Используйте микрофибровую ткань и мягкое средство для чистки, специально предназначенное для автомобильных защитных лаков. Избегайте абразивных средств для чистки, так как они могут повредить покрытие.: Regularly applying a high-quality wax can help protect the fairing’s finish from UV rays and contaminants. Consider using a sealant for added protection against the elements.
- Avoid Parking in Direct Sunlight: Try to park your motorcycle in shaded areas or use a cover to prevent the fairing’s color from fading due to UV exposure.
3. Periodic Inspections
- Check for Cracks and Chips: Make it a habit to inspect your fairings for any signs of damage such as cracks or chips. Addressing these issues early can prevent further damage.
- Ensure Secure Fastenings: Occasionally check that the fairing bolts and clips are tight, ensuring structural integrity, especially after long rides.
- Inspect for Dirt Accumulation: Check the areas where dirt and debris might accumulate, such as along seams and edges, and clean them to prevent buildup that can lead to corrosion.
By implementing these essential maintenance tips, you can contribute to the longevity of your Kawasaki fairings and enjoy a pristine motorcycle appearance for years to come. For more customized fairing options, check out our collection of custom Kawasaki fairings.
The Importance of Fairing Maintenance
Motorcycle fairings play a crucial role in both aesthetics and functionality. As motorcycle repair expert John Davidson, who has over 20 years of experience in the industry, states:
“Regular maintenance of motorcycle fairings is essential. Not only do they protect your bike from wind and debris, but they also play a significant role in your motorcycle’s aerodynamics and overall performance. Neglecting their upkeep can lead to costly repairs down the line.”
John Davidson is renowned for his expertise in motorcycle repairs and often shares invaluable insights on how to keep motorcycles in optimal condition. His emphasis on fairing maintenance underscores its importance not just for appearance but also for safety and performance.
Understanding motorcycle fairing upkeep can significantly benefit business owners involved in motorcycle service or retail. By establishing solid maintenance practices, you can ensure the longevity of the motorcycles you service, enhancing customer satisfaction and business reputation.
For comprehensive guides on motorcycle care, visit Summit Fairings and explore featured products to help your customers.
In conclusion, understanding how to repair motorcycle fairings for Kawasaki models is essential for business owners aiming to enhance their service offerings and customer satisfaction. By implementing effective repair techniques, you not only improve the durability and aesthetics of motorcycles but also boost your reputation within the riding community. The durability of ABS plastic used in these fairings ensures longevity, making it a smart choice for businesses focused on quality and performance. As customization becomes increasingly popular amongst riders, consider the vast array of options available at Summit Fairings, where you can find customized fairings that cater to specific models and personal styles. As your business grows, prioritizing the repair and customization of motorcycle fairings can set you apart from competitors, attract more clients, and ultimately increase profitability. Don’t miss the opportunity to enhance your offerings; explore how Summit Fairings can help you customize your fairings today. Embrace this evolution in motorcycle customization and position your business for success in the dynamic motorcycle industry!