


Introduction
DIY painting motorcycle fairings offers a strategic opportunity for business owners to reduce outsourcing costs while delivering personalized, customized aesthetics that meet evolving customer demands. Understanding the detailed process—from surface preparation and repair to advanced painting techniques and finishing coats—empowers businesses to elevate their offerings and maintain quality control. This comprehensive guide outlines every critical element, starting with an overview of DIY painting advantages, moving into preparation and specialized techniques, then focusing on surface repair essentials. It continues by exploring customization applications such as graphic decals, and discusses the vital finishing procedures that protect and enhance the paintwork. Finally, valuable resources and tutorials provide business owners actionable insights for training staff or expanding service capabilities, making this a holistic manual to integrate DIY motorcycle fairing painting into your enterprise.
Tables of Contents
Chapter 1: Introduction to DIY Painting Motorcycle Fairings
- Mastering Surface Preparation for Flawless DIY Motorcycle Fairings Paint
- Choosing the Right Materials and Techniques for Lasting Motorcycle Fairing Paints
- Achieving Lasting Brilliance: Finishing and Care for DIY Painted Motorcycle Fairings
Chapter 2: Preparation and Painting Techniques for DIY Painting Motorcycle Fairings
- Mastering Surface Cleaning and Sanding for Flawless Motorcycle Fairing Paints
- Ensuring Flawless Results: Primer Application and Repair Essentials for DIY Motorcycle Fairings
- Mastering Spray Painting and Clear Coating for Flawless DIY Motorcycle Fairings
Chapter 3: Mastering Surface Prep: Essential Techniques for Repairing Motorcycle Fairings
- Effective Cleaning and Precision Sanding for Flawless Motorcycle Fairing Paintwork
- Mastering Fiberglass Repair for Strong, Smooth Motorcycle Fairings
- Mastering Primer and Paint Application for Durable, Flawless Motorcycle Fairings
Chapter 4: Customization and Graphic Application in DIY Painting Motorcycle Fairings
- Mastering Surface Preparation and Priming for Flawless Motorcycle Fairings Customization
- Mastering Graphic Application and Artistic Effects for Personalized Motorcycle Fairings
- Mastering Finishing Touches: Protective Coatings to Preserve and Enhance Your Custom Motorcycle Fairings
Chapter 5: Finishing and Clear Coating Techniques for DIY Motorcycle Fairings
- Mastering Surface Preparation to Achieve a Flawless Finish and Durable Clear Coat
- Expert Techniques for Flawless Clear Coating in DIY Motorcycle Fairing Painting
- Seamless Post-Clear Coat Refinement and Long-Term Care for DIY Motorcycle Fairings
Chapter 6: Comprehensive Resources and Tutorials to Master DIY Motorcycle Fairing Painting
- Essential Installation and Surface Preparation Techniques for Painting Motorcycle Fairings
- Essential Materials and Proven Techniques to Master DIY Motorcycle Fairing Painting
- Expert Techniques and Maintenance Essentials for Lasting DIY Motorcycle Fairing Paints
Chapter 1: Introduction to DIY Painting Motorcycle Fairings
1. Mastering Surface Preparation for Flawless DIY Motorcycle Fairings Paint
Achieving a professional and durable finish on motorcycle fairings begins with meticulous surface preparation. This phase ensures paint adhesion, longevity, and a smooth visual appeal. Initially, thorough cleaning removes all dirt, oils, and contaminants that could interfere with paint bonding. Following this, sanding plays a crucial role; using specialized sanding pads—like red (600 grit) or gray (800 grit)—tailored for plastic fairings, creates an ideal textured surface without causing damage. This sanding removes any glossy finish and gives the paint and primer a firm grip. For metal components, sanding also involves rust removal and application of rust converters if necessary. Light scuffing of previously painted panels with fine abrasive pads readies surfaces for clear coat adhesion, guaranteeing new layers adhere evenly. After sanding, it’s vital to clean the surfaces again using degreasers or tack cloths to eliminate dust and residue. Applying a primer specifically compatible with the fairing material—epoxy primers for metals and plastic-specific primers for plastics—forms a protective base that enhances paint durability. Masking off areas protects parts not intended for paint, ensuring sharp, clean lines and preventing overspray. Skipping or rushing these surface preparation steps often results in peeling, bubbling, or uneven finishes. A careful and patient approach during this preparation stage lays the foundation for a flawless, long-lasting custom paint job on motorcycle fairings. For more insight on quality fairings to paint, explore the Summit Fairings blog.
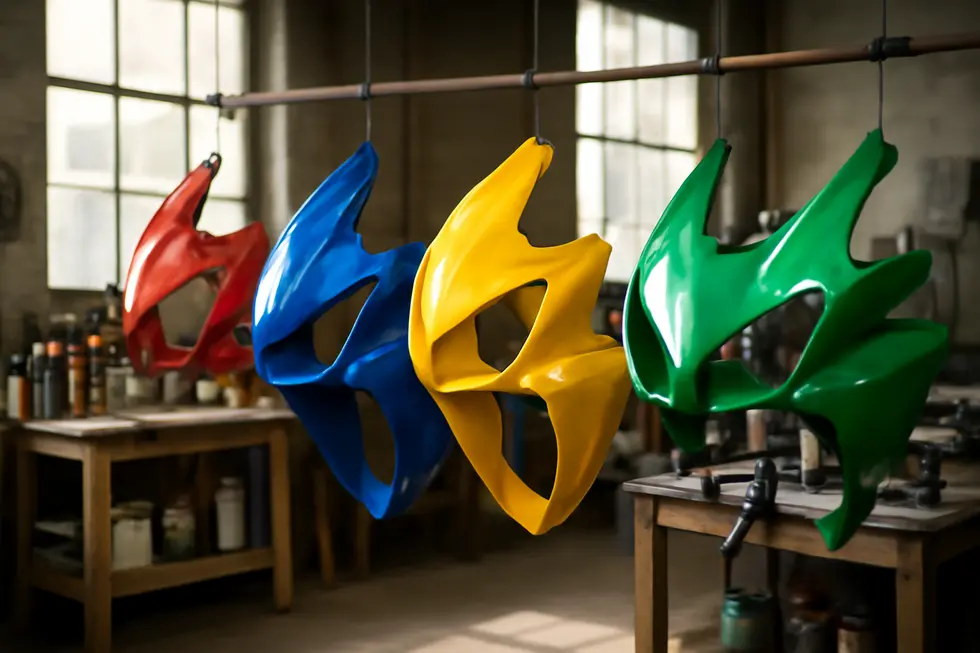
2. Choosing the Right Materials and Techniques for Lasting Motorcycle Fairing Paints
Selecting appropriate materials and application methods lays the foundation for achieving a durable and visually striking paint finish on motorcycle fairings. Most aftermarket fairings are made from ABS plastic, prized for its strength and smooth surface, which simplifies painting. Fiberglass fairings, common in some models, benefit greatly from a high-quality primer and sometimes a gel coat layer to enhance durability and surface smoothness. Choosing the right paint type depends on the desired look and functional needs. For vibrant finishes, candy paints deliver a deep, glossy color, while metallic or pearl paints add shimmer and dimension. Matte paints offer a sleek, flat appearance when gloss is not desired. For areas subjected to intense heat, high-temperature resistant paints ensure durability without discoloration. Effective application always starts with thorough cleaning and sanding of the fairings using grit suited for plastics to promote adhesion. Primers compatible with the fairing’s material are critical, creating a uniform base for paint layers. Depending on available tools and design detail, paint can be applied via spray cans for simplicity, spray guns for uniform coverage, or airbrushes for intricate designs. The process concludes with clear coats that safeguard the paint from UV damage and scratches while enhancing gloss. To sustain the finish, regular gentle cleaning and waxing with motorcycle-safe products protect the paint’s vibrancy and resilience. For deeper insights on specific paint brands and techniques, a detailed visual guide is available in this comprehensive painting tutorial. This approach, combined with the right materials, prepares DIY enthusiasts to achieve professional-caliber results. For additional resources on aftermarket fairings to pair with your painting projects, explore unmatched motorcycle fairings choices.
3. Achieving Lasting Brilliance: Finishing and Care for DIY Painted Motorcycle Fairings
Transforming motorcycle fairings with DIY painting demands not just precise application but also meticulous finishing and ongoing care to preserve the vibrancy and durability of your work. After thorough surface preparation and applying evenly layered base coats, the addition of multiple clear coat layers seals the paint beneath a protective, glossy shield. This clear coat guards against UV rays and road debris, the primary culprits that can dull or degrade painted plastics over time. Achieving a mirror-like finish involves wet-sanding with ultra-fine grit sandpaper followed by polishing, which removes minor imperfections and deepens the shine. Beyond the workshop, protecting your bike begins with practical strategies: park in shaded spots whenever possible or use a UV-protective cover outdoors to limit sun damage. Regular cleaning with mild soap and soft microfiber cloths prevents surface wear by removing dirt and grime gently, avoiding harsh detergents or abrasive materials that could harm the finish. To further enhance protection and gloss, applying a motorcycle-safe wax every few months creates an additional barrier against environmental contaminants. Minor chips can be effectively touched up using matching paint and clear coats to blend repairs seamlessly. For more extensive damage, DIYers can either perform bodywork repairs using specialized kits or consult professionals, depending on confidence and desired outcome. These finishing and maintenance steps are essential for sustaining the personalized aesthetic and longevity of your freshly painted motorcycle fairings. For detailed guidance on layering paint and clear coats, refer to this practical guide.
Chapter 2: Preparation and Painting Techniques for DIY Painting Motorcycle Fairings
1. Mastering Surface Cleaning and Sanding for Flawless Motorcycle Fairing Paints
Proper preparation of motorcycle fairings through thorough surface cleaning and careful sanding forms the cornerstone of a successful DIY paint job. Before any paint touches the fairing, all dirt, grease, and contaminants must be completely removed with an appropriate cleaner or degreaser to ensure optimal paint adhesion and prevent defects. Once cleaned and dried, the surface requires sanding with fine-grit sandpaper—typically between 600 and 800 grit—to create a subtle texture that allows primer and paint to bond effectively without damaging the plastic substrate. For fairings displaying old paint, scratches, or imperfections, starting with a coarser grit such as 150 to remove flaking or uneven areas, then progressively moving to finer grits around 220 or higher, ensures a smooth and even base. Post-sanding, the surface must be wiped clean of dust and residue to maintain pristine conditions for priming. Since motorcycle fairings are mostly plastic, using primers and paints formulated specifically for plastic surfaces is crucial for durability and finish quality. Finally, applying a clear coat protects the paint and enhances gloss, giving the fairings a professional, long-lasting look. These foundational steps, demonstrated in useful tutorials like “Stop Wasting Time The Ultimate Paint Prep Hack”, significantly elevate the quality and longevity of your custom paintwork. For more insights on customizing your bike with aftermarket parts, explore affordable motorcycle fairings that serve as perfect canvases for DIY transformations.
2. Ensuring Flawless Results: Primer Application and Repair Essentials for DIY Motorcycle Fairings
Achieving a durable and professional paint finish on motorcycle fairings begins with meticulous primer application and careful repair of imperfections. Start by thoroughly cleaning the fairing to eliminate dirt, grease, and any contaminants that might compromise paint adhesion. Next, sand the surface gently with 600 to 800 grit sandpaper or sanding pads, which dulls the existing gloss and creates a slightly rough texture essential for primer grip. Address any scratches, dents, or cracks by using a plastic filler or putty tailored for motorcycle plastics; once fully cured, sand these areas smooth to ensure a seamless base. Selecting a primer specifically designed for ABS plastic or fiberglass is vital, with flexible or plastic adhesion primers offering protection against cracking or peeling due to material flex. Apply the primer in thin, even coats, allowing each layer to dry thoroughly and sanding lightly between coats if needed to maintain an ultra-smooth surface. After primer application, clean off any residual dust before moving on to painting. Executing these steps in a clean, dust-free environment and practicing controlled spray techniques help prevent imperfections such as runs or uneven coverage, ultimately enhancing the longevity and visual appeal of the paint job. This approach reflects the standards used in professional auto body repair and sets the foundation for a refined DIY custom finish. For a practical demonstration of sanding and primer techniques on plastic fairings, a detailed visual guide can be found here. For more on sourcing high-quality motorcycle fairings to customize, check out this ultimate guide.
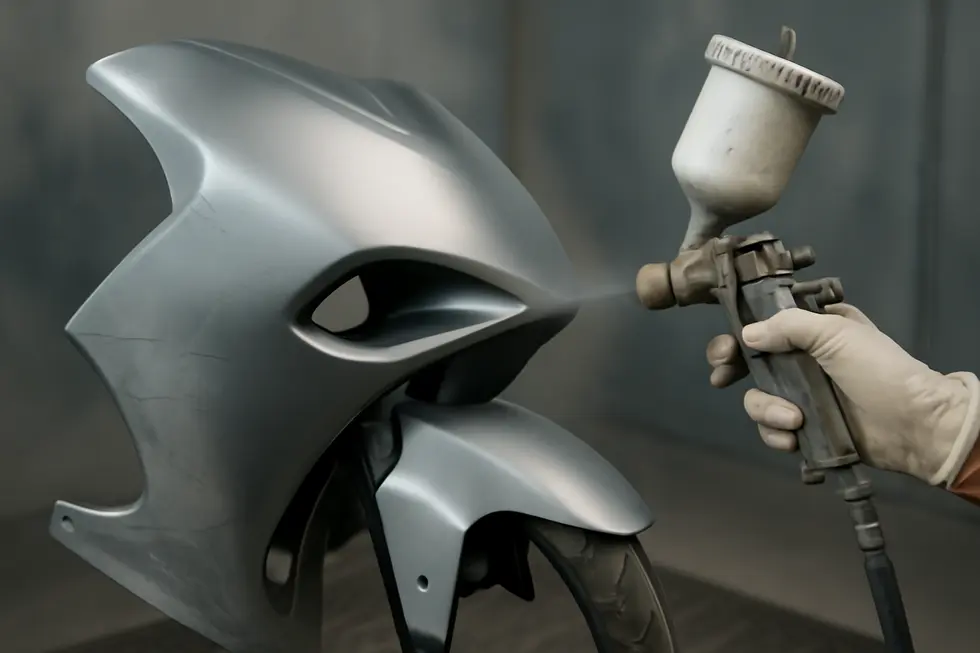
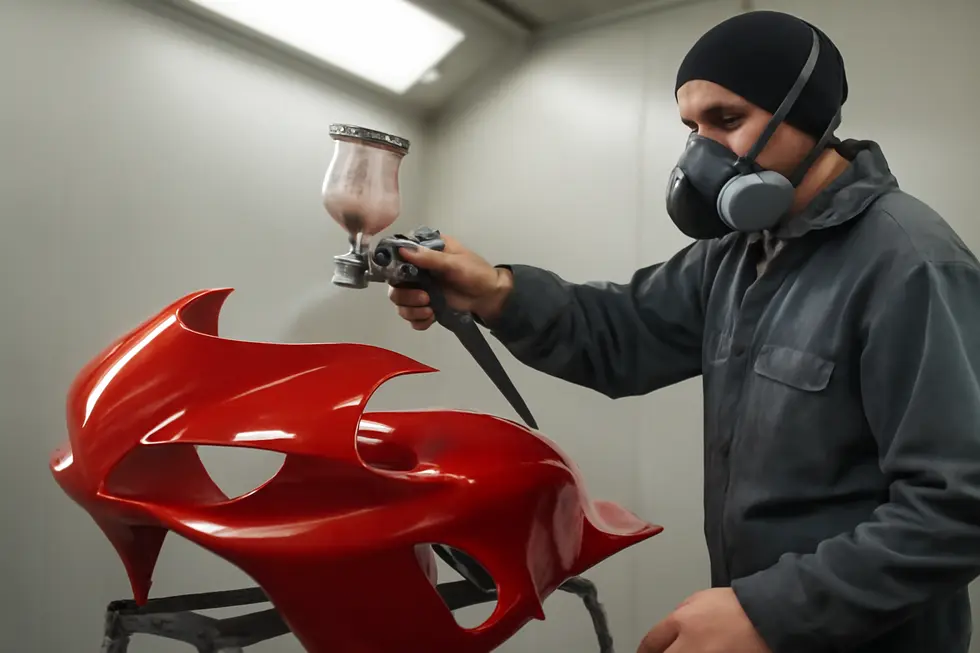
3. Mastering Spray Painting and Clear Coating for Flawless DIY Motorcycle Fairings
Spray Painting and Clear Coating are critical stages in achieving a professional finish on motorcycle fairings. Begin with meticulous surface cleaning using mild detergent followed by a degreasing agent to eliminate all contaminants, since any residue can compromise paint adhesion. Next, lightly sand the surface with 400–600 grit sandpaper to dull the original finish and create an ideal texture for layering paint. Proper masking protects areas not intended for painting, ensuring crisp lines and preventing overspray.
When priming, an adhesion promoter is essential for plastics, while epoxy primers provide corrosion resistance for metal or repaired sections. Applying primer evenly and allowing it to cure fully establishes a durable foundation. For the base coat, use thin, overlapping spray passes holding the applicator 8–12 inches away, allowing each layer to flash off to avoid runs and sags.
After the base coat cures, clear coating enhances gloss and protects the paint from UV damage, scratches, and chemicals. Applying multiple thin clear coats evenly prevents texture issues like orange peel. Ambient conditions such as temperature and humidity significantly influence drying; ideal ranges improve finish quality. Once fully cured, wet sanding with ultra-fine grit paper can refine the surface to a mirror shine. Painting in a dust-free, well-ventilated environment while using quality spray equipment and safety gear maximizes results and personal safety.
For additional insights on choosing the right fairings to customize, explore detailed resources on affordable motorcycle fairings.
More detailed guidance on clear coat advantages and application methods can be found in relevant automotive finishing literature here.
Chapter 3: Mastering Surface Prep: Essential Techniques for Repairing Motorcycle Fairings
1. Effective Cleaning and Precision Sanding for Flawless Motorcycle Fairing Paintwork
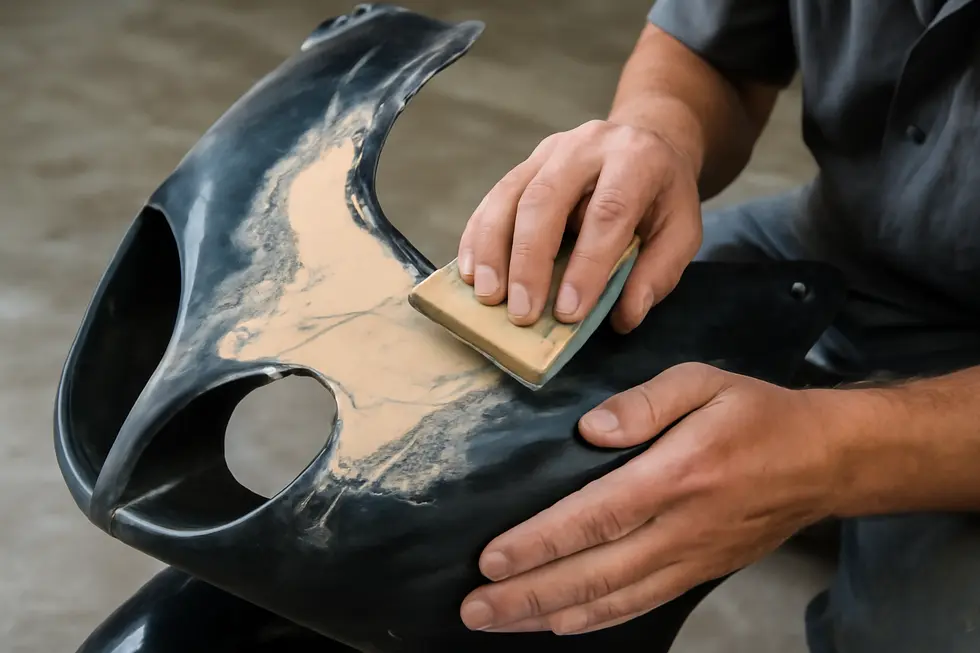
Achieving a durable and professional finish on motorcycle fairings begins with thorough cleaning and precise sanding. Initially, the fairings must be washed carefully using a mild detergent or a dedicated motorcycle cleaner to remove dirt, oil, and road grime. This step is crucial because contaminants interfere with paint adhesion, causing premature peeling or uneven coverage. Once clean, a degreaser is applied to eliminate any residual oils, especially after sanding or repairs, ensuring the surface is perfectly prepared for primer.
Repair stages often involve addressing cracks or chips in fiberglass fairings by layering fiberglass cloth and resin, then sanding to achieve a seamless surface. Sanding requires a progressive approach: coarser grits like 80–120 are used to remove major imperfections or shape repairs, while medium to fine grits (220–400, then 600 and above) smooth the surface for primer application. For minor scratches in existing paint, ultra-fine wet sanding with 1500–2000 grit sandpaper eliminates surface flaws without damaging underlying layers. Gentle pressure and patience here preserve the factory finish and prepare the fairing for paint.
Each sanding progression must result in a clean, smooth, and contaminant-free surface, ensuring optimal primer and paint bonding. This meticulous preparation is foundational to any DIY painting success, creating a canvas that highlights the quality and longevity of your custom design. For detailed guidance on sourcing quality fairings as a base for customization, visit Explore the Best Motorcycle Fairings at Summit Fairings.
External detailed resource: https://www.handymansworld.com/motorcycle-fairing-painting.htm
2. Mastering Fiberglass Repair for Strong, Smooth Motorcycle Fairings
Mastering Fiberglass Repair for Strong, Smooth Motorcycle Fairings
Proper fiberglass repair and structural restoration are crucial for durable and visually appealing motorcycle fairings before painting. The process begins with a careful damage assessment, identifying cracks, holes, or weak spots. After thoroughly cleaning the area to remove dirt, grease, and loose debris, sanding is essential to create a rough surface that ensures repair materials adhere effectively. Any compromised or soft fiberglass must be removed to establish a solid foundation for restoration.
Restoring structural integrity involves applying resin—either polyester or epoxy—and layering fiberglass cloth over the damaged section. Cutting the cloth slightly larger than the damaged area allows for stronger reinforcement. The cloth is saturated thoroughly with resin to bond firmly, and the repaired area is left to cure fully, mirroring professional methods borrowed from marine fiberglass restoration. This assures the fairing regains strength comparable to original factory conditions.
Once cured, the surface is sanded smooth to blend the repair seamlessly with the surrounding fairing. Applying a specialized gelcoat or fiberglass primer primes the surface, creating optimal paint adhesion and extending the longevity of the finish. Throughout this process, safety is paramount: using a particulate mask, gloves, goggles, and protective clothing protects against harmful resin fumes and fiberglass dust.
This comprehensive approach to fiberglass repair not only restores critical structural support but also prepares the fairing beautifully for painting, ensuring a long-lasting, professional-grade result. For a detailed visual walkthrough of this technique, consider the video tutorial “How Do You Repair Fiberglass On A Motorcycle?.”
For further tips on fairing care and customization, explore our guide on discovering affordable motorcycle fairings.
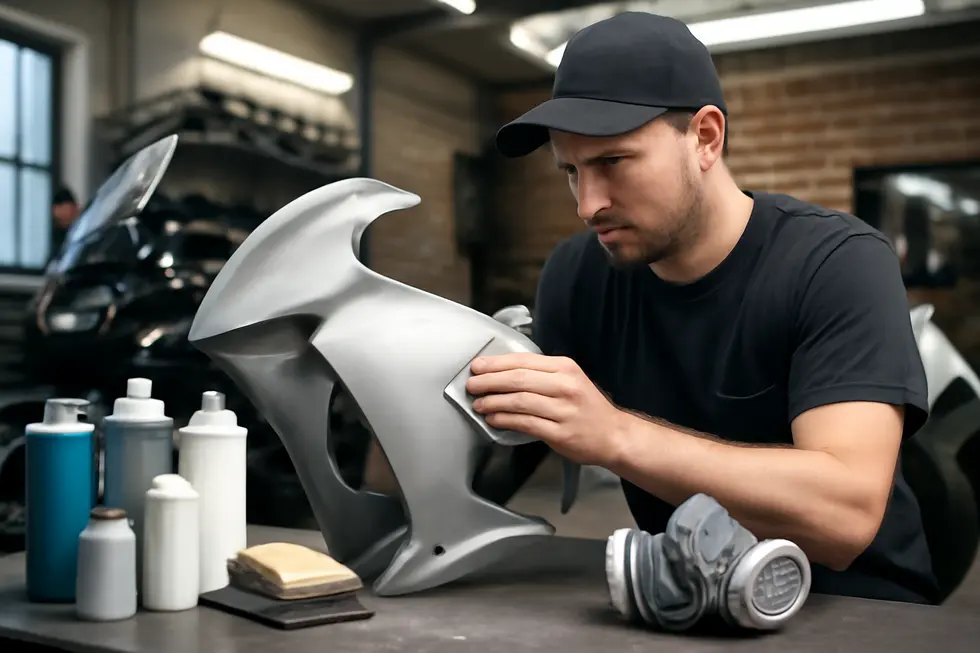
3. Mastering Primer and Paint Application for Durable, Flawless Motorcycle Fairings
Achieving a long-lasting, professional finish on motorcycle fairings begins with meticulous primer and paint application. After carefully sanding to create a smooth, even surface, applying the right primer is crucial. Primers act as a bonding bridge between the fairing material and paint, preventing peeling and enhancing durability. Choosing the appropriate type—such as high-build primers to fill minor imperfections—ensures the surface is both smooth and receptive. It is vital to apply primer in multiple thin coats rather than one thick layer, allowing adequate drying time between each to avoid runs and uneven texture.
Following priming, the painting stage demands careful attention. Using spray paints formulated specifically for motorcycle or automotive surfaces is essential to withstand weather, UV exposure, and mechanical wear. Thin, even coats promote a flawless finish and reduce the risk of drips or pooling. Patience during the drying phase between coats allows each layer to settle properly, contributing to overall adhesion and color depth. When precisely executed, layering paint builds vibrancy and resilience, providing a surface ready to handle the demands of the road.
Integrating these techniques into your surface preparation workflow transforms the painting process from a simple task into an art form. For motorcyclists eager to explore comprehensive guidance on painting and protection methods, additional resources like this detailed auto repair and finishing techniques guide can prove invaluable. Additionally, exploring options for quality fairings can further enhance customization efforts, as discussed in this source on motorcycle fairings.
Chapter 4: Customization and Graphic Application in DIY Painting Motorcycle Fairings
1. Mastering Surface Preparation and Priming for Flawless Motorcycle Fairings Customization
Achieving a professional and long-lasting finish in DIY painting starts with meticulous surface preparation and priming. The process begins by thoroughly cleaning the fairing to eliminate dirt, oils, and residues that could hinder paint adhesion. Following this, sanding is essential—not only to smooth the surface but also to help the primer adhere better. Starting with a coarser grit and progressively moving through finer sandpapers up to 3000 grit creates an ultra-smooth base, free from scratches and imperfections. The material of the fairing—whether plastic, fiberglass, or carbon fiber—also influences the priming method. Etch primers are particularly effective, as they chemically bond with the surface and promote paint durability. For imperfections, a high-build primer can be applied over the etch primer to fill minor dents, ensuring a flawless finish ready for paint or graphic application. Patience during priming is key; allowing the primer to become tacky before recoating ensures proper layering and adherence. Once painting is complete, a high-quality clear coat protects the paint and any added graphics, offering a glossy finish and extended durability. This protective layer must be applied in thin, even coats with adequate drying time to prevent runs. For those looking to add intricate logos or designs, ensuring the underlying surface is perfectly smooth and contaminant-free guarantees the best outcome. For additional guidance on techniques and supplies, exploring expert resources on motorcycle fairings customization can provide invaluable support. Discover affordable motorcycle fairings at Summit Fairings and detailed priming insights from external painting tutorials like this one. (https://www.youtube.com/watch?v=UcVt8BVLoF8)
2. Mastering Graphic Application and Artistic Effects for Personalized Motorcycle Fairings
Mastering graphic application methods unlocks limitless creative potential in DIY painting motorcycle fairings. Central to this process is airbrushing, which offers precise control to produce intricate designs, smooth gradients, and detailed artwork that transform fairings into unique visual statements. Leveraging high-quality paints and skilled airbrush techniques allows riders to combine vintage flair or modern forms with durable finishes that resist chips and fading. Alternatively, vinyl wraps provide a flexible route to customization, featuring special finishes like color-shifting films that respond to lighting and angles, generating dynamic and striking effects without permanent alteration. These wraps shield fairings from environmental damage and can last several years while retaining vibrant detail. Whether painting or wrapping, careful surface preparation including cleaning, sanding, and priming ensures adhesion and a flawless base for colors or graphics. Layered paint jobs with clear coats enhance depth and gloss, while stencils and freehand airbrushing contribute personalized motifs, from classic flames and pinstripes to geometric or abstract art. Wrapping demands meticulous measurement and bubble-free application for a professional appearance. Ultimately, these graphic methods create eye-catching, durable finishes reflecting the rider’s personality and style. For those interested in guided steps and resources on motorcycle fairing customization, detailed DIY fairing painting tutorials can provide valuable instruction. More inspiration and advanced artistic techniques can be explored through external professional custom painting services, which emphasize both quality and creativity in motorcycle art.
External resource: https://www.psychoticair.com/motorcycle/
3. Mastering Finishing Touches: Protective Coatings to Preserve and Enhance Your Custom Motorcycle Fairings
Achieving a durable and striking finish on motorcycle fairings requires thorough attention to finishing and protective coatings. After meticulous preparation and paint application, sealing the surface is vital to maintain color vibrancy and shield against environmental hazards. Start by ensuring the painted surfaces are clean and polished, promoting optimal adhesion for final layers. Selecting high-quality clear coats tailored to your finish—whether matte or glossy—provides not only aesthetic cohesion but also a resilient barrier against chipping and fading. Beyond clear coats, protective films offer nearly invisible, long-lasting defense from scratches and UV damage without diminishing the paint’s shine. Alternatively, cutting-edge ceramic or graphene-based coatings create an exceptionally hard, hydrophobic surface that repels dirt and water, simplifying upkeep and extending clarity for years. These coatings complement each other and can be combined depending on your desired protection level and maintenance routine. Regularly washing fairings with gentle soaps and using soft cloths preserves the finish, while avoiding prolonged sun exposure and covering the bike protects against premature deterioration. Using OEM-match or premium aftermarket paints for graphics ensures colors remain vivid under layers of protection. For enthusiasts seeking detailed guidance on applying protective films and coatings, visual tutorials such as demonstrations on paint protection application offer in-depth insights. Incorporating these finishing strategies empowers DIY painters to elevate both the aesthetics and longevity of their customized motorcycle fairings, blending creativity with practical durability. For a wide range of fairing options that complement custom painting projects, explore Summit Fairings’ collection.
Chapter 5: Finishing and Clear Coating Techniques for DIY Motorcycle Fairings
1. Mastering Surface Preparation to Achieve a Flawless Finish and Durable Clear Coat
Achieving a professional-quality finish on motorcycle fairings begins with meticulous surface preparation essential for flawless paint adhesion and a durable clear coat. The process starts by thoroughly cleaning each fairing to remove dirt, grease, oils, and wax residues that can interfere with paint bonds. Degreasers and specialized surface prep sprays are highly effective in creating a pristine canvas. Following cleaning, light sanding with fine-grit sandpaper smooths the surface and enhances adhesion by providing subtle texture without damaging the plastic base. This step also eliminates small imperfections that would otherwise show through the paint layers.
If the fairings are bare or have visible imperfections, applying a plastic-compatible primer provides a uniform base and improves paint grip. Once primed, applying multiple thin coats of base paint prevents runs and ensures an even color distribution. The final stage involves layering clear coats—thin and even to build a robust, glossy shell that protects paint from petrol spills and environmental elements. Clear coats should be allowed adequate drying time between layers to maximize their durability.
For those seeking ultimate protection and brilliance, applying a ceramic coating after the clear coat cures offers long-lasting gloss and resistance. This requires an extra round of surface prep, including polishing and claying to eradicate contaminants. Proper curing time is crucial before cleaning to let the ceramic layer fully harden. For additional insights on ceramic coating techniques tailored to motorcycles, visit this detailed