


Introduction
Painting motorcycle fairings presents an exciting opportunity for business owners to enhance their product offerings and diversify their services. This guide will navigate through the detailed process of painting fairings, exploring the benefits it brings to both business and customer satisfaction. Each chapter is designed to impart critical knowledge: from a step-by-step process, the advantages of painting, material selection, and common pitfalls to avoid. With these insights, you’ll be better equipped to meet the demands of motorcycle enthusiasts looking for customization and restoration options.
Tables of Contents
Chapter 1: Mastering the Art of Painting Motorcycle Fairings: A Comprehensive Guide
- Essential Steps and Expert Techniques for Achieving Flawless Motorcycle Fairings
- Preparing Your Workspace and Yourself: A Guide to Safety and Materials in Motorcycle Fairing Painting
Chapter 2: Maximizing Durability and Style: The Transformative Power of Motorcycle Fairing Painting
- Guardians of Aesthetics: The Protective Benefits of Painting Motorcycle Fairings
- Visual Appeal Versus Financial Investment: The Dual Nature of Motorcycle Fairing Painting
Chapter 3: Mastering Surface Preparation for Flawless Motorcycle Fairing Painting
- Essential Techniques for Preparing Motorcycle Fairings Before Painting
- Precision in Painting: Choosing the Right Paints and Techniques for Motorcycle Fairings
Chapter 4: Mastering the Art of Painting Motorcycle Fairings: Keys to a Flawless Finish
- Avoiding Pitfalls in Surface Preparation: The Gateway to a Stunning Paint Job
- Mastering Material Selection and Creating the Perfect Environment for Painting Motorcycle Fairings
Chapter 1: Mastering the Art of Painting Motorcycle Fairings: A Comprehensive Guide
1. Essential Steps and Expert Techniques for Achieving Flawless Motorcycle Fairings
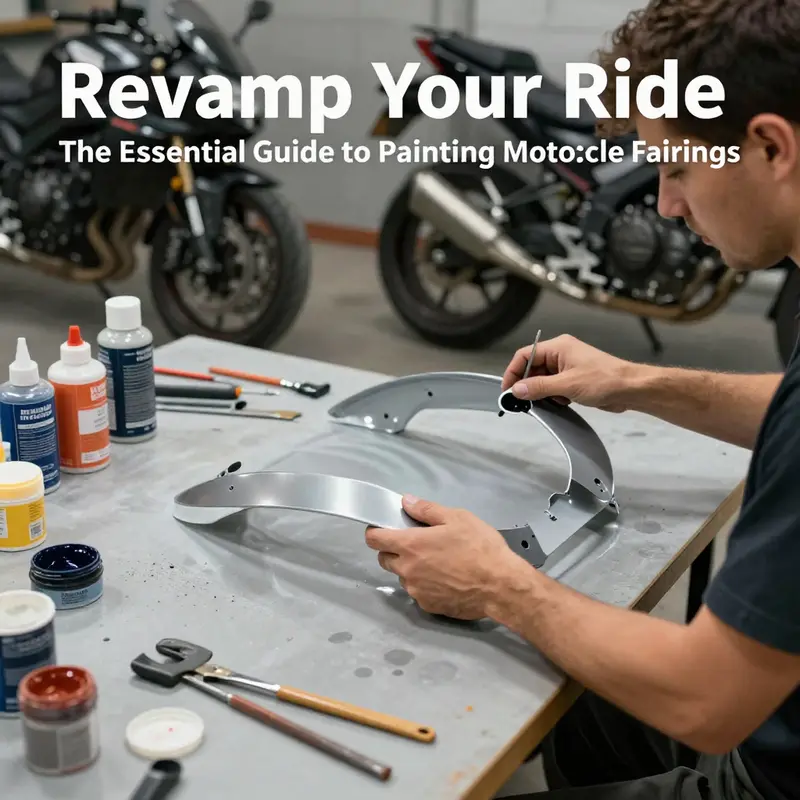
Painting motorcycle fairings is not merely an act of color change; it’s a transformative ritual that can breathe new life into your ride. By following a well-structured approach, you can achieve professional-looking results that stand the test of time. Whether you’re restoring the fairings of an aged classic or customizing a newer model, each step influences the final outcome. Here, we delve into the essential techniques and best practices that ensure your fairings not only look stunning but also remain durable against the elements.
The journey begins with the careful removal of the fairings from the motorcycle. This is not just about accessing surfaces but doing so in a manner that prioritizes the integrity of your bike. Ensure that you label any disconnected components carefully and store screws and small parts in a secured, organized manner. This preparation sets the stage for a focused painting project that minimizes risk to the bike’s frame and electronics.
Once the fairings are free, the next imperative step is cleaning them thoroughly. Utilizing a degreaser or an alcohol-based cleaner is crucial for stripping away oils, wax, and road grime. The aim here is simple yet critical: any residues left on the fairings may compromise the paint’s adherence. A clean surface lays the foundation for a professional finish, allowing the primer and paint to connect seamlessly with the fairings.
Following the cleaning, it’s time to tackle the fairings with sandpaper. Bringing in fine-grit sandpaper, usually in the range of 400–600 grit, creates a slightly textured base that enhances the bond between the primer and the fairing surface. This sanding process serves a dual purpose – it eliminates imperfections and existing layers of old paint while ensuring the new layers can latch onto the surface securely. Take your time here; poor surface preparation can lead to peels and bubbles in the future.
With your fairings prepped and ready, the spotlight now shifts to priming. Choose a high-quality automotive primer specifically designed for plastic or composite materials. Applying this primer in thin, even coats helps to prevent drips and ensures a smooth application. Patience is key; allow each layer to dry completely, typically within 15 to 30 minutes, before proceeding. Over-spraying can lead to unsightly runs or an orange peel texture, which can mar an otherwise flawless finish.
When the primer is fully cured, a process called wet sanding should follow. By utilizing finer grit sandpaper (800–1200 grit) in conjunction with water, you can refine the surface to an ultra-smooth finish. This step is vital; it not only eliminates minor imperfections but also prepares the foundation for ultimate paint application. After this, thoroughly clean the surface with a tack cloth to wipe away all dust and debris, ensuring no contaminants are left to interfere with the painting stage.
Now comes the exciting part: paint application. Spraying multiple thin coats of your chosen color is essential for achieving an even finish rich in depth. Maintaining a consistent distance from the surface and employing even strokes prevents uneven coverage and drips. In between coats, allowing for a flash-dry time of about 10 to 15 minutes will help maintain a perfect layer structure without compromising the painting process.
For those aiming for professional quality, consider incorporating a basecoat and clearcoat system. The basecoat offers vibrancy and depth, while the clearcoat adds an essential layer of protection and gloss. Similar to the previous stages, it’s key to apply the clearcoat in multiple thin layers with adequate drying time, ensuring each layer melds seamlessly into the next.
Lastly, after your masterpiece is painted and the clearcoat is applied, the importance of curing time cannot be overstated. Allowing the paint to cure fully—typically within 24 to 72 hours—maximizes durability against UV rays, weather conditions, and everyday abrasion. While the urge may be strong to reassemble the fairings and get back on the road, patience here will pay off tremendously in the long run.
To excel in this venture, certain best practices can guide your project toward success. Always work in a clean, dust-free environment. Ideally, a dedicated spray booth will create optimal conditions for a flawless finish. Additionally, prioritize proper ventilation and invest in personal protective equipment (PPE)—respirators, gloves, and goggles—to safeguard your health while working with chemicals and paint.
Moreover, avoid painting in direct sunlight or extreme temperatures, as these conditions can adversely affect paint flow and drying consistency. Before diving in, it’s wise to test your paint mixture and spray pattern on scrap material. This ensures you have the right consistency and procedure down, preventing costly errors on your fairings.
In summary, the process of painting motorcycle fairings is a rewarding endeavor that merges artistry with proper technique. By following these essential steps and adhering to the best practices mentioned, you can elevate not only the aesthetic appeal of your motorcycle but also its longevity. For more detailed guidance and resources, check out collections specific to your motorcycle’s model, as they provide insights tailored to your bike’s unique needs.
2. Preparing Your Workspace and Yourself: A Guide to Safety and Materials in Motorcycle Fairing Painting
Painting motorcycle fairings not only rejuvenates your bike but also ensures safety during the process. Engaging in this project demands careful consideration of safety precautions and the appropriate materials. This section will guide you through essential safety protocols and the supplies necessary to achieve a high-quality finish while keeping your health and environment in mind.
Safety Precautions When Painting Motorcycle Fairings
The allure of customizing motorcycle fairings lies in the vibrant colors and unique designs that bring personality to your ride. However, the potential hazards associated with the materials used cannot be overlooked. Solvents, primers, paints, and clear coats release fumes that can be harmful if inhaled. Thus, establishing a safe working environment is crucial. Here are several critical safety measures:
-
Aération: Create a well-ventilated workspace. The ideal scenario involves working in a dedicated spray booth; however, if that isn’t possible, choose an outdoor location or a garage with sufficient airflow. Open windows and use fans to facilitate air circulation, minimizing the risk of inhaling toxic vapors.
-
Équipement de protection individuelle (EPI): Wearing the right protective gear is essential. Start with a respirator equipped with organic vapor cartridges that filter out harmful fumes. It’s your first line of defense against inhaling potentially dangerous chemicals.
- Gloves: Opt for chemical-resistant gloves to protect your skin from direct contact with paint and solvents. Nitrile gloves are an excellent choice as they resist many types of chemicals and provide good dexterity.
- Safety Goggles: Protecting your eyes from splashes and airborne particles is paramount, especially when working with aerosols. Invest in well-fitting safety goggles to provide a tight seal around the eyes.
- Protective Clothing: Wearing a coverall or lab coat reduces skin exposure to chemicals and helps prevent paint contamination on your clothes. Choose clothing that you don’t mind getting stained, as paint overspray is inevitable.
By meticulously adhering to these safety measures, you create an environment that allows for a more enjoyable and less hazardous painting process.
Materials Essential for a Successful Painting Process
Having gathered the necessary safety precautions, the next step is assembling the materials required for painting motorcycle fairings. A thorough understanding of each component will enhance your efficiency, allowing for a smooth workflow.
-
Carénages de motocyclettes: Start with the fairings removed from the bike, ensuring access and precise control while you paint. Before diving into the painting stage, thoroughly cleans the fairings to remove dirt, grease, and any previous paint.
-
Sandpaper: The sanding process is crucial for proper paint adhesion. You’ll require a variety of grits, typically ranging from 400 to 1500. Use coarser grits (400-600) to tackle old paint or surface imperfections. Transition to finer grits (800-1500) to ensure an ultra-smooth base before applying primer. If you have larger fairing sections, consider using an orbital sander to speed up the sanding process, but be careful not to over-sand and compromise the fairing material.
-
Primer: Select a high-quality primer specifically formulated for plastics or composites. This layer is vital as it creates a suitable surface for paint adherence, improving both durability and finish quality.
-
Base Color Paint: Choose your desired base color paint, ideally one that complements your bike’s design. Most enthusiasts use an airbrush or spray gun for application, ensuring even coverage. Ensure the paint is compatible with the primer and clear coat you plan to use.
-
Clear Coat: To protect your hard work and enhance the aesthetic appeal, apply a durable, UV-resistant clear coat. This layer is imperative in shielding the paint from fading due to sun exposure and adds a glossy finish that elevates the overall look of your motorcycle.
-
Paint Thinner or Reducer: Depending on the paint system, you may need a suitable paint thinner or reducer to achieve the right viscosity for spraying.
-
Masking Supplies: Invest in quality masking tape and plastic sheeting. These will help shield areas from overspray and maintain clean lines, which is especially important when spray painting intricate designs or multiple colors.
By assembling this comprehensive toolkit, you’ll position yourself for success as you begin the painting process.
For those just starting their painting journey or those wanting reliable paint supplies, professional-grade options are available through various suppliers. Opting for high-quality materials will yield the best results, ensuring that your efforts and investment manifest in an impressive finish.
If you’re restoring or customizing your ride, consider checking out a range of motorcycle fairings tailored to specific models Dear client, nous
Chapter 2: Maximizing Durability and Style: The Transformative Power of Motorcycle Fairing Painting

1. Guardians of Aesthetics: The Protective Benefits of Painting Motorcycle Fairings
When it comes to the art of customizing motorcycles, painting fairings is not merely an aesthetic choice; it is an essential protective strategy that ensures your bike endures the rigors of both nature and use. The motorcycle fairings, specifically designed to cover and protect various components, can be significantly vulnerable to damage from environmental factors and everyday wear, making the application of protective film a prudent consideration for any motorcycle enthusiast.
At the core of this protective strategy is the paint protection film, often referred to as an “invisible car wrap.” Applying this durable, transparent shield to your motorcycle fairings offers a multitude of advantages that far outweigh the initial investment. One of the most notable benefits lies in its capability to guard against physical damage. As you traverse gravel roads or navigate through city traffic, your motorcycle becomes a target for road debris such as stones, dirt, and small particles, which can chip or scratch the surface. The paint protection film mitigates this risk effectively, absorbing the impacts and ensuring that your motorcycle’s paint remains intact. This layer becomes especially crucial during instances of minor scrapes, whether from contact with riding gear or accidental bumps as you maneuver into tight parking spaces. In the unfortunate scenario of a tip-over, the film acts as a sacrificial barrier, significantly reducing the potential for damaging the paint or compromising the structural integrity of the fairing.
Beyond physical threats, environmental factors also pose a major risk to the integrity of motorcycle paint. Ultraviolet (UV) radiation is one such relentless adversary that can cause profound harm over time. Prolonged sun exposure can lead to fading, oxidizing, and a brittle finish, which detracts from your motorcycle’s pristine appearance. The protective film serves as a barrier that effectively shields the underlying paint from these harmful rays, preserving the vibrancy and longevity of the color. In addition to UV protection, the film guards against other corrosive elements like acid rain, bird droppings, and various pollutants. These environmental aggressors can etch into the paint surface, leading to permanent discoloration or damage if left unchecked. With the film in place, these everyday threats are neutralized, allowing your bike to maintain its striking original aesthetics.
Another remarkable feature of high-quality paint protection films is their self-healing property. This innovative characteristic allows the film to mend minor scratches and swirl marks that can accumulate from routine cleaning or light contact. Exposed to heat—be it sunlight or warm water—these minor imperfections vanish, restoring the fairing’s flawless appearance without the need for expensive polishing or repainting. This self-renewing quality not only keeps your motorcycle looking new but also eliminates the frequent maintenance that can burden other bike owners.
Moreover, applying a protective film can enhance the motorcycle’s overall aesthetics. Unlike traditional paint that can become dull over time, the film increases the gloss and depth, giving your bike the appearance of a freshly polished surface. Enthusiasts often notice that their motorcycle seems brighter and more vibrant, reflecting a richness that lasts longer than conventional finishes. This enhancement is not just about looks; it contributes to your motorcycle’s perceived value, making it more appealing to potential buyers if you ever decide to sell or trade.
In addition to aesthetic enhancement and protection, painting your motorcycle fairings can support the bike’s de la fibre de carbone dépassent largement les matériaux traditionnels, avec une résistance à la traction supérieure à 3 500 MPa. Cette résilience améliore non seulement la longévité globale de la moto, mais réduit également les coûts de maintenance en diminuant la fréquence des réparations nécessaires. De plus, la conception aérodynamique des carénages en fibre de carbone réduit la traînée, améliorant ainsi la stabilité et le contrôle à haute vitesse.. A well-maintained and visually appealing motorcycle often fetches a higher price on the market. Buyers are more inclined to purchase a bike that has been carefully protected against wear, thus ensuring that they are getting a quality product. A pristine paint job, preserved by an effective protective film, could make all the difference between a sale and a missed opportunity.
By investing time and resources into painting your motorcycle fairings—augmented by a paint protection film—you establish a robust line of defense against the typical adversities faced by a motorcycle. The process yields benefits that enrich not only the longevity of the paint job but also reinforce the durability of the fairings themselves. Thus, whether you’re considering a design refresh for a cherished ride or planning a complete overhaul of a damaged fairing, the decision to paint your motorcycle fairings is underscored by practical protective values alongside the undeniable flair it adds to your bike’s personality.
To achieve this high level of protection, consider professional assistance or thoroughly researched DIY methods when applying paint and protective film. Key elements to prepare include ensuring a clean and dust-free surface for painting, employing quality materials, and adhering to proper drying times. As you embark on the journey of transformation, don’t overlook the extensive range of fairing choices available for specific models—from classic bikes to the latest sport offerings, such as those for the Honda CBR series or Yamaha YZF models. Investing in quality fairing options allows you to tailor your bike to your aesthetic preferences while also preparing it for the rigors of the road ahead.
With both protective and aesthetic benefits significantly enhancing the motorcycle experience, it becomes clear that painting fairings is a multifaceted approach to motorcycle customization. With proper care and attention, the results contribute not only to the visual appeal and joy of the ride but also to the enduring integrity of your investment.
2. Visual Appeal Versus Financial Investment: The Dual Nature of Motorcycle Fairing Painting
Painting motorcycle fairings offers riders a unique opportunity to blend aesthetics with economic considerations. This duality is particularly compelling as it reflects not only a transformative process but also a strategic investment for motorcycle enthusiasts. A well-executed custom paint job can elevate the visual appeal of a motorcycle from a mere means of transportation to a stunning expression of individuality.
Aesthetic Transformation
From an aesthetic perspective, painting motorcycle fairings serves as a vital extension of a rider’s personality. The choice of colors, designs, and finishes can dramatically redefine how a motorcycle is perceived. While a standard factory finish may convey functionality, a vibrant custom paint job injects life and artistry into the bike. This personalization turns each motorcycle into a unique piece of rolling art that speaks to the rider’s tastes and influences.
Custom paint work often incorporates intricate graphics, custom logos, or even full illustrations that resonate with various elements of bike culture. It can showcase themes ranging from retro designs to modern motifs, allowing riders to connect with their personal narrative expressed through their motorcycle. Such customization doesn’t just enhance the visual appeal; it fosters a deeper emotional connection between the rider and their machine, as the bike evolves into a representation of one’s life story.
Moreover, a unique paint job can enhance a motorcycle’s perceived value. Riders considering selling their motorcycle in the future may find that an attractive, professionally-done paint job can command a higher resale price. The allure of a standout design in a saturated market can capture buyer attention, translating into greater sales potential. This aesthetic appeal can also cultivate brand loyalty within motorcycle communities, where owners often celebrate and appreciate custom work as a sign of craftsmanship and individuality.
Economic Considerations
On the flip side, the economic implications of painting motorcycle fairings must be scrutinized with equal diligence. The initial investment in painting involves costs related to materials, labor, and expertise. High-quality paints, primers, and clear coats are essential for achieving a durable and visually pleasing finish. This requirement for specialized materials means that owners must allocate a significant budget for proper painting efforts, whether they decide to undertake the project themselves or hire professionals.
For manufacturers, introducing custom paint solutions into production lines can also elevate costs. This involves investing in skilled workforce training, specialized equipment, and the potential interruptions in production efficiency. Custom paint options might boost sales by attracting specific segments of the market, but the upfront investment may result in long-term financial commitments that need to be carefully considered.
For individual owners looking to modify their factory finishes through aftermarket painting, the decision can complicate their economic landscape. Many riders may not be aware that some aftermarket modifications can void warranties or may lead to unforeseen repair costs if the results are subpar. Mistakes such as peeling, chipping, or fading can quickly turn what was intended as a budget-friendly project into a costly endeavor, requiring additional funds for correction or even a complete redo of the paint job.
Repairing damaged fairings becomes particularly intricate when both aesthetic and economic concerns are factored into the picture. Motorcycle fairings, especially those associated with full-body designs, can be cumbersome and expensive to replace if damaged. The cost of care can escalate quickly, particularly if precise color matching is required or if structural issues arise from an improperly executed paint job. Such repairs are not only financially burdensome but can also be emotionally taxing for owners who take pride in the visual integrity of their motorcycles.
Balancing Choices
As riders ponder painting motorcycle fairings, finding an equilibrium between aesthetic enhancements and economic realities is paramount. The decision extends beyond mere color selection; it encompasses considerations of long-term satisfaction and ownership experience. Riders must assess their artistic vision against the feasibility of achieving that vision without straining their finances.
For those seeking a balance, thorough research can be a game-changer. Understanding the durability and longevity of different materials and finishes can inform decisions about maintenance and restoration costs. Engaging with the broader motorcycle community, seeking insights from experienced painters, and even exploring established resources can deepen an owner’s understanding of both the artistic and financial facets of motorcycle fairing paint jobs. Top-notch guidance is available at specialized websites where seasoned professionals share tips and tricks of the trade.
As the global motorcycle culture thrives, the appeal of customized fairings remains profoundly influential. Yet, this appeal is intricately tied to an awareness of the total cost involved—both aesthetically and financially. Owning a motorcycle is not just about riding; it’s about building a narrative through personalization that resonates with one’s identity. Understanding the dynamic interplay between appearance enhancement and economic investment allows riders to make informed choices that enhance their experience with every mile traveled.
For further insights on the implications of protective and aesthetic treatments, including the critical factors involved in motorcycle fairing design, [Manufacturer Motorcycle Fairings: Composition, Classification, and Industrial Applications] can serve as an invaluable resource.
Chapter 3: Mastering Surface Preparation for Flawless Motorcycle Fairing Painting

1. Essential Techniques for Preparing Motorcycle Fairings Before Painting
In the vivid world of motorcycle customization, preparing the surface of fairings before applying paint is a decisive step that can enhance the final look of the bike and ensure the longevity of the chosen finish. Successful paint application is not simply about selecting vibrant colors or artistic designs; it begins long before the first brush or spray. It involves a series of precise techniques that guarantee the paint adheres properly and withstands the rigors of daily riding.
Thorough Cleaning: The Foundation of Preparation
The journey of transforming your motorcycle fairings starts with a comprehensive cleaning. Your fairings, having been subject to weather elements, road grime, and oil residues, require a meticulous wash to eliminate any contaminants that could undermine paint adhesion. Choosing an effective cleaning detergent, preferably a degreasing agent, is critical. This needs to be applied with a non-abrasive cloth to gently scrub surfaces without scratching the plastic or composite materials typically used in motorcycle fairings. After cleaning, ensure that the surfaces are rinsed thoroughly and left to dry completely. Any lingering moisture or detergent can lead to peeling and bubbling under the paint, so patience at this stage is essential.
Initial Sanding: Creating the Perfect Texture
Once the fairings are clean and dry, the next step is initial sanding, a crucial process to enhance the texture of the fairing. The aim here is to create a rough surface that allows paint to grip effectively. Start this phase with a coarser grit sandpaper, preferably around 320 to 600 grit, focusing on removing old paint and addressing surface imperfections. Sanding should be done thoughtfully; use circular motions and moderate pressure to prevent damage to the fairings. The idea is not to strip the plastic but to prepare it for a better bond with the paint that will follow.
Refining the Surface: Achieving Perfection
After the initial sanding, transitioning to finer grit sandpaper is essential. This step is often overlooked, but it is indispensable for achieving a smooth and polished surface. For this, wet sanding using 2000-grit sandpaper is recommended. The process of wet sanding helps to eliminate fine scratches left by coarser papers and provides a sleek, high-gloss finish that is visually appealing and conducive for painting. It’s important to use clean water and to frequently change the sandpaper to maintain efficacy. After completing this step, rinse the fairings again to wash away any leftover particles; this thoroughness ensures that no debris interferes with the paint application.
Choosing the Right Materials: Quality Matters
As you approach the actual painting phase, the selection of materials becomes paramount. High-quality primers and paints specifically designed for use on plastics or composite surfaces will yield far superior results than generic options. Most motorcycle fairings are made from materials that require special treatment, and compatibility with the primer and paint ensures proper curing and adhesion. The right materials will also contribute to flexibility, allowing the fairings to handle vibrations and impacts without cracking or peeling, thus enhancing the overall longevity of your paint job.
Creating the Controlled Environment: Conditions for Optimal Application
Equally crucial is the environment in which you will paint. Utilizing a dedicated spray booth with controlled airflow and humidity levels can drastically improve the consistency and quality of your paint application. A clean workspace prevents dust and debris from contaminating the freshly applied paint. Maintaining a stable environment helps control drying times, which is essential in achieving an even coat and avoiding unsightly bubbles or streaks.
2. Precision in Painting: Choosing the Right Paints and Techniques for Motorcycle Fairings
When embarking on the journey of painting motorcycle fairings, selecting the correct paint and mastering application techniques is integral to achieving a visually striking and resilient finish. Each motorcycle fairing is crafted from specific materials, and understanding these materials informs the choice of paint type and method, ensuring a successful restoration or custom look. Three primary materials are commonly found in motorcycle fairings: 3K dry carbon fiber, ABS thermoplastic, and fiberglass. Each boasts distinct characteristics that influence both the painting process and the durability of the finish.
Material Considerations 3K dry carbon fiber surfaces are popular for their lightweight and strength but require careful handling during painting. Due to their composite nature, they demand a primer specifically designed for adhesion to plastic surfaces. This helps prevent issues like delamination that can occur under high thermal stress. Similarly, ABS thermoplastic—a material favored for its flexibility—needs the right preparation and possibly an adhesion promoter to ensure the paint adheres properly. In contrast, fiberglass tends to share some characteristics with car