


Motorcycle fairing painting stands as a critical skill set within the realm of motorcycle customization, where professionals meticulously balance precision, durability, and aesthetic value. Business owners in this sector understand that a remarkable paint job not only elevates the motorcycle’s appearance but serves a crucial protective function for the fairing materials against environmental factors. Essential to models like the Suzuki GSX-R1000 with its distinct half fairings, the painting process requires accurate color matching and seamless coverage to ensure visual continuity and quality. Each chapter of this article delves deeper into necessary techniques, materials considerations, and aesthetic enhancements in motorcycle fairing painting, laying a comprehensive foundation for understanding how these elements contribute to a successful business in this specialized niche.
Precision in the Speedcraft: Mastering Techniques for Motorcycle Fairing Painting
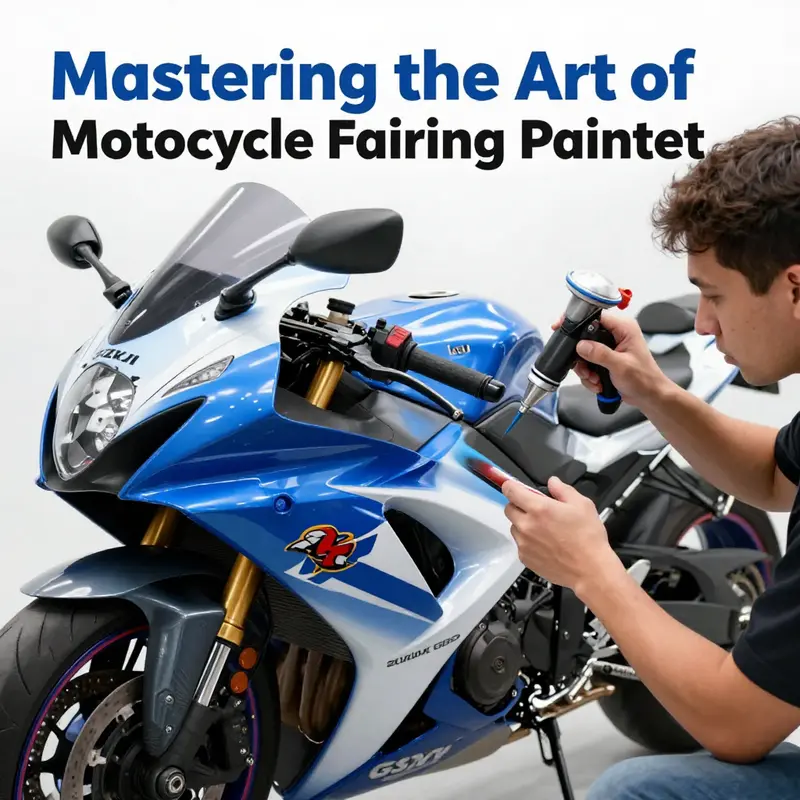 The act of painting a motorcycle fairing is more than color on a curved plastic shell. It is a careful negotiation between art and engineering, a conversation between the bodywork that defines a bike’s silhouette and the coatings that protect it from wind, sun, and road debris. In the high-stakes world of sportbikes and race-inspired builds, the fairing is a moving canvas—often a showcase of a rider’s personality, a statement of performance, and a shield against the elements. The Suzuki GSX-R1000, for example, with its half fairings that wrap around the front and upper middle of the machine, sits at the nexus of visibility and function. It demands color consistency across complex curves, precise coverage of joints and edges, and a finish that can resist heat from the engine, rapid temperature shifts, and the occasional tiny impact from what would otherwise be an unremarkable ride through a pothole-laced road. To achieve this, professional painters rely on a disciplined process rooted in preparation, material choice, controlled application, and patient curing. The result is a finish that looks flawless from arm’s length and holds up under exposure to sunlight and weather for years to come.
The journey begins not with the color itself but with the surface on which it will sit. Surface preparation is the bedrock of any durable, aesthetically pleasing paint job. A fairing’s material—whether thermoplastic, fibreglass, or composite—will carry its own set of adhesion challenges. The painter’s first concern is cleanliness. Every speck of dust, every fingerprint, and every trace of silicone or wax must be removed. Contaminants may seem minor, but they can cause adhesion failures that manifest as microblisters or peel-back in the sun. In practice, this means washing with solvents and detergents suitable for automotive plastics, followed by a thorough wipe-down with clean, lint-free towels. A meticulous hand inspection then reveals any residual imperfections—scratch marks, small gouges, or unevenness that could telegraph through the paint. Those imperfections are addressed with careful sanding and, if necessary, spot filling. Wet sanding is not merely a cosmetic step; it introduces a micro-roughness that improves adhesion and provides a uniform texture for the primer to bite into. The surface should feel uniformly smooth under a gloved hand, yet remain slightly abrasive to the touch, a tactile reminder that perfection here prevents trouble later.
Once the base texture is established, the primer comes into play. A high-quality primer does more than create a neutral base; it also contributes to adhesion, sealing capabilities, and the overall texture that the color will sit on. Primers designed for automotive plastics are formulated to remain flexible while resisting cracking under stress. The painter will apply several thin coats, allowing each to set to a firm tack before the next is introduced. The goal is a uniform, pinhole-free surface that appears flat and glassy in daylight. Any orange peel effect—the uneven, dimpled texture that can plague a finish when the spray technique is inconsistent—must be avoided at this stage because it compounds the risk of problems in the color coat. After the primer has cured, a light block and wipe remove any dust from the surface. The fairing should appear as if it has been cast from one solid, flawless plane, even before color is added.
Masking and edge control represent the quiet craftsman’s art of painting. The half fairings meant for models like the GSX-R1000 demand sharp, clean lines around panels, along edges, and where two finishes meet. Masking isn’t a mere barrier; it is a guide that ensures that color boundaries remain predictable and repeatable. The painter will use a combination of high-quality masking tapes, sometimes with edge-release films to prevent adhesive transfer, and precision-cut stencils for complex graphics or shapes. The process is not simply about keeping colors apart; it is about protecting what must not pick up color, such as logos, fasteners, or the inner surfaces that emerge from the curves. A well-executed masking job reduces the need for heavy correcting later and preserves the integrity of the design. It’s one of those things that can be learned only by repetition and careful observation—watching how paint behaves on curved surfaces and how masking forces the color to stay where it belongs, even as the panel flexes slightly under temperature changes.
With the surface prepared and edges secured, the actual color begins to take form. The application method—airbrush for fine details or a spray gun for base coats—depends on the desired effect. A controlled spray gun, set to a measured pressure and sprayed with a steady, sweeping motion, yields even distribution and minimizes sags. An airbrush can deliver subtle shading or precise accents that require feathered transitions. The painter’s hand becomes the instrument that translates the design from concept to reality. The principle of layering—thin, even coats as opposed to one heavy layer—wins out time and again. Multiple coats build depth and uniform color, reduce the risk of runs, and give the finish the opportunity to mature in the can’s atmosphere of humidity and temperature. Each coat should dry to the touch before the next is applied, with an interim period for light sanding between layers. Wet sanding between coats is common practice, using progressively finer grits to eradicate any texture and to promote adhesion for subsequent layers. The meticulousness of this step determines how well the final clear coat will flow, gloss, and resist micro-scratches in the environment.
Color matching is both science and art. When a rider asks for a color that harmonizes with the rest of the bike or wants a custom scheme, the painter must consider how light interacts with the fairing’s contours. Metallics and candy colors introduce a complexity that flat colors do not. Flake direction, pigment distribution, and the way light catches a line at different angles all influence the final impression. The GSX-R1000’s curves are a testament to the challenge: the front fairing’s arc followed by the shoulder of the mid panel creates a landscape of reflections that must align from every seat position. The painter frequently uses test panels or sample chips to compare under the same lighting conditions that the bike will likely inhabit. This practice reduces the risk of a mismatch in a garage or show environment. In some designs, a second color or a stripe is integrated into the base coats. This requires careful planning in the masking phase to ensure that the line remains crisp and that the two colors meet with a seamless transition. A skilled painter understands that the final appearance depends on the sum of many tiny decisions, such as the amount of overspray allowed near a masked edge, the way a color layers over a primer with different absorbency, and the timing of thermal expansion between the paint layers and the underlying plastic.
After the color has cured and the base is complete, the clear coat enters the stage. The clear coat serves several critical purposes beyond mere gloss. It locks in color, adds depth, and provides a resilient protective layer against UV exposure, rain, road debris, and the minor abrasion that accompanies riding. A durable clear coat must be applied in a controlled sequence of light, even coats, allowing each pass to set before the next arrives. The layer count depends on the desired depth of gloss and the bike’s exposure environment. In professional shops, a high solids clear is common for its durability and resistance to hazing; the spray technique emphasizes uniform flow across the curved panels, so as to avoid orange peel and to achieve mirror-like reflection. The process does not end with the last application. A controlled cure allows the finish to harden without developing micro-cracks. The final step—careful polishing—removes any micro-imperfections and enhances the clarity of the gloss. The motor’s heat and the sun’s rays will test the respect this finish shows to the surface. A well-polished clear coat resists oxidation and color fade, providing a surface that is easy to clean and maintain and that keeps its hue looking sharp through miles of sun and grit.
Durability is not merely about top-coat chemistry; it is about anticipating the environment in which the bike will live. The fairing is a high-contact, high-visibility component. It embarks on daily commutes, weekend track sessions, and occasional rain-soaked rides. The combination of UV exposure, weather cycles, and micro-abrasion from wind and gravel means that every practical painter will choose materials known for resilience. Automotive-grade primers and coatings are engineered to resist cracking and peeling as temperature cycles swing between heat and cold. The finished surface should feel firm to the touch, with no softness that might indicate a future delamination around edges or seams. The protective properties of the clear coat help keep the color stable despite exposure to sunlight and air pollutants. Without this layer, pigments would degrade more quickly and the bike would lose its original richness of color and depth. The finished job should feel as durable as the bike’s own frame and as capable of standing up to the long life of daily riding and occasional show-day scrutiny.
Some projects push the limits of what fairings can be asked to do. Graphics, two-tone schemes, and graphic overlays add an artistic layer that is as much about technique as about design. In such cases, the painter must maintain color integrity while executing complex lines and precise separations. This requires a refined masking discipline, careful planning of line weights, and an approach to layering that preserves the crispness of the edge without bleed. When complex graphics are part of the plan, designers often finalize the scheme digitally before any paint touches the panels. The physical execution then becomes a translation of the design into a tactile, glossy surface. The result is a bike that communicates its identity with clarity, a moving advertisement for the owner’s taste and the builder’s craft. It is a demonstration of how a professional’s precision, patience, and discipline translate into a durable, road-ready work of art.
The craft is not a solitary endeavor. It thrives on collaboration with clients who provide direction, refer to portfolios, and supply detailed requirements. A reputable shop will present a portfolio that demonstrates capabilities across a spectrum of models and finishes. Clients often seek inspiration from these galleries, looking for a balance of aesthetic impact and practical maintenance. In this ecosystem of custom finishes, it is also common to discuss practicalities such as how a finish will age, how it will respond to UV exposure, and how easy it will be to repair a scratch or chip in the future. A rider may want a look that emphasizes speed and aggression, or one that respects the bike’s heritage while offering a modern edge. Either way, the result depends on a shared understanding of the bike’s line, the intended riding context, and the owner’s preferences. The process becomes a dialogue—between the rider, the designer, and the painter—where technical feasibility aligns with artistic intention to produce a final piece that functions as well as it looks.
For those considering a personal project, a return to fundamentals is often wise. The steps outlined above—meticulous cleaning, careful sanding, proper priming, precise masking, layered color application, and a well-executed clear coat—form a reliable blueprint for a durable result. Even in DIY scenarios, the discipline of each stage matters. In particular, the habit of applying multiple very thin coats and letting each coat cure appropriately reduces the likelihood of runs, sags, or color mismatches. The temptation to rush the process can be strong, especially when the excitement of creating a new look is high. Yet the most faithful representations of a model’s lines come from a patient, methodical process that respects both the material’s natural behavior and the predictable outcomes of well-applied automotive-grade finishes. The half fairing’s curves, the dividing lines where front and mid panels meet, and the headlight cutouts demand this level of scrutiny. A slip here becomes obvious and can require substantial rework.
The professional approach also recognizes that a fairing’s finish is as much about care after painting as it is about the painting itself. Routine cleaning and gentle polishing help preserve the gloss, while avoiding harsh solvents that can compromise the clear coat. The rider should be mindful of protective films or waxes compatible with cured clear coats, recommendations that extend the life of the artwork on the bike. The finish’s longevity hinges on how well it is maintained. In turn, this maintenance reinforces the value of choosing quality materials and a methodical process from the outset. The investment in proper tools, precise conditions, and experienced hands pays dividends in the finish’s durability and the thoroughness of the color’s depth and richness.
In shaping a project narrative, it is useful to reflect on particular case studies that illustrate the convergence of technique and outcome. Consider the scenario of a modern streetfighter or a track-focused build that uses a partial front fairing kit. A kit like this tightens the visual language of the bike, drawing the eye to aerodynamic contours while letting the rider’s color story stand out against the machine’s silhouette. The painter’s job is to articulate that story with a finish that does not distort under heat or rain, and to ensure that the kit integrates seamlessly with the rest of the bodywork. It is a reminder that precision is not merely about achieving a certain appearance; it is about ensuring the fairing’s performance and protection remain intact. The skilled painter respects the fairing’s geometry and uses it to guide a color narrative that feels inevitable and balanced when the bike is standing still or moving at speed.
Beyond technique, there is a broader context to the craft of motorcycle fairing painting. The field thrives on the exchange of ideas across communities of builders, painters, and enthusiasts who share techniques, critiques, and inspiration. Knowledge is not static; it migrates through forums, demonstrations, and hands-on mentoring. For those who want to deepen their understanding, watching tutorials and engaging with portfolios can reveal industry norms and evolving best practices. The official channels of reputable industry publications often offer insights into standards, materials, and long-term durability. Such resources provide a framework for evaluating a shop’s capability, from the quality of its primers and paints to the precision of its masking and the control of its spray technique. The result is a more informed decision for owners seeking a professional result that meets both aesthetic and practical expectations.
Within this landscape of technique and taste, one thread remains constant: precision is the essential ingredient. It is the difference between a fairing that looks good in a photo and one that ages gracefully on the road. It is the difference between a line that appears crisp under showroom lights and one that survives the wear and tear of daily use. It is the difference between color and depth—the kind of depth that makes reflections shimmer and the color seem to glow from within rather than sit on the surface. The rider deserves a finish that mirrors the care given to the bike’s mechanicals, and the painter owes the rider a process that respects the value of this collaboration. In the end, the objective is not merely to cover a plastic shell with paint but to honor the bike’s lines, enhance its presence on the road, and provide a durable finish that can be enjoyed for many seasons of riding.
For readers seeking an accessible entry point into the world of fairing finishes and a sense of what a professional studio can offer, consider exploring a curated selection of fairings that highlight the interplay of form and color in a rider’s project. The Suzuki fairings collection provides a useful snapshot of how designers and painters approach the challenge of color across the bike’s geometry, especially on models with prominent front sections and mid panels that require careful alignment of lines and hues. This reference can serve as a starting point for imagining how a color scheme might ride with a bike’s existing lines and hardware. The Suzuki fairings collection can be explored at https://www.summitfairings.com/collections/suzuki-fairings.
In this craft, the painter’s toolkit grows beyond brushes and spray guns. It encompasses a disciplined workflow, a commitment to quality materials, and a respect for the bike’s architecture. The result is a finish that stands up to the scrutiny of riders and editors alike: gloss that lasts, color that remains true, and lines that stay sharp through countless miles. It is a craft that blends technical discipline with artistic intuition, where every panel is treated as part of a larger composition and every coat is a careful stroke in the broader portrait of the bike. That fusion of art and engineering is what makes motorcycle fairing painting a field of continuous learning, where precision techniques are not merely a set of steps but a philosophy of care—care for the bike, care for the rider, and care for the color that makes the machine feel alive on the road.
External resource: https://www.motorcycle-mag.com/
Durable Hues, Structural Shield: The Material Science Behind Long-Lasting Motorcycle Fairing Finishes
 Durability in motorcycle fairing painting rests on a careful partnership between the chosen materials and the painting process. It is a partnership built as much on chemistry as on technique, where every decision about substrate, primers, paints, and topcoats reverberates through the bike’s appearance and its endurance in the field. The fairings themselves are the first line of defense against environmental assault—from relentless UV rays and airborne contaminants to temperature swings, rain, dust, and the occasional, if unfortunate, scrape. To endure all that, modern fairings rely on thermoplastic materials with high impact resistance, primarily ABS or polycarbonate. These polymers provide a robust foundation for adhesion and for resisting environmental stress. Their chemistry is forgiving enough to allow color to stick, yet tough enough to resist microcracking under flex and vibration. On the bench or in the spray booth, this balance becomes the difference between a finish that lasts and one that fades or peels within a riding season. The painter, in turn, must read the substrate’s temperament and respond with a compatible system that respects its behavior under real-world conditions.
If the substrate is ABS, the lesson is to begin with surface preparation that respects plastic porosity and surface energy. Primers formulated specifically for plastic substrates act as adhesion promoters, bridging the gap between the polymer’s surface and the subsequent paint layers. This step is not cosmetic; it is a critical confidence builder for the entire scheme. Without a proper primer, even the finest urethane topcoats can fail by peeling, cracking, or delaminating in response to heat cycling and UV exposure. The primer’s job is threefold: to provide a uniform, receptive surface, to even out minor imperfections, and to create a chemical handshake that allows the paint to bond as it cures. The result is a smoother base film that resists lifting and remains flexible enough to accommodate slight panel flex without cracking.
From there, the paint system itself takes center stage. In the realm of durability, automotive-grade urethane paints are a preferred workhorse due to their resistance to fading, chipping, and chemical exposure. These urethanes form a sturdy film that can stand up to road grime, fuel splashes, rain, and the heat generated by long days in the sun. The clear coat that follows adds depth and a protective barrier against abrasion and weathering. In practice, the finished layer structure—primer, base color, and clear—must be applied as a sequence of very thin, controlled films. Each pass adds a precise amount of material, building a continuous, uniform layer while minimizing the risk of runs or sags. The benefit of such a layered approach is not only aesthetic: it yields a resilient surface that resists chemical attack, stays color-true under UV exposure, and preserves gloss over time.
A crucial, often overlooked, part of durability is surface preparation. The adage that preparation is half the finish is especially true here. Thorough cleaning to remove oils, waxes, and fingerprints must be followed by mechanical abrasion to reveal a fresh surface energy. Sanding or scuffing creates micro-etching that improves the mechanical grip between each layer. Degreasing then removes the residue that could otherwise interfere with adhesion. Inconsistent prep work—such as uneven scuffing, incomplete degreasing, or residual surface oils—creates weak points where moisture can intrude and solvents can migrate, eventually leading to micro-peels or cracks after exposure to heat and sunlight. The degree of preparation also interacts with the type of plastic; some polycarbonates may require different sanding grits or degreasing protocols than ABS, and the painter must tailor the regimen accordingly. The goal is a base that is clean, uniform, and resilient, a foundation that allows color and clear to perform as a unified system rather than as separate layers marching to different agendas.
In practice, achieving durability means thinking through the entire lifecycle of the finish. It means choosing a primer that will adhere to the substrate for years, selecting a base color not only for its hue but for its stability under light, and topping it with a clear that will resist UV degradation and maintain gloss. The color itself is not a static artifact; it is a protective layer that, if properly formulated, contributes to the long-term environment resistance of the panel. A color that bleaches or dulls prematurely signals a breakdown in the system somewhere along the chain—from substrate preparation to primer selection, to the actual paint chemistry, to the protective clear.
For the practitioner, the theory translates into practice through the deliberate use of materials that have demonstrated compatibility with plastic substrates. The primer choice matters as much as the pigment in the topcoat. A primer designed for ABS, for example, will offer better adhesion, improved fill, and a more even surface for color laydown. The urethane topcoat must not only deliver color integrity but also preserve that integrity under UV exposure, which can be brutal in riding conditions. The clear coat, often formulated to be aliphatic, adds UV resistance and a hard, abrasion-ready surface that can withstand the inevitable contact with luggage, stands, boots, and road debris. In combination, these layers create a film that not only shines but endures, maintaining color depth, resisting environmental attack, and preserving the mechanical integrity of the fairing’s surface.
The design of the finish also takes into account the geometry of the fairing. Half fairings, common in high-performance configurations, present curved, contoured surfaces that challenge even seasoned painters. The curvature affects film thickness and evaporation dynamics during spray application. A very thin layer on a tight curve risks orange-peel or dryness, while a thicker layer on a broad panel can sag or create flash lines that catch the eye in certain lighting. Skilled painters manage these issues through controlled passes, appropriate air pressure, and careful thinning of the paint. They understand that curved surfaces often require more passes with light coats to build thickness evenly, while flat sections may tolerate slightly heavier coats. The result is a visually seamless transition across the contoured geometry, with no perceivable line between layers and no soft edges where moisture or dirt could collect over time.
Color matching, while often perceived as purely aesthetic, is in fact a durability-oriented discipline as well. A correct shade in isolation may look perfect indoors, but it must survive the sun’s rays and the bike’s day-to-day exposures. This is where stable pigments and robust binder systems matter. Modern pigment packages are engineered to resist fading and color shift, while the binder system governs how well the film resists adhesion loss, chalking, or chemical attack. Matching also extends to the base and clear layers. When color and clear are chosen with an eye to long-term performance, the painter is not merely creating a pretty finish; they are engineering a protective, enduring surface that retains its vibrancy and clarity through miles and years of use.
Durability is not an abstract ideal but a practical benchmark. It requires attention to the entire supply chain of materials and the precise execution of technique. Cleanliness, temperature control, humidity management, and ventilation in the painting area all influence how well primer adheres, how uniformly pigment lays down, and how the clear cures. Subtle shifts in ambient conditions can alter film formation, revealing themselves later under sun or in vehicle lighting. Therefore, a durable finish is rarely the result of a single miracle product. It is the outcome of disciplined process control: the right surface preparation, the correct primer for the substrate, a properly calibrated urethane paint system, and a clear coat tuned for UV stability and abrasion resistance.
To support these practices, painters often rely on resources and portfolios that demonstrate consistent results across different models and fairing configurations. These portfolios provide real-world evidence of how a given substrate, primer, paint, and clear interact in practice. They also offer the opportunity to study how a finish holds up after time, weather, and riding wear, enabling painters to refine their approach and tailor it to new curves and configurations without compromising durability. In the broader ecosystem of the craft, an informed painter consults technical references and industry-standard guidance to ensure that every layer of the system contributes to a finish that remains vibrant and intact after countless accelerations and weather cycles.
The client-facing aspect of durability also matters. When clients seek custom finishes, they often value longevity as much as color and gloss. The best studios articulate the rationale for their material choices, discussing why a particular primer enhances adhesion on a given substrate, or why a specific clear formulation offers superior UV resistance. This transparency helps clients understand that durability is not an afterthought but an integral part of the artistic and mechanical equation. It is this blend of science, craft, and communication that distinguishes long-lasting finishes from ephemeral color changes that fail to endure the road’s testing conditions.
For readers seeking a tangible sense of how durability translates into finished projects, many shops maintain detailed portfolios and sample runs that showcase the range of finishes achievable on different fairing geometries. These examples illustrate how subtle decisions—such as the thickness of a clear, the degree of gloss, or the specific type of primer—collectively influence performance over time. They also reveal the nuanced skill required to reproduce consistent results across curved and complex surfaces. The painter who masters these subtleties can deliver a finish that not only looks striking on day one but remains resilient across seasons, weather conditions, and miles on the road. The end result is a bike that presents a compelling blend of aesthetic appeal and practical durability, a testament to the craft that underpins modern motorcycle fairing painting.
In thinking about the broader ecosystem, it is helpful to consider the materials and finishing techniques that support durable outcomes in creative but demanding environments. The reference resources at hand emphasize a holistic view of fairing manufacturing and finishing, including the properties of the base materials and the stepwise progression from surface prep to final topcoat. This perspective reinforces the idea that durability is a system property. It arises when each component—substrate, primer, color, and clear—works in harmony, each stage reinforcing the next. The painter’s role, then, is to steward this system with disciplined technique and informed material choices, translating scientific principles into reliable, beautiful finishes that stand up to the tests of sun, spray, and street.
Within this framework, a practical takeaway emerges for both seasoned professionals and enthusiasts aiming to reproduce durable results in a workshop setting. Start with a strong, well-characterized substrate. Choose a primer engineered for that substrate to establish a reliable adhesion base. Layer color with a urethane formulation known for fade resistance, followed by a clear that provides UV protection and abrasion resistance. Prioritize meticulous surface preparation, and apply thin, even coats to avoid defects. Finally, confirm that the environment during application aligns with the needs of the chemistry—stable temperature, clean air, and appropriate humidity—to allow a uniform cure and long-lasting performance. When followed, these principles yield a finish that remains visually compelling while offering lasting protection against the realities of the road. The result is not merely a cosmetic upgrade but a durable shield that preserves the bike’s appearance and its value over time.
For readers seeking concrete examples and further technical context, consider exploring the broader landscape of fairing finishing resources. These materials provide practical guidance on materials and finishing techniques for durable motorcycle fairings, offering a useful frame of reference for practitioners who want to deepen their understanding of adhesion, film formation, and long-term performance. And for those who wish to view real-world applications from a brand-independent perspective, you can browse the Suzuki fairings collection for a sense of how different shapes and contours are handled within a single supplier ecosystem. This combination of theory, practice, and exemplars helps keep durability at the center of the painting process, ensuring that the f