


Motorcycle fairings are critical for both aesthetics and performance, shielding the bike while enhancing its look. Unfortunately, damages can occur, whether from minor accidents, wear and tear, or environmental factors. Understanding how to repair these fairings is vital for business owners who rely on motorcycles for their operations. This guide delves into practical techniques for repairing plastic fairings, highlights challenges associated with composite fairings, and discusses the cost, durability, and when to seek professional services. Equip yourself with the information to confidently tackle fairing repairs and maintain your motorcycle’s integrity.
Reshaping the Ride: Practical Techniques for Repairing Plastic Motorcycle Fairings
 Plastic fairings do more than shield the engine; they give a motorcycle its silhouette and aerodynamics. When a fairing cracks or breaks, the urge to ride on can collide with the discipline needed to repair. A well-executed plastic repair preserves not only the appearance but also the structural integrity that keeps mounting points aligned and protects the internal components from wind and debris. The approach outlined here helps you restore both strength and style, honoring the reality that some damage is simple enough for a careful home fix, while other cases demand professional tools and OEM-grade materials to ensure a seamless match and a durable bond. This chapter keeps the focus on ABS-based fairings because they are common on many sport and street bikes, but the core principles translate to other plastic and composite configurations. The goal is not just a cosmetic fix but a repair that sustains the fairing’s role as a load-bearing, wind-deflecting component, capable of withstanding the on-road stresses that come with high-speed riding and variable weather. In that spirit, the following discussion weaves assessment, preparation, bonding, filling, finishing, and safe reassembly into a cohesive process that you can adapt to the scale of the damage you confront.
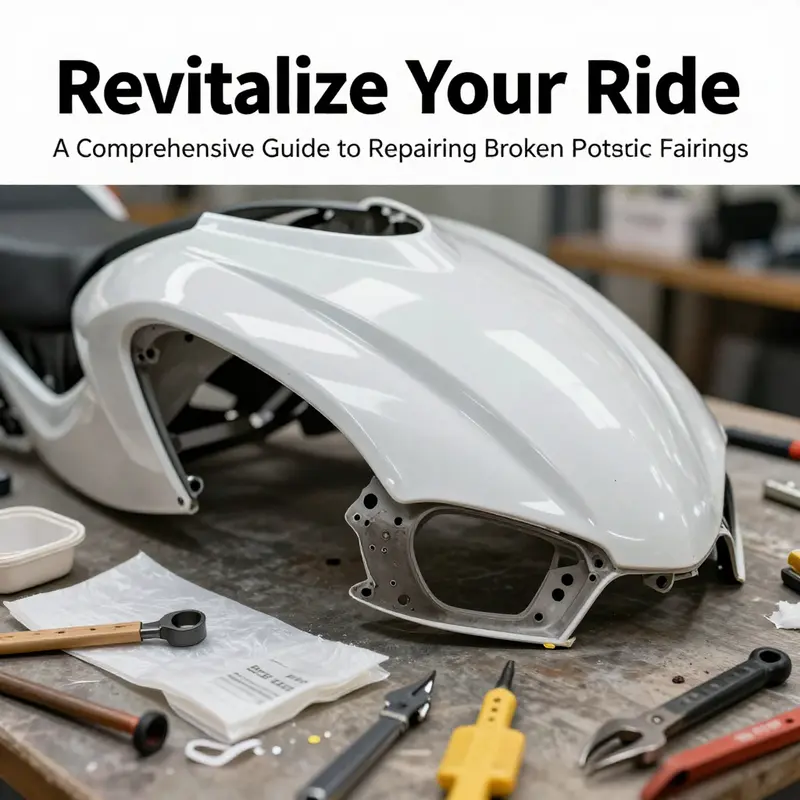
Begin with a sober assessment: is the crack superficial, a split along the grain, or a break that compromises the support ribs and mounting holes? Surface cracks that do not reach the inner structure can often be stabilized with adhesive and filler, while deeper injuries near or across integral ribs may require more conservative repair or even replacement. The aim is to determine whether the material around the fracture has delaminated, whether there is missing plastic, and whether any mounting points have shifted. A clear-eyed diagnosis saves time and money and reduces the chance of a repair that fails under a high-speed wind gust or a pothole impact. If the crack is within a region that houses a mounting point or intersects a seam with another panel, you will need to check both the inner backing and the outer skin. Delamination can hide under the surface, and a bond that seems strong on the outside may not distribute load evenly if the interior remains compromised. This early stage of inspection sets the course for the rest of the repair and helps you decide whether you can safely revive the piece at home or you should step toward a professional assessment.
Before any bonding takes place, the repair area must be clean and ready. Thorough cleaning with a degreaser or mild soap removes wax and oils that would otherwise sabotage adhesion. After washing, dry the area completely; moisture trapped behind a repair can weaken the bond. Light sanding around the damaged zone with 400–600 grit paper creates micro-roughness that helps the adhesive bite. It’s not about removing material, but about exposing a fresh surface. A common misstep is to rush into gluing over greased, glossy plastic; that oversight becomes a weak seam that peels under stress. If the break is longer or there is a missing chunk, you can back up the repair with a fiberglass mesh or patch on the inside surface. The mesh provides a seat for the resin and reduces the risk of future cracking from flex and vibration. For larger repairs, a two-step approach—adhesion first, then a structural fill with epoxy or body filler—helps restore both strength and shape. The preparation phase, carefully executed, is often the most decisive factor in a repair’s long-term success.
For ABS or similar automotive plastics, use a high-quality plastic repair adhesive designed for that class of material. Apply along the broken edge to bond the pieces. Avoid gluing with solvent-based products that can make the plastic brittle. Following the bond, clamp the parts firmly to maintain alignment as the adhesive cures, typically overnight in a dry environment. If the break is longer or there is a missing chunk, back up the repair with a fiberglass mesh or patch on the inside surface. The mesh provides a seat for the resin and reduces the risk of future cracking from flex and vibration. For larger repairs, a two-step approach—adhesion first, then a structural fill with epoxy or body filler—helps restore both strength and shape. The curing time is a practical constraint; plan around the 24-hour window so that the composite can solidify without disturbance. In some cases, using a membrane or release film between the repair and the paint layer during curing can prevent unintended adhesion or heat buildup from the sun if you’re in a hot environment. This stage is often where riders realize how much control they have over the final outcome by simply keeping the environment consistent and patient.
For gaps or missing sections, a two-part epoxy filler can rebuild the missing geometry, followed by shaping to achieve a snug profile that matches the surrounding fairing. Apply the filler in thin layers, letting each cure before applying the next. This layered approach minimizes heat buildup and reduces the risk of warping. After sanding, there should be a continuous line with the adjacent material, not a noticeable ridge. The goal is to recreate the original contour so paint lays down evenly. When using epoxy-based fillers, follow safety guidelines and ensure the area is well ventilated. Abrading the cured filler with progressively finer sandpaper from roughly 800 to 1500 grit yields a smooth surface ready for primer. If your repair area extends into a curved or edge-to-edge transition, consider using a flexible filler or adding a slight bevel to the edge to blend the repair into the curve, which helps the paint flow and reduces the risk of edge lift over time. The smoother your surface after filing and sanding, the less you’ll notice the repair once the color returns.
Priming plastic requires careful surface preparation and a compatible plastic primer that adheres to the chosen paint system. A primer that fills minor imperfections and accepts top coats consistently is essential for a uniform undercoat. Allow the primer to cure as directed and inspect for pinholes or blemishes. If you see any, fill and re-prime as needed. When the surface is truly uniform, spray a thin base coat in even layers, allowing each coat to dry before the next. The color match is critical for a seamless repair; if the shade is off, the repaired area will announce itself when light hits the surface. Priming also serves to protect the repaired bond from moisture and environmental exposure, extending the life of the repair beyond the aesthetic fix. The key is patience: thin coats, proper ventilation, and controlled temperatures produce the cleanest base for color and clear.
After base coats, apply several thin coats of automotive paint to build depth and gloss. Maintain a light touch and avoid heavy coats that can cause runs or sagging. When the color matches, clear coating locks in the finish and adds UV protection to prevent chalking and fading with exposure to sun and weather. The final sanding and polishing stage should be done with care; use a fine polishing compound and a soft pad to bring back the luster without removing the paint along the seam. In the end, the repaired area should disappear into the surrounding surface, with the same texture and sheen as the rest of the fairing. A flawless finish is often the difference between a repair that lasts and one that wears prematurely under the drag and vibration of road use. If you are color matching a complex decal or metallic finish, you may need to blend shapes or patterns along the edge to help the repair fade into the original design rather than stand out as a new plane on the surface.
Composite and multi-layer fairings, often found on higher-end models, pose additional challenges. The layers can delaminate, and resin-rich regions may respond differently to heat and solvents. In these cases, a DIY approach is more risky, because a wrong solvent choice or aggressive sanding can deepen the damage rather than repair it. Specialized composite repair kits and professional services better address delamination, resin compatibility, and precise alignment with the rest of the assembly. If a dealer or body shop can perform the repair, you gain the advantage of controlled heat, validated resin systems, and calibrated paint matching. It’s worth noting that even when a repair seems structurally sound, the aesthetic result could still fall short if the composite lamination shows through the surface. For composite fairings, the decision to repair or replace must weigh not only the present cracks but the potential for hidden layups and fiber damage that may become apparent after heat or impact. If you must pursue a DIY route with composite parts, proceed with extreme caution, and keep expectations modest about achieving OEM-level uniformity in color and texture.
Cost considerations matter, especially when the fairing you want to preserve is decorative or reinforces a specific aesthetic. Repairs of decorative fairings can be costly, and replacement parts may be scarce or expensive due to the fairing’s curb appeal and the model’s age. Heavier fairings also influence handling and aerodynamics if not restored to original specifications. The choice between repair and replacement is often a balance between downtime, matching accuracy, and the risk of weak spots that could emerge after a hard ride. Even when the repair looks good, subtle flex can occur during high-speed riding, introducing micro-cracks that slowly propagate if the bonded seam is stressed. The best path, in many cases, is to seek professional, OEM-grade material alignment, precise paint matching technology, and tools that guarantee a nearly invisible finish. Minor cosmetic damage, however, can be effectively addressed at home with the right supplies and patience. Always document the repair, including photos of the crack and the repair process, in case future work or resale considerations require proof of the fairing’s condition.
Safety and reassembly are the final stages. Once the repair is complete, perform a careful reassembly and check alignment with mounting tabs and other fasteners. The fairing must sit flush with adjacent panels, and the paint should not trap moisture at the edges. Inspect for gaps around the edges where wind could catch a seam at speed. A test-fit on the bike is essential before final torqueing of mounting bolts. If the repair involved internal backing or patches, double-check that they do not interfere with the cable runs, brake lines, or electrical harnesses. Even a small misalignment can create noise, flutter, or rubbing that forces meaningfully invasive adjustments later. Take the time to recheck fitment, and, if possible, ride at a low speed in a controlled environment to ensure there is no vibration, flutter, or contact. The goal is a seamless integration that looks original and feels solid to the rider.
When damage extends to the inner ribs, core structure, or near mounting points, or when the fairing has already undergone heat exposure or previous repairs, professional service is recommended. A body shop with experience in OEM-matched paints, precise color spectrometry, and controlled curing environments can deliver a result that stands up to sunlight and road debris. If the fairing has any sign of delamination, soft spots, or warping after attempted DIY repairs, it’s prudent to pursue a professional assessment. The investment can be offset by the longer lifespan of the repair and the confidence that the repair will withstand the stresses of riding at highway speeds or in rough weather. In the end, the most reliable approach is to treat critical repair as a capital investment in safety and aesthetics, ensuring the fairing continues to protect the rider and maintain the motorcycle’s streamlined profile.
For riders who want to explore compatible parts or new color options, the Honda fairings collection can be a practical resource if you’re working within a Honda platform. You can browse the selection and compare shapes, sizes, and mounting patterns to locate a fairing that matches the original geometry while you plan a fix for a cosmetic or moderate structural repair. This approach helps maintain the bike’s balance and alignment while ensuring that the repaired fairing continues to perform as designed on a road with varying wind and load conditions. Honda fairings collection allows you to assess whether a replacement shell is a viable path or whether a repaired unit can extend the bike’s life on a practical budget. For a detailed, step-by-step external guide, see this resource: external guide.
Fibers, Resin, and Road Hazards: Mastering the Art of Composite Motorcycle Fairing Repairs
 Composite motorcycle fairings sit at the intersection of performance and design. They are engineered to be light yet stiff, to bend no more than necessary under dynamic loads, and to present a visually seamless profile at high speeds. Yet when they crack, delaminate, or suffer internal damage from a crash or impact, the repair challenge is fundamentally different from repairing a sheet of plastic or a sheet metal panel. The key to a durable repair lies in understanding the material’s behavior, the hidden nature of some faults, and a careful sequence of preparation, bonding, curing, and finishing. This knowledge translates into outcomes that restore not only the appearance of a fairing but its structural integrity and aerodynamic performance as well. While much of the general repair guidance for plastic fairings is widely available, composites demand a deeper, more disciplined approach that respects resin systems, fabric orientations, and the way light and air interact with a repaired surface. For riders who own or service high-performance machines, the nuance matters. It matters when a bike makes clean, wind-cut passages through air at speed, and it matters when a rider leans into a corner and the fairing continues to do its job without introducing unexpected flex or noise. Within this landscape, the challenges are real, but they are not insurmountable. They require a disciplined process, the right facilities, and, at times, the willingness to seek professional assistance, especially for complex damage or larger structural repairs. This chapter threads together the anatomy of composite fairings, the diagnostic hurdles, the repair methodologies that actually restore strength, and the practical realities that influence decisions about repair versus replacement. It is a narrative built from what engineers and experienced fabricators recognize as core truths: composites don’t bend the way metal does, they separate and delaminate in more subtle ways, and the path to a reliable repair must honor the layered construction from the outside skin to the core and back again to a flawless surface finish.
Composite fairings are usually built from layers of materials such as fiberglass or carbon fiber, bonded with epoxy or other resin systems. The stiffness and lightness come from those layered architectures, but the same layers that confer strength can conceal damage that travels through the fabric matrix. When a fairing suffers impact, you may see cracks or chips on the surface, yet the real danger often lies beneath: microcracks, micro-delaminations, or resin-rich pockets that weaken the bond between layers. Unlike metal, which may dent or bend and then be reshaped, a damaged composite panel often shows little surface movement even when internal damage has advanced. The result is a repair that looks good at first glance but fails under load if the underlying structure isn’t sound. The diagnostic phase must therefore be thorough and patient. A visual inspection should be followed by tactile probing of suspected areas, listening for dull or hollow sounds when tapping the surface, and, where possible, non-destructive testing methods such as ultrasonic scanning or X-ray imaging to locate hidden delaminations or voids. These techniques, while not always accessible to DIY repairs, form part of the professional toolkit and help guide whether a simple surface fix will suffice or a more extensive rebuild is necessary.
Resin infusion stands out as a pivotal technique in composite repair. It is not merely about filling a crack; it is about restoring the fabric-to-resin matrix so that the repaired region carries loads in the same way as the surrounding material. Resin infusion requires careful control of resin flow, fabric orientation, and curing conditions. The goal is to reestablish a continuous fiber network with resin that penetrates to the core where needed, creating a bond strong enough to withstand the stresses generated by riding and aerodynamics. Achieving that bond often demands controlled heat during curing, a step that helps the resin reach a complete and tension-free state. If the curing temperature is too low or uneven, the result can be a repair that remains vulnerable to future cracking or delamination. The finishing phase—smoothing, shaping, and painting—then becomes the final test of the repair’s success. A surface that looks flawless but feels tacky to the touch, or a paint layer that peels away at the edges of a repaired zone, betrays a compromised bond or mismatched cure. The finishing steps must respect the priming, sanding, and clear-coating sequence that yields a surface as uniform as the original, with the same gloss and texture that harmonize with adjacent panels.
In the realm of composite repair, there is a practical tension between restoration and replacement. For some riders, the most efficient path after a severe impact is to replace the fairing entirely, particularly when the damage spans multiple layers or involves critical mounting points. Replacement ensures you begin with a known-good structure and a surface that aligns with factory tolerances. For others, especially those who value originality or are working with limited budget, repair is a viable option when damage is localized to a small area, where a professional facility can perform a precise resin infusion, patching, and re-finishing. Even in these scenarios, the repair must address more than the visible damage. The repaired area should integrate seamlessly with the original panel in terms of rigidity, color, and texture. If the repaired portion stands out to the eye or feels inconsistent to the touch, it is likely because the layups have not been properly aligned, or the curing process introduced residual stresses that manifest as warp or micro-cracking over time.
The aesthetic considerations are far from cosmetic ornamentation. A composite fairing’s color, texture, and sheen contribute to the rider’s perceived quality of the machine and can influence resale value as much as any mechanical performance metric. Achieving color matching on composite panels can be a delicate art. The pigment in carbon fiber, for example, interacts differently with clear coats compared to pigment-rich fiberglass. The repair must account for the parent material’s optical characteristics so that the finish reads as a single plane under varying lighting conditions. Surface smoothness matters not only for looks but for aerodynamics; any roughness or waviness on the repaired surface can generate drag or turbulence that undermines the bike’s efficiency at speed or cornering stability. The craft here blends science with artistry: choose a compatible resin system, apply the right thickness to match the surrounding laminate, and employ a finishing process that respects the original texture and gloss level.
For riders who own or service a Ducati, a Suzuki, or a Honda—models often seen with high-performance composite fairings—the specifics of design can influence repair strategy. On some models, the fairing shape is achieved through a multi-layer laminate that may include inner cores or honeycomb structures for stiffness. Repairing such a panel means understanding how those cores contribute to load paths and how resin must flow to restore the core-to-skin bond. In practice, this means that a generic, one-size-fits-all repair kit may not suffice. A professional repair facility, with access to the right tooling and materials, is more capable of tailoring the repair to the exact layup. The nuance matters because a composite panel’s performance is not just about returning it to its original look; it is about regaining the aerodynamic efficiency, vibration control, and crashworthiness that the original construction intended.
From a diagnostic standpoint, the most challenging aspect is often deciding when a repair is practical and when replacement is the wiser course. A small surface crack or chip might tempt a DIY fix, especially when the owner has a bench or a small workshop and a budget. Yet the risk of missing an internal delamination or an interlaminate separation can leave a rider with a repaired shell that fails under stress or, worse, a compromised panel that detaches in service. In professional settings, testing and inspection protocols guide these decisions. Ultrasonic gating and computed inspection methods can reveal thickness variations and bond line integrity that are invisible to the naked eye. These insights translate into a repair plan that prioritizes safety and reliability, not just aesthetic restoration.
When it comes to the actual repair workflow, the process can be summarized in a sequence that, while familiar to professionals, must be adapted to each panel’s specifics. First comes meticulous surface preparation. The area must be cleaned of oils, waxes, and contaminants that would interfere with adhesion. Light abrasion is used to create a micro-roughness that improves bonding strength. Then a layup plan is designed: which fabric to use, how many plies, and where to place patches or backing material to address the damage’s geometry. If delamination is present, a resin infusion approach with a backing patch or skin reinforcement is often deployed to reconstitute the structural integrity. The curing phase follows, with careful temperature control to avoid introducing thermal stresses that would warp the panel. After curing, the surface is ground and shaped to re-create the fairing’s flush contour with adjacent panels. Then comes paint matching. This is not a cosmetic afterthought; it completes the restoration so the panel visually merges with the bike’s overall finish. The final step is a functional check: mount the panel, verify alignment with mounting points, assess any interference with other components, and, ideally, perform a short test ride to confirm vibration and resonance behavior have returned to expected levels.
A practical note about labor and facilities helps set expectations. Composite repairs are not simply “glue and go.” They demand controlled environments and specialized equipment such as vacuum infusion setups, stabilized curing ovens or heat devices, and precise measuring tools to ensure the repaired laminate’s fiber orientation matches the original engineering intent. A well-executed repair often requires access to a professional facility that can source OEM-grade materials and reproduce the exact finish and color. The cost, of course, reflects these requirements. While minor cosmetic scuffs on plastic fairings can be addressed at home with the right prep work and paints, composite repairs—especially those involving delamination or core damage—tend to justify professional involvement. The investment is not merely in restoring the panel’s look but in ensuring the panel maintains its designed strength and aerodynamic properties.
Anecdotes from riders illustrate the spectrum of options. Some riders leverage workplace resources or maker spaces to perform the repair themselves, turning a potentially expensive service into a learning project. Others choose to replace entire fairings when the damage is extensive or when the repair would require multiple patching operations that could accumulate residual stresses or mismatched finishes. These real-world choices underscore an overarching principle: the integrity of the repair is more important than the speed with which it is completed. If a repair cannot guarantee a uniform finish, a predictable load transfer, and a reliable aerodynamic profile, opting for replacement becomes a prudent decision. This isn’t a sign of defeat; it is a pragmatic judgment about safety, performance, and the long-term cost of ongoing maintenance.
For those who pursue repairs with intent and care, professional guidance remains invaluable. Manufacturer documentation and industry standards provide a framework for repeatable, safe repairs. In the composite repair community, standards bodies and technical resources—such as the Society of Plastics Engineers—offer guidelines that help technicians avoid common missteps like under-curing resins, using incompatible fabrics, or neglecting post-repair finishing that can trap moisture or cause sheen mismatches. Following these guidelines helps ensure the repair not only looks right but functions as part of the bike’s overall structural system. In practice, a repair that adheres to these principles will better resist the daily rigors of riding, including temperature swings, UV exposure, and the cyclical stresses of acceleration, braking, and cornering.
To connect theory with practice, consider the way a composite repair might unfold on a popular high-performance model. A fairing panel of fiberglass or carbon fiber layup sustains a crack that penetrates several layers. The repair begins with an assessment that confirms whether the damage remains localized to the outer skin or whether it has compromised the laminate beneath. If the damage is contained, a patch on the backside with reinforcing mesh can be applied, followed by resin infusion to re-embed the patch and re-establish the load path through the laminate. If the damage is more extensive, a full panel repair or even a partial rebuild may be necessary, in which case the technician may re-knead the layup by hand, re-sand the area, and re-finish to the level of precision the bike’s body shop team expects. In all cases, the repair must restore not only the panel’s strength but its aerodynamics, which means careful attention to surface texture and line continuity across joints. The rider’s experience—feel, sound, and confidence at speed—depends on that fidelity. The narrative is not simply about patching a hole; it is about preserving the material’s designed behavior under real-world stresses.
An important resource in this space is documented guidance from authoritative bodies and manufacturers. These guidelines emphasize proper joint design, surface preparation, bonding, curing, and finishing practices. They also stress the value of using compatible materials and recognizing when a region has to be replaced due to the complexity or depth of damage. The practical upshot is that composite repairs demand a holistic approach: the repair must be correct at the micro level and correct at the macro level—matching stiffness, load transfer, surface finish, and aesthetic coherence with the rest of the bike. For readers who want a concrete starting point, consider a real-world reference to a commonly accessed model family where composite fairings are prevalent. For example, enthusiasts examining a comprehensive collection of Honda fairings in the community marketplace can gain a sense of the variety and geometry of these panels by exploring the Honda CBR fairings collection. This resource offers a tangible sense of the scale and complexity of the panels you might encounter in a repair, and it helps frame expectations about repair feasibility and cost when the work involves multi-layer composites. Honda CBR1000RR fairings (2012-2016) collection.
In closing, the repair of composite motorcycle fairings sits at the edge of art and science. It demands a line from the world of materials engineering—understanding fiber orientation, resin behavior, and heat cure dynamics—combined with practical workshop skill in finishing and paint. When done well, a composite repair returns the panel to its original strength, looks indistinguishable from the rest of the bike, and preserves the rider’s confidence in the bike’s performance. When done sloppily, it can create a latent weakness that shows up only after a few hundred miles, or worse, during a fast corner or a hard braking event. The emphasis, therefore, is on measured judgment, high-quality materials, controlled processing, and a finish that respects the fairing’s original design intent. The chapter’s throughline is clear: with composites, the repair must address the entire system—from the rigid outer surface to the internal layers and back again—so that the repaired panel behaves as a single, integrated element rather than a patched module. The payoff is a restored fairing that not only looks right but performs right, delivering the same protection, aerodynamics, and aesthetics for which these panels were designed.
External resource for professional practice and deeper standards: For a standards-based, in-depth exploration of composite repair methods, practitioners can consult the Society of Plastics Engineers’ Composite Repair Guidelines. This external reference provides comprehensive guidance on fiber-reinforced resin systems, curing protocols, and structural considerations essential to high-quality repairs. https://www.spe.org/technical-resources/composite-repair-guidelines/
From Crack to Contour: A Considered Path to Repairing Broken Motorcycle Fairings
 Every ride carries a scrape of fate against the edge of a fairing, a panel that blends aerodynamics with identity. When a fairing breaks, the damage is rarely just skin deep. A crack might be a cosmetic blemish, or it could be a sign of deeper structural compromise that affects stiffness, alignment, and even how the bike breathes through the wind. The repair challenge, then, is not merely patching a hole or filling a dent. It is diagnosing the damage with honesty, choosing the right materials for the specific build of the panel, and applying a method that can restore both appearance and strength. The broad spectrum of fairing materials—from common plastics to layered composites and carbon fiber—demands a thoughtful plan. Plastic fairings, which grace a wide range of sport and naked bikes, respond well to resin-based repair kits that are designed to bond with the original material, fill gaps, and form a surface that accepts paint and withstands sun and weather. Yet even plasti