


Introduction
The durability and aesthetic appeal of motorcycle fairings is crucial for both performance and appearance. Cracked fairings can detract from a bike’s visual charm and lead to increased repair costs if not addressed promptly. Understanding how to repair fairings made from either fiberglass or ABS plastic is key for any business involved in motorcycle maintenance or manufacturing. From identifying materials to employing effective repair techniques, this guide will explore actionable steps to help you maintain the integrity of your motorcycles and please your clientele. Each chapter will delve into specific methods for considering fairing material types, step-by-step repair processes, the value of specialized repair kits, and additional tips to ensure long-lasting fixes.
Tables of Contents
Chapter 1: Diving into ABS Plastic: Understanding Its Role in Motorcycle Fairing Repairs
- The Versatility of ABS Plastic in Motorcycle Fairings: A Key to Successful Repairs
- Practical Repair Techniques Tailored to Motorcycle Fairing Materials
- Understanding Long-Term Durability: Key Materials for Optimal Fairing Repair
Chapter 2: Mastering the Essential Materials for Fiberglass Fairing Repair in How to Fix Cracked Motorcycle Fairings
- Gathering Essential Tools and Materials for Repairing Fiberglass Fairings in Your Motorcycle
- Essential Surface Preparation Techniques for an Impeccable Bicycle Fairing Repair
- Achieving a Pristine Finish: Essential Techniques for Fiberglass Fairing Restoration
Chapter 3: Repair Techniques for ABS Plastic Fairings: Mastering the Process
- The ABS Cement Method: A Reliable Approach to Fixing Cracked ABS Plastic Fairings
- Mastering Plastic Welding Techniques for Resilient Repair of Cracked ABS Fairings
- Mastering the Sprinkling Technique: A Seamless Repair for Cracked ABS Plastic Fairings
Chapter 4: Mastering Material Identification to Enhance Specialized Motorcycle Fairing Repairs
- Crucial Steps in Identifying Motorcycle Fairing Materials for Repair Success
- A Hands-On Approach to Repairing Cracked Motorcycle Fairings with Specialized Kits
- Precision and Reliability: Advanced Installation Techniques for Repaired Motorcycle Fairings
Chapter 5: Navigating the Nuances of Material Repair in Cracked Motorcycle Fairings
- Choosing the Right Repair Strategy: Material Insights for Cracked Fairings
- Maximizing Repair Durability: Strategies for Long-Lasting Motorcycle Fairing Fixes
- Essential Surface Preparation Techniques for Flawless Fairing Repairs
Chapter 1: Diving into ABS Plastic: Understanding Its Role in Motorcycle Fairing Repairs
1. The Versatility of ABS Plastic in Motorcycle Fairings: A Key to Successful Repairs
When it comes to motorcycle fairings, ABS plastic stands out as a primary material used for its blend of durability, flexibility, and repair potential. Understanding this material is crucial for anyone looking to fix cracked fairings effectively and restore their motorcycle’s aesthetic and functionality. Also known as Acrylonitrile Butadiene Styrene, ABS combines three significant components that offer unique benefits, making it a preferred choice in the motorcycle manufacturing industry. The strength of ABS lies in its excellent impact resistance, which guards against drops and collisions, ensuring vital internal components like wiring harnesses and radiators remain protected.
One of the standout features of ABS plastic is its dimensional stability. Unlike certain other materials, which may warp or flex over time, ABS maintains its shape under stress, providing riders with the assurance that their fairings will not deform easily. Additionally, ABS possesses outstanding paint adhesion properties, allowing for simple cosmetic repairs or custom paint jobs without significant risk of flaking or bubbling.
However, it is essential to acknowledge that ABS is not devoid of drawbacks. While it is less brittle than fiberglass, it is also heavier than some other composite alternatives, which can be a consideration for performance-driven riders. Moreover, prolonged exposure to sunlight without UV protection can lead to yellowing, which detracts from an otherwise sleek appearance. In particular, the optimal thickness for ABS used in fairings, such as those for the Suzuki Katana GSX 600 F, should ideally range from 2.5 to 3mm. This thickness strikes a balance between rigidity and weight, ensuring that the structural integrity of the fairing is preserved without undue burden on the motorcycle’s overall performance.
Identifying ABS plastic is a tactile endeavor, especially when contrasting it with other common materials used in fairing construction. For instance, polycarbonate—while more flexible—lacks the scratch resistance and paintability of ABS, making it unsuitable for vibrant, long-lasting aesthetics. Meanwhile, fiberglass, though often lauded for its lightweight nature, can be more susceptible to cracking upon impact, often requiring more intensive repair procedures. In contrast, carbon fiber, though providing exceptional strength, comes with a heftier price tag and demands special care during repairs, both in terms of expertise and materials needed.
When faced with a crack in an ABS fairing, the path forward for repair is relatively straightforward. The material allows for multiple repair methods to restore and strengthen the damaged area. This includes utilizing ABS cement for quick fixes or engaging in plastic welding techniques that meld new material seamlessly into the crack. Compared to its competitors, repair strategies for ABS can be more flexible and enduring, which means riders can regain their fairing’s integrity with less hassle.
Navigating the repair landscape means not overlooking the coverage options for new parts. If a damaged fairing is still under warranty, documenting the damage and alerting the seller is critical, as many reputable suppliers will replace compromised parts. For existing damage, it’s also helpful to consult repair experts or guides, as indicated in specialized resources like buying guides for motorcycle plastics.
In conclusion, understanding the properties of ABS plastic is instrumental in managing cracked motorcycle fairings effectively. Employing the right repair techniques related to ABS can not only restore the current damage but also enhance the longevity and appearance of the motorcycle’s bodywork, allowing riders to enjoy their bikes without detracting from their aesthetic appeal. Recognizing the distinctions between ABS and alternative materials enables riders and mechanics to make informed decisions during repairs, yielding results that enhance performance and safety seamlessly.
2. Practical Repair Techniques Tailored to Motorcycle Fairing Materials
When it comes to repairing cracked motorcycle fairings, understanding the material composition is crucial for any effective fix. Motorcycles commonly use ABS plastic, fiberglass, or carbon fiber for their panels, each requiring targeted techniques to ensure a robust repair that can withstand the rigors of riding. Failing to match the repair method to the material type can lead to premature failures that mar the aesthetic or functionality of the fairings.
To start the repair process, accurate identification of the fairing material is imperative. Begin with a visual and tactile inspection: ABS plastic tends to be lightweight and slightly flexible, almost rubbery to the touch; fiberglass is generally more rigid, heavier, and conveys a woven texture; while carbon fiber is characterized by its ultra-lightweight and distinct matte weave. If there’s any doubt, a flame test can provide clarity: a small edge can be burned—ABS will melt to a black gooey substance, fiberglass chars without significant melting, and carbon fiber resists burning but emits an acrid smell. Always exercise caution and perform this test outdoors with safety equipment at the ready.
If magnetic properties are in question, a magnet test can indicate the presence of metal contaminants. Pure plastic such as ABS will not react to magnets; however, if a magnetic attraction is noted, this may suggest reinforced composites. For those who have the manual or part markings, checking these sources can be beneficial—some manufacturers print material information directly onto the base of the fairing.
Once the material is confirmed, the corresponding repair technique should be employed. For ABS plastic, which tends to be the most common, chemical welding using single-part ABS resin works remarkably well. This method melts the original plastic at the edges, creating a bond akin to the original material. In cases of larger cracks, the ‘sprinkling technique,’ which applies solvent consistently across the cracks for quick bonding, can be used effectively. Avoid using traditional epoxies for these repairs, as they tend to fail under flex and vibration.
On the other hand, fiberglass repairs necessitate a more hands-on approach. Firstly, the crack should be sanded down to prepare for a patch. A mix of fiberglass cloth and resin is then applied, harmonizing multiple layers to achieve a robust finish. Finally, a gelcoat may be added to protect and aesthetically blend the repair with the original surface.
For those repairing carbon fiber, it’s advised to utilize professional-grade epoxy alongside matching pre-preg fabric. A DIY approach could risk delamination if the repair is not conducted with precision and care.
Regardless of the material, all repairs should begin with thorough cleaning. Washing with soapy water or a degreaser lays the groundwork, followed by scuffing the surface with sandpaper (around 400-600 grit). This process creates a necessary ‘tooth’ that promotes adhesion without removing too much base material. Progressing to wet sanding using 320-800 grit aids in achieving a smooth finish before drying the area completely.
After repairs, when it comes to painting, apply primer and spray the finish in thin, even coats. This method allows each layer to cure fully, ensuring durability. Taking these preparation steps will allow for a successful bond, capable of enduring the vibrations and stresses encountered while riding.
For many motorcycle enthusiasts, plastic welding represents a strong alternative to replacement for ABS cracks. By heat-fusing matching rods, the end result is not just sleek but incredibly durable, yielding advantages that traditional repairs can’t match. With a practical understanding of these techniques, riders can ensure that their fairings are not just repaired but restored to their original form, ready for the road ahead.
3. Understanding Long-Term Durability: Key Materials for Optimal Fairing Repair
When it comes to maintaining the integrity and aesthetics of motorcycle fairings, understanding the fundamental materials involved is crucial for achieving long-term durability. Motorcycle fairings, primarily fashioned from ABS plastic or fiberglass, are often the first line of defense against environmental factors and impacts. However, distinguishing between these materials can significantly affect repair methods and the resultant longevity of the fix. This section delves into the characteristics and strengths of each material to enhance decision-making during repairs and restore your bike’s visual appeal and effectiveness.
ABS Plastic: Known for its versatility and ability to withstand harsh conditions, ABS plastic is the predominant material used in motorcycle fairings. Its robust nature allows it to resist impacts and flex without fracturing, a quality especially beneficial in the event of a minor accident. This resilience is paired with excellent weather resistance, effectively avoiding the brittleness and fading commonly seen in other materials after prolonged sun exposure. When evaluating fairings, look for the rigidity that hints at ABS’s dominance; this material can handle the vibrations and environmental exposure typical during rides, thereby presenting little risk of future cracks or breaks.
Moreover, repairing ABS fairings is relatively straightforward and cost-effective. Common techniques such as using ABS cement provide a strong bond, matching the material’s properties and ensuring longevity. Specialized repair products designed for ABS can further enhance the repair, establishing flexibility that’s crucial for enduring day-to-day riding conditions. For those initiating repairs, a well-executed process that includes cleaning, applying filler, sanding, and painting will yield results that withstand the test of time, making ABS a preferred choice within the motorcycle community.
Fiberglass: In contrast, fiberglass offers lightweight advantages alongside superior airflow characteristics. While this makes it favorable for performance-oriented bikes where weight savings is paramount, it comes at a cost. Fiberglass tends to be more brittle compared to ABS and is susceptible to cracking under heavy impacts, rendering it less effective for daily street use. When repairing fiberglass fairings, it’s vital to adopt a cautious approach, utilizing layering techniques with resin and cloth to reinforce the repaired area. However, the intricacy and potential cost associated with fiberglass repairs can deter many DIY enthusiasts.
Carbon Fiber: Carbon fiber is celebrated for its strength-to-weight ratio and aesthetic appeal, particularly in high-end bikes. Yet, its high performance comes with significant drawbacks, especially regarding repairability. Damaged carbon fiber generally requires professional attention due to the complexity involved in its restoration and the necessity for specialized equipment to perform effective repairs. Additionally, it’s vulnerable to UV damage if unprotected, demanding extra diligence to maintain its structural integrity over time.
Polycarbonate: Another contender, polycarbonate is less common but worth mentioning for weather resistance and clarity. Though variations reinforced for durability exist, they often lack the widespread application found in ABS and fiberglass fairings. Identifying such materials can sometimes require a bit of experimentation, such as applying a plastic filler to see compatibility.
Understanding the durability and repairability of these materials is paramount for motorcycle owners. For instance, replacing cracked ABS fairings with OEM components ensures that you uphold the original specification and performance of the bike. Remember, investing in quality parts ensures you’ll avoid frequent repairs and replacements.
For further information on specific models and their fairing kits, refer to the detailed guides available here.
This foundation establishes critical considerations as you engage in the repair of your motorcycle fairings, enhancing both your skills and the bike’s longevity.
Chapter 2: Mastering the Essential Materials for Fiberglass Fairing Repair in How to Fix Cracked Motorcycle Fairings
1. Gathering Essential Tools and Materials for Repairing Fiberglass Fairings in Your Motorcycle
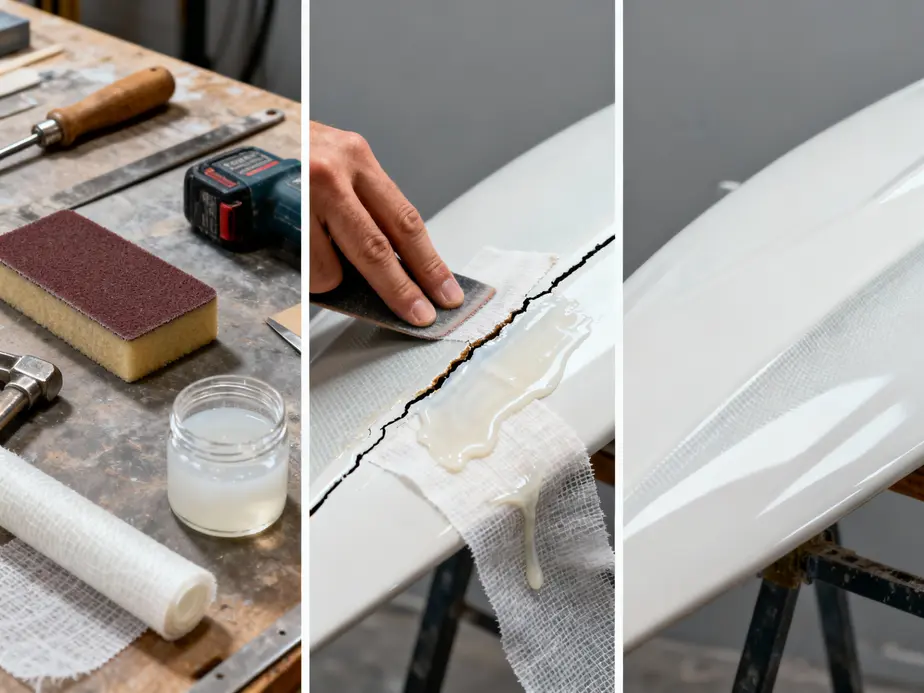
To successfully repair cracked fiberglass motorcycle fairings, understanding and gathering the right materials is crucial. Each material plays a unique role in achieving a durable and visually appealing repair, and selecting them thoughtfully can significantly impact the outcome. Let’s delve into the components you’ll need for a successful repair process.
Fiberglass Cloth is perhaps the most fundamental material in this endeavor. This reinforcement material comes in various weights and weaves, allowing you to select based on the specific strength and flexibility required for your repair. A heavier cloth offers greater strength but may be less flexible, which might be critical depending on the fairing’s location and design specifications.
Resin, when combined with a catalyst, forms a strong adhesive that bonds the fiberglass cloth to the fairing. There are several types of resin to consider: polyester resin is the most cost-effective, suitable for general repairs; vinylester resin adds durability and moisture resistance; epoxy resin, while often more expensive, provides superior strength but requires careful mixing. Each choice carries its benefits, with the right application depending on the fairing’s specific needs.
The catalyst is equally important, as it activates the resin and initiates the curing process. Following the manufacturer’s proportions is essential; too much or too little can lead to an unsuccessful repair, weakening the overall structure of the fix.
Next, a small roller becomes invaluable. This tool is vital for ensuring that the fiberglass cloth adheres properly—pressing down uniformly eliminates air pockets, promoting a strong bond between layers. The uniform application is key to avoiding weak spots that could compromise the repair during prolonged use.
To prepare the area for repair, sandpaper is indispensable. This will be used to smooth out the crack’s edges and create a rough surface for better adhesion of the resin. After sanding, any loose debris must be meticulously cleaned to guarantee a clean surface. Following this, filler is essential for treating imperfections. This material helps to smooth out the surface of the fairing, creating an even finish before applying the fiberglass cloth.
Masking tape should not be overlooked. It protects areas surrounding the repair site from accidental resin spills. A careful application of tape around the edges of the repair area helps retain a clean line, which is especially important if aesthetics are a concern.
Once all these materials are gathered, the repair process can begin. Start by sanding the cracked area to remove old paint, dirt, or debris, ensuring proper adhesion. Next, apply the masking tape to protect adjacent areas. Then, fill any imperfections while smoothing the surface to prepare it for the fiberglass reinforcement.
Once the surface is prepped, mix the resin with the specified amount of catalyst, observing the proper ratio to ensure a successful cure. After cutting the fiberglass cloth to size, apply the resin mixture generously over the crack before laying the cloth on top. Use the roller to press down, ensuring no air pockets remain trapped beneath the cloth.
Finally, allow the repair to cure completely, following the manufacturer’s instructions. This thorough preparation and execution will yield a seamless repair, restoring both functionality and aesthetics to your motorcycle fairings.
For additional resources and visual demonstrations on fiberglass repairs, you can check out helpful guides and videos on platforms dedicated to motorcycle maintenance. Affordable options like these can provide you with tips and tricks to fine-tune your repair techniques, making for a successful and enjoyable repair experience.
Investing time in understanding these essential materials and their respective functions arms you with the knowledge necessary to approach fiberglass repairs with confidence. It’s not just about fixing a crack – it’s about renewing the integrity of your motorcycle’s fairings.
2. Essential Surface Preparation Techniques for an Impeccable Bicycle Fairing Repair
Surface preparation is a crucial yet often underestimated step in fixing cracked fiberglass motorcycle fairings. A well-prepped surface ensures a bond that withstands the rigors of both time and stress, ultimately leading to a smoother finish and longer-lasting repair. To achieve this, a meticulous approach is necessary, one that starts well before you apply any filler or resin. The process begins with a clean foundation.
First, you must thoroughly clean the cracked area. This involves removing dirt, grease, and any loose materials that might inhibit proper adhesion of the repair products. Ideally, perform this step in a clean, dry environment. Working in such conditions minimizes the risk of dirt re-entering the preparation process. Utilizing a degreaser can enhance your cleaning efforts, ensuring that there are no residues that could compromise the integrity of the bond.
Once you’re satisfied with the cleanliness of the area, the next step is to scuff the existing gelcoat or paint surface. The objective is to create a mechanical “tooth” for better adhesion. Here, you can reach for 400-600 grit sandpaper or a Scotch-Brite pad, being cautious not to over-sand and weaken the fiberglass beneath. This light scuffing is essential, as it prepares the surface to hold the repair materials effectively.
With the surface scuffed, the focus shifts to repairing any cracks or imperfections. Fillers, particularly epoxy-based fairing putties, play a critical role in this phase. When selecting a filler, ensure that it is not harder than the surrounding fiberglass; otherwise, it may complicate the sanding process later. Mix the filler appropriately as per the manufacturer’s instructions and apply it generously to the damaged areas, smoothing it out to create an even surface before allowing it to set fully.
After the filler has dried, it’s time to move onto progressive sanding. Start with coarser sandpaper, around 320-400 grit, to address any irregularities, and then transition to finer grits, 600-800, for that necessary smooth finish. Utilizing an appropriate sanding block or long board is advisable to prevent shaping irregularities into the fiberglass itself. This process not only prepares the fairing for a smooth finish but also ensures that any remaining imperfections are addressed.
Once satisfied with the smoothness of the surface, the last major step of preparation involves applying a primer suitable for plastic. Using a plastic-specific primer is crucial, as it ensures that the paint adheres properly while maintaining flexibility. Apply 2-3 light coats, allowing for adequate drying time in between each coat. Should imperfections remain visible after priming, lightly sand the area once more to maintain the integrity of your repair efforts.
With these surface preparation techniques, your fiberglass motorcycle fairings will be ready for the application of resin or additional patches without the worry of poor adhesion. Following these steps will significantly enhance the quality and durability of your repairs, paving the way for a flawless finish that can rival a factory look. As you take these precautions, remember to work methodically and allow each step the attention it deserves, which ultimately pays off when your motorcycle hits the road once again.
For those seeking specific motorcycle fairings tailored to various models, you might explore additional resources detailing fairing options that cater to specific brands such as Honda or Suzuki.
3. Achieving a Pristine Finish: Essential Techniques for Fiberglass Fairing Restoration
To successfully restore cracked fiberglass motorcycle fairings, achieving a pristine finish is vital, transforming a simple repair into a professional-grade restoration. This final stage encompasses meticulous steps that enhance durability, aesthetic appeal, and ensure long-lasting results after the repair process.
The first essential step in this finishing phase involves sanding the repaired area. Once the fiberglass cloth and resin have completely cured (this typically takes several hours), the initial task is to remove any adhesive tape carefully. Start working the surface with coarse grit sandpaper to eliminate excess resin and blemishes from your repair. This step not only smoothens the surface but also prepares it for further refinement. Transitioning to finer grit sandpaper is necessary to meticulously buff out any remaining imperfections, such as air pockets or minor scratches. The goal is to achieve a flawless, smooth surface that is ready for the next stages of restoration.
After painstakingly sanding the surface, applying a fairing compound is crucial in filling any low spots or dings that may have resulted during the sanding process. Using a marine-grade filler or specific fiberglass compounds is highly recommended for this step. Apply the fairing compound generously yet thoughtfully, ensuring it effectively fills in any uneven areas. Allow this compound to dry fully – patience during this drying stage pays dividends later in the outcome. Once dried, repeat the sanding process with fine grit paper to refine the profile of the fairing to a smooth finish.
With the surface now levelled and sanded to your satisfaction, it’s time to add a protective final layer. You have options when it comes to this step—either applying gelcoat or a premium topcoat paint. The use of gelcoat provides a thicker protective finish. When applying, it’s essential to be aware that additional sanding and polishing will be required to restore its glossy appearance and prevent future oxidation. On the other hand, opting for Awlgrip paint as a thinner topcoat also offers excellent durability and provides a wide array of color choices, making it easier to match the bike’s original aesthetic. This paint’s easy maintenance is a bonus, with simple washing and occasional waxing keeping it looking fresh.
As you finalize the finishing touches, ensure your workspace is clean and dry, as any dust or contaminants can ruin the immaculate finish you’ve worked so hard to achieve. Pay close attention to the mixing of your resin, stirring carefully to avoid introducing bubbles that could compromise the repaired area’s integrity. Utilizing a roller during the application process is an excellent way to minimize air entrapment, further ensuring a high-quality result.
Once all finishing processes have been successfully completed, it’s time to reinstall the fairings and admire your labor’s fruits. Achieving a professional finish on your fiberglass fairings enhances not only their aesthetic appeal but their performance as well. From cosmetic refinements that boost the look of your motorcycle to repairs that extend the fairings’ lifespan, mastering these finishing techniques is essential for any motorcycle enthusiast dedicated to repair. For a detailed overview of different motorcycle models and the fairings suitable for them, visit the vast collection available through related online sources, which can offer great insight into specific needs for your bike.
Chapter 3: Repair Techniques for ABS Plastic Fairings: Mastering the Process
1. The ABS Cement Method: A Reliable Approach to Fixing Cracked ABS Plastic Fairings
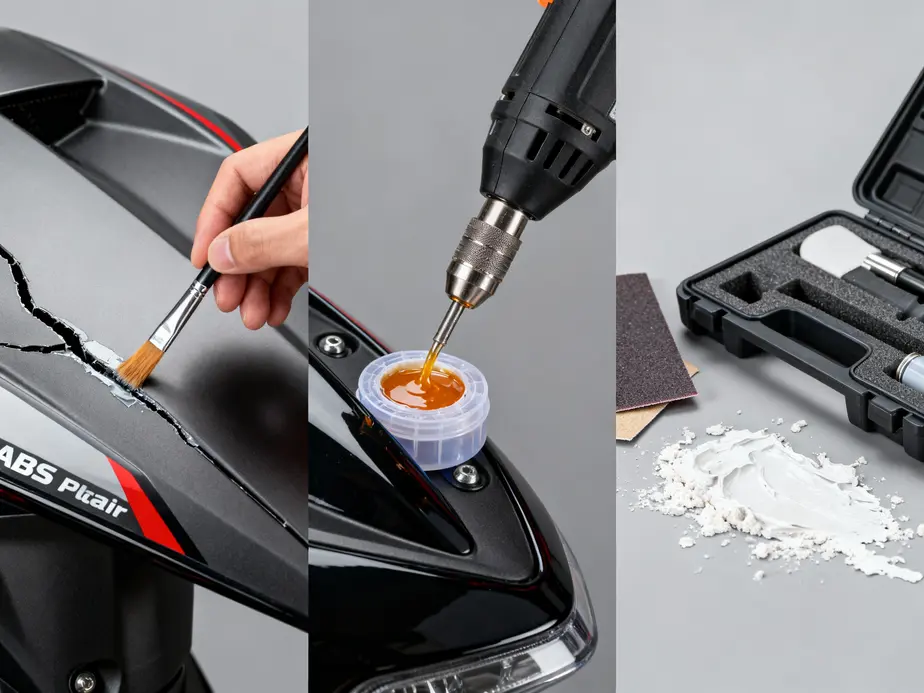
Repairing cracked ABS plastic fairings can be a daunting task, but utilizing the ABS cement method offers a reliable and effective solution. This technique stands out because it chemically bonds the cracked surfaces, creating a solid and durable repair. Unlike standard glues or epoxies, which often fail under stress or vibration, ABS cement is specifically designed to fuse with the ABS material, ensuring a long-lasting and robust fix.
The process begins with careful preparation. To achieve a successful repair, first, clean the damaged area meticulously. Use sandpaper to remove any dirt, grime, and gloss from the surface. A roughened surface helps ensure better adhesion, allowing the cement to grip effectively. Take time to inspect the crack thoroughly and determine whether it requires further stabilization, particularly if the crack is large or structural in nature.
Next, you move to the application of the ABS cement. This specialized adhesive, made for ABS plastic, should be applied directly into the crack and along both edges of the broken pieces. The unique formulation of ABS cement contains solvents that soften the plastic, promoting a fusion effect as the solvents evaporate. When spread generously, the cement should fill the crack adequately, setting the stage for a strong join.
It’s essential to maintain alignment during the curing process. To accomplish this, tape the pieces together firmly. This temporary holding mechanism not only keeps the crack aligned but also prevents any movement that could compromise the bond as the cement dries. Depending on the specific product you use, the initial set time may be quick, but it is advisable to allow a full 24 hours for complete curing to achieve the cement’s maximum strength. Patience here is critical; rushing this part could lead to an inadequate repair.
Once cured, the final finishing touches can transform a rough repair into a polished one. Sand the area smoothly using progressively finer grits of sandpaper, starting from around 220 grit up to 600 grit. This step is vital for both aesthetic and functional purposes; a smooth surface helps blend the repair with the original fairing while ensuring no sharp edges are present that could cause injuries or further damage.
After sanding, consider adding paint if desired. If the original finish was glossy, choosing an appropriate color match can provide a factory-like appearance, enhancing the overall look of the motorcycle once again.
Why does this method work so effectively? The key lies in the structural integrity created through the chemical interaction between the cement and the ABS material. Unlike PVC cement or regular epoxies, which often create weak bonds that can easily fail under vibration or stress, ABS cement ensures a reliable join that remains waterproof and resistant to the challenges faced during rides.
For those looking to boost the strength of their repair even further, consider combining the ABS cement method with plastic welding: after taping the crack, plastic rods can be melted into the gap, adding additional in