
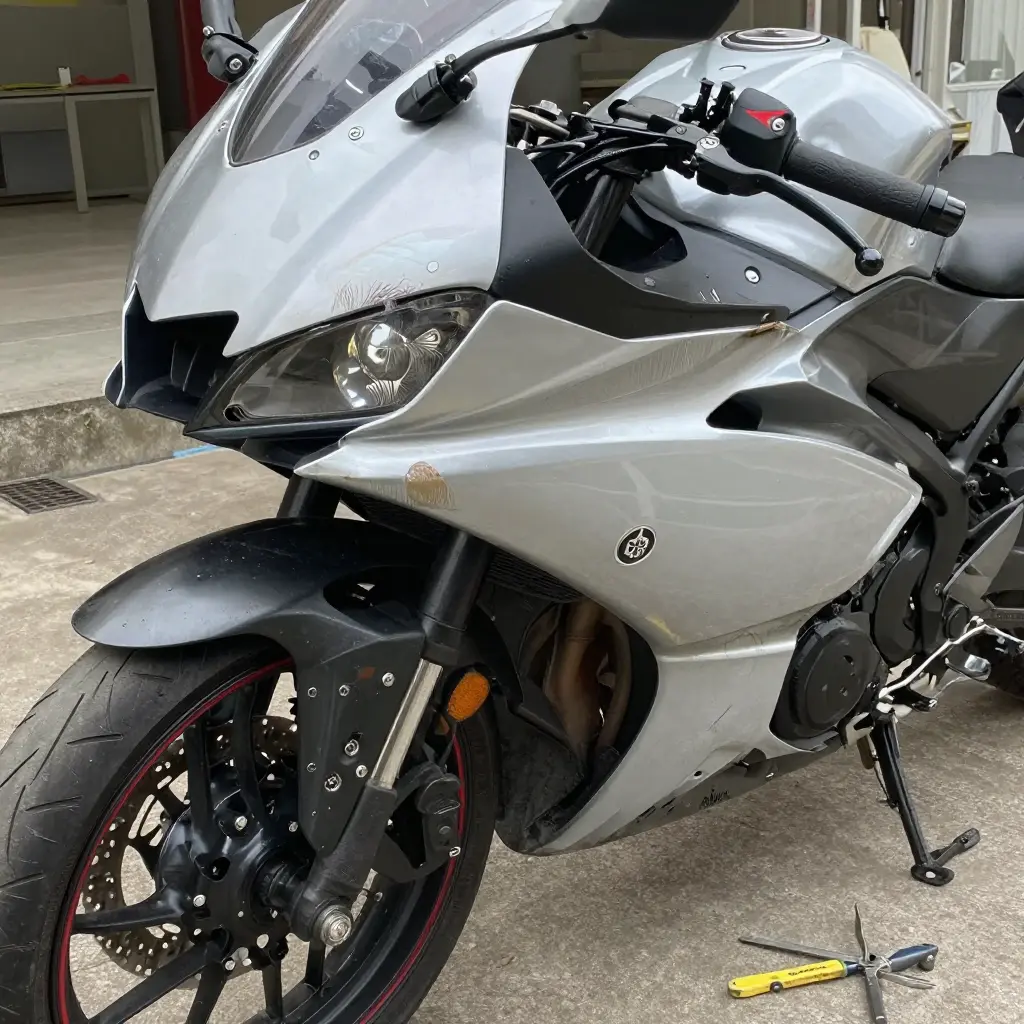
Repair or Replace: The Two Numbers That Decide It
Two measurements decide the repair-or-replace call on a Yamaha R3 left fairing red panel: the stress the mounting tabs are carrying, and how much paint has to be refinished. Price and preference come later. Work through them in that order, because costing a repair before anyone has looked at the tabs is how people end up paying for the same job twice.
1. Structural integrity. Check the upper, mid and lower mounting tabs for stress whitening, hairline cracks and elongated fastener holes. A tab that will not hold torque will not hold a panel gap either, and no amount of paint work corrects a mounting point that has already yielded.
2. Cosmetic coverage. Tape out the refinish area, the blend zones and the edges of the neighbouring panels, then compare that footprint with the total surface of the fairing. Past a certain share, the fairing repair vs replace arithmetic tips to replacement, and it tips hard.
3. Cost. A price only means something once the first two answers exist, because labour and materials scale with both. A replacement panel – OEM, or pre-painted from a custom Yamaha fairings supplier – carries a fixed price that either beats the repair estimate or loses to it.
The rest of this guide takes those two measurements on the R3 specifically, starting with the coolant reservoir bracket and the lower tab, which between them account for most of the alignment and panel-gap complaints on this bike.
Left Fairing Mounting Architecture: Anchors and Load Paths
The left side of the R3 is three mouldings: upper side cowling, side panel, belly pan. Each one attaches to the frame or to its neighbour at a defined anchor, and each anchor carries its share of vibration, wind pressure and contact load. When one point goes soft, its share moves to the remaining fasteners and into the panel itself.
Upper Side Bolt Points
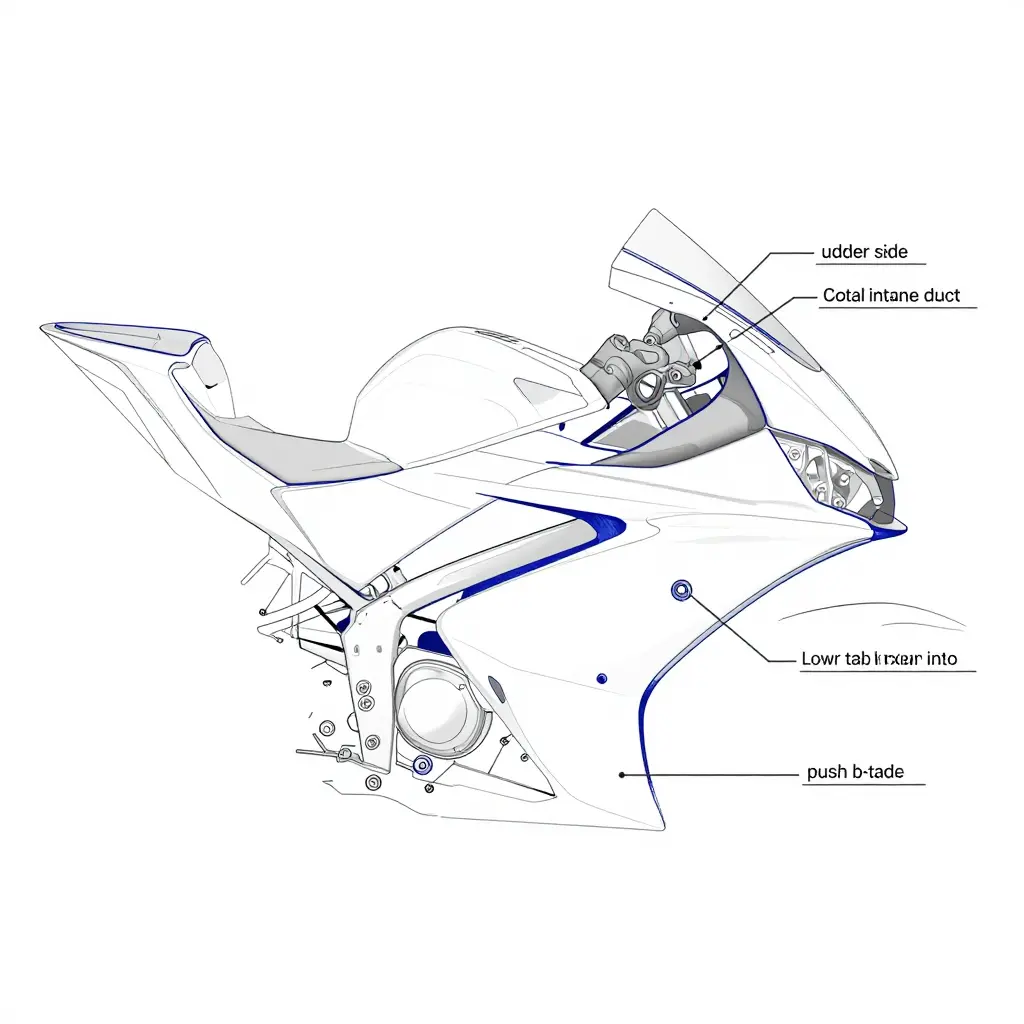
Two M5 flange bolts hold the forward edge of the left upper side cowling to the air intake duct and the headlight bracket. They sit inboard of the outer skin, clamping through rubber grommets and clip nuts rather than against a rigid face, so their job is to resist fore-aft shear and stop the cowling spreading outboard under wind pressure. The forward bolt does more of that work because it sits closer to the leading edge.
Coolant Reservoir Bracket
The coolant reservoir bracket bolts to the frame spar and carries both the reservoir and the inboard face of the left side panel. It works as a standoff: it holds the panel’s inboard plane a set distance off the spar and takes vertical vibration out before that vibration reaches the painted skin. Bend the bracket, or lose its rubber isolator, and the panel has no reference plane left and drifts outboard at the mid-section.
Lower Tab and Belly-Pan Indexing
A moulded lower tab runs down and forward from the left side panel and indexes into the receiving channel at the belly-pan joint. It is the assembly’s only positive locator, so it sets the vertical relationship between the two panels and defines where the seam falls. It carries almost no tensile load and takes all of the indexing load, which is why a cracked tab shows up as a shifted seam rather than as a visibly loose panel.
Push-Rivets Along the Frame Spar
Three plastic push-rivets clamp the inboard flange of the side panel to the spar at evenly spaced intervals. They are compression fasteners, there to hold the panel inboard and damp small movement, not to resist shear. Lose one and its clamp load transfers to the two beside it and up to the coolant reservoir bracket.
| Anchor point | Direction of load path | Primary load carried | Symptom when rigidity is lost |
|---|---|---|---|
| Upper side bolt points (2x M5) | Outboard-to-inboard clamp, fore-aft shear | Fore-aft position of the cowling | Cowling lifts away from the air intake duct; front gap opens |
| Coolant reservoir bracket | Inboard standoff to the frame spar | Inboard depth of the side panel, vertical damping | Mid-panel drifts outboard; panel gap widens near the radiator shroud |
| Lower tab | Forward/downward index into the belly-pan channel | Vertical index and seam position | Seam steps out of plane; tab crack visible on the panel back |
| Push-rivets (3x) | Outboard flange to the spar | Outboard clamp, small-amplitude damping | Flange rattles; load transfers to remaining rivets |
How Load Sharing Breaks Down
Each anchor group controls one degree of freedom, so the assembly only holds its shape with all four intact. The upper bolt points control fore-aft position, the coolant reservoir bracket controls inboard depth, the lower tab controls vertical index, and the push-rivets control outboard clamp.
Lose one and the panel pivots about the remaining anchors instead of sitting on its datum. A bent coolant reservoir bracket lets the mid-panel move outboard, which drags the lower tab out of the belly-pan channel and opens the gap at the seam. The error is magnified at the seam because the whole panel is rotating about the upper bolts, so movement too small to measure at the bracket is obvious at the joint.
That geometry is why a repair that replaces only the red outer skin often leaves the same misalignment in place. Verify all four anchor groups, and trial-fit any custom Yamaha fairings panel against the undamaged right side before final torque, using the opposite panel gap as your reference dimension. Once the bracket and tab are confirmed straight, the ready-to-ship fairings list will show you what is in stock.
Pre-Repair Inspection Checklist
Before you sand, glue or bolt anything back on, run this checklist against the left panel. Ten minutes here is cheaper than a repaint that fails in a month – and if the damage reads as terminal, you can compare replacements in the custom Yamaha fairings range before committing to a repair.
- Cracks at the root of a tab, not at the tip. A root crack means the load is concentrated where the panel flexes, and it will come back.
- Bolt-hole ovality, measured with a caliper or the shank of a drill bit. An oval, worn hole proves the panel has been moving and will not hold a stable gap.
- The coolant reservoir bracket: bends, cracked welds, a wallowed bolt slot. A misaligned bracket pushes the left fairing outward.
- Every push-rivet, for missing, split or seized hardware. A rivet that tore out of its seat has already loaded the ABS.
- Stress whitening in the ABS around the lower tab. Chalky white streaks mean the plastic is fatiguing.
- Cracks that follow a flex line instead of a straight impact crease. Movement-driven cracks mean the panel is still flexing under load.
- Fit of the adjacent right panel, as a baseline for judging how far the left has deformed.
Use the matrix below to grade left-fairing damage by tab stress level and painted area before committing to repair or replacement.
| Damage Condition | Tab Stress Level | Paint Area Affected | Recommended Action |
|---|---|---|---|
| Hairline crack at single tab root; localized paint damage | Low | Under 25 mm at tab root | Repair: weld root, reinforce tab, spot refinish |
| Two or more cracked tabs; skins intact | Moderate to high | Minimal; original paint intact | Replace: cracked tabs cannot hold panel gaps |
| Fully torn lower tab; deformed coolant reservoir bracket | Severe | Underside; largely concealed | Replace: tab loss and bracket deformation misalign panels |
| Deep abrasion across red upper and mid panels | Low to moderate; tabs sound | Large; two full panels | Replace: refinish cost exceeds replacement panel cost |
| Stress cracks radiating from bolt hole into painted face | High; mounting point compromised | Localized around bolt hole | Replace: bolt hole integrity cannot be restored |
| Repairable panel in discontinued OEM color | Low to moderate | Moderate; full repaint required | Replace: discontinued color cannot be matched from factory stock |
Tab stress decides most of those rows. Once the mounting points have lost their integrity, paint coverage and refinish cost only confirm what the tabs already said, which is why pre-painted custom Yamaha fairings usually beat a repair on a compromised panel.
Tab Stress Analysis: When a Tab Repair Actually Holds
On the Yamaha R3 left fairing, tab stress concentrates at the root of the lower tab, and the geometry explains why. The coolant reservoir bracket anchors the upper-rear section, the nose fasteners hold the front, and the lower tab sits in the span between them with nothing supporting it. Every vibration cycle bends the panel across that span, and the bending lands on the tightest radius in the part: the root fillet.
Bolt preload decides how much of that load the fasteners share. An over-torqued fastener crushes the ABS under the washer and turns the bolt hole into a stress riser. An under-torqued one lets the panel fret against the bracket, and that micro-motion starts a crack at the hole edge. Either way the panel deflects and fairing alignment drifts before a crack becomes visible, which is why a widening panel gap is a load symptom rather than a cosmetic complaint. A repair that ignores the unsupported span and the preload value only moves the failure down the road.
Whether a repair survives comes down to three readings, not to how tidy the weld looks. Crack propagation direction shows which way the load is driving the fracture: a crack running across the load path, from the hole toward the outer edge and perpendicular to the root, is being prised open and will keep growing, while a crack running parallel to the tab’s long axis and stopping at a boss, rib or flange edge is largely arrested and can be stabilised. Substrate whitening indicates yield in the ABS: a chalky zone confined to the root is workable, but whitening that runs past the root into the visible face means the material has no ductility left to redistribute load. Hole ovality is the third gate. Measure the bolt hole on two axes with a caliper. Up to 0.5 mm is recoverable with a bushing; 1.0 mm or more means the panel has started to tear off the fastener and the hole can no longer hold preload.
| Condition | Accepted repair method | Decision |
|---|---|---|
| Single crack under 25 mm, no missing material, ovality under 0.5 mm | Plastic weld with ABS rod plus hot staples, root dressed and bushed | Repair holds; re-torque to spec |
| Crack 25-50 mm, or two or more cracks radiating from one hole, or ovality 0.5-1.0 mm | 2-3 mm aluminium or ABS backing plate at least 25 mm wider than the damage per side, four fasteners, fresh bushing | Reinforce; verify fairing alignment afterwards |
| Crack over 50 mm, missing tab section or boss, root whitened end to end, ovality over 1.0 mm, or a previously failed repair at the same site | No weld or plate accepted | Retire the panel structurally |
Plastic welding is the answer only in the first row, and a backing plate only in the second. The plate has to reach at least 25 mm past the damage on every side and carry a bushing, so the load bypasses the root entirely. Past the third row the panel is finished: welding a tab whose substrate has already yielded does not restore fairing alignment, it just holds the panel until the next vibration cycle finishes it off. Owners at that point are usually better served by a fresh panel from our Yamaha R3 fairing range than by a third attempt at the same root.
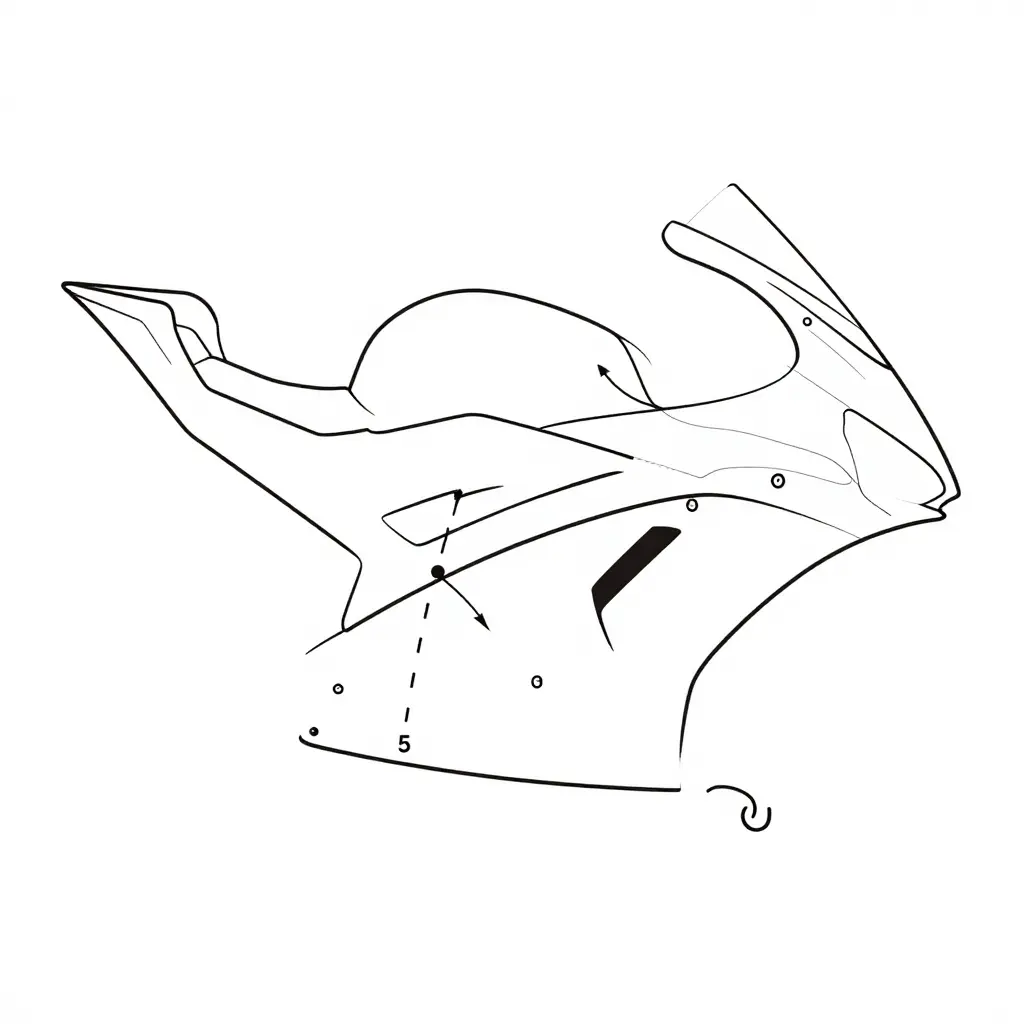
Figure 1. Inboard face of the left fairing, schematic view. No shading, no scene, no lettering: six load-bearing features and the dashed load paths that connect them.
Paint Area Analysis: Red Refinish Coverage and Color Match Risk
Measure before you sand. The economics of a Yamaha R3 left fairing red panel come down to one number: how much red actually has to be refinished. On the R3’s left side the red is not one continuous field. It breaks into three sections – the upper cowl band that wraps the flank of the headlight; the middle side panel, the largest single red field, which bridges the coolant reservoir bracket and the lower tab; and the lower red section on the belly pan that tucks behind the front wheel. Trace the damage with masking tape, then extend the tape outward by the blend distance each defect demands. That taped footprint, not the scratch, is your true paint area.
| Red section (left side) | Approx. share of left-side red | Blend risk if refinished alone |
|---|---|---|
| Upper cowl band | ~25% | Low to moderate, seam hides transition |
| Middle side panel | ~45% | High, large flat field shows banding |
| Lower red section | ~30% | Moderate, but close to road debris |
Those shares are rough figures for the pre-2019 bodywork; the proportions shift a little on later panels. What does not change is the blending problem. A three-stage red resists panel-to-panel blending, because factory and quality aftermarket finishes often put a tinted mid-coat under a semi-transparent top coat, and a top coat that is not fully opaque leaves final hue dependent on mid-coat film thickness to within a few microns. Spray the mid-coat a shade heavier on the replacement panel than the factory did on the adjacent one and the two read as different reds in daylight while looking identical under shop fluorescents. That is the color match trap: the mismatch lives in the mid-coat, not the top coat, so it cannot be sanded and polished out afterwards.
The same logic governs spot repair versus full left-panel respray. A spot repair inside one panel boundary works when the damage sits well away from edges and body lines, because the blend zone stays on one continuous surface. Touch a panel seam, a tab or a graphics edge and you are forced into a full left-panel respray, with the cost rising by the added blend area. Two failures show up only in direct sunlight: clear-coat edge halos, where a repaired edge reads as a dull ring because the coat never flowed into the surrounding film, and metallic orientation, where flakes sprayed at a different angle to the panel flip light and dark as you walk around the bike. Neither is visible under a single overhead lamp.
Rule of thumb for replacing the panel
If the damage plus its blend zones covers more than roughly 30 percent of the left side’s total red paint area, or crosses two of the three red sections or any panel seam, materials and refinish labour alone usually meet or exceed the price of a new panel. Replace it. Below that threshold a contained spot repair stays the cheaper path. Treat the 30 percent as a working figure rather than a specification: on the flat middle panel the blend zone grows quickly, while on the upper band the seam hides the transition and the tape stays narrow. If you are weighing a factory-matched replacement, custom Yamaha fairings can be compared on price and color before you book booth time.
Cost and Downtime Comparison: Repair vs. Replace
The chart below compares estimated parts and materials cost, labor cost, paint and refinish cost, and total bike-down time in days for repairing versus replacing a damaged left fairing on a mid-displacement sportbike such as the Yamaha R3.
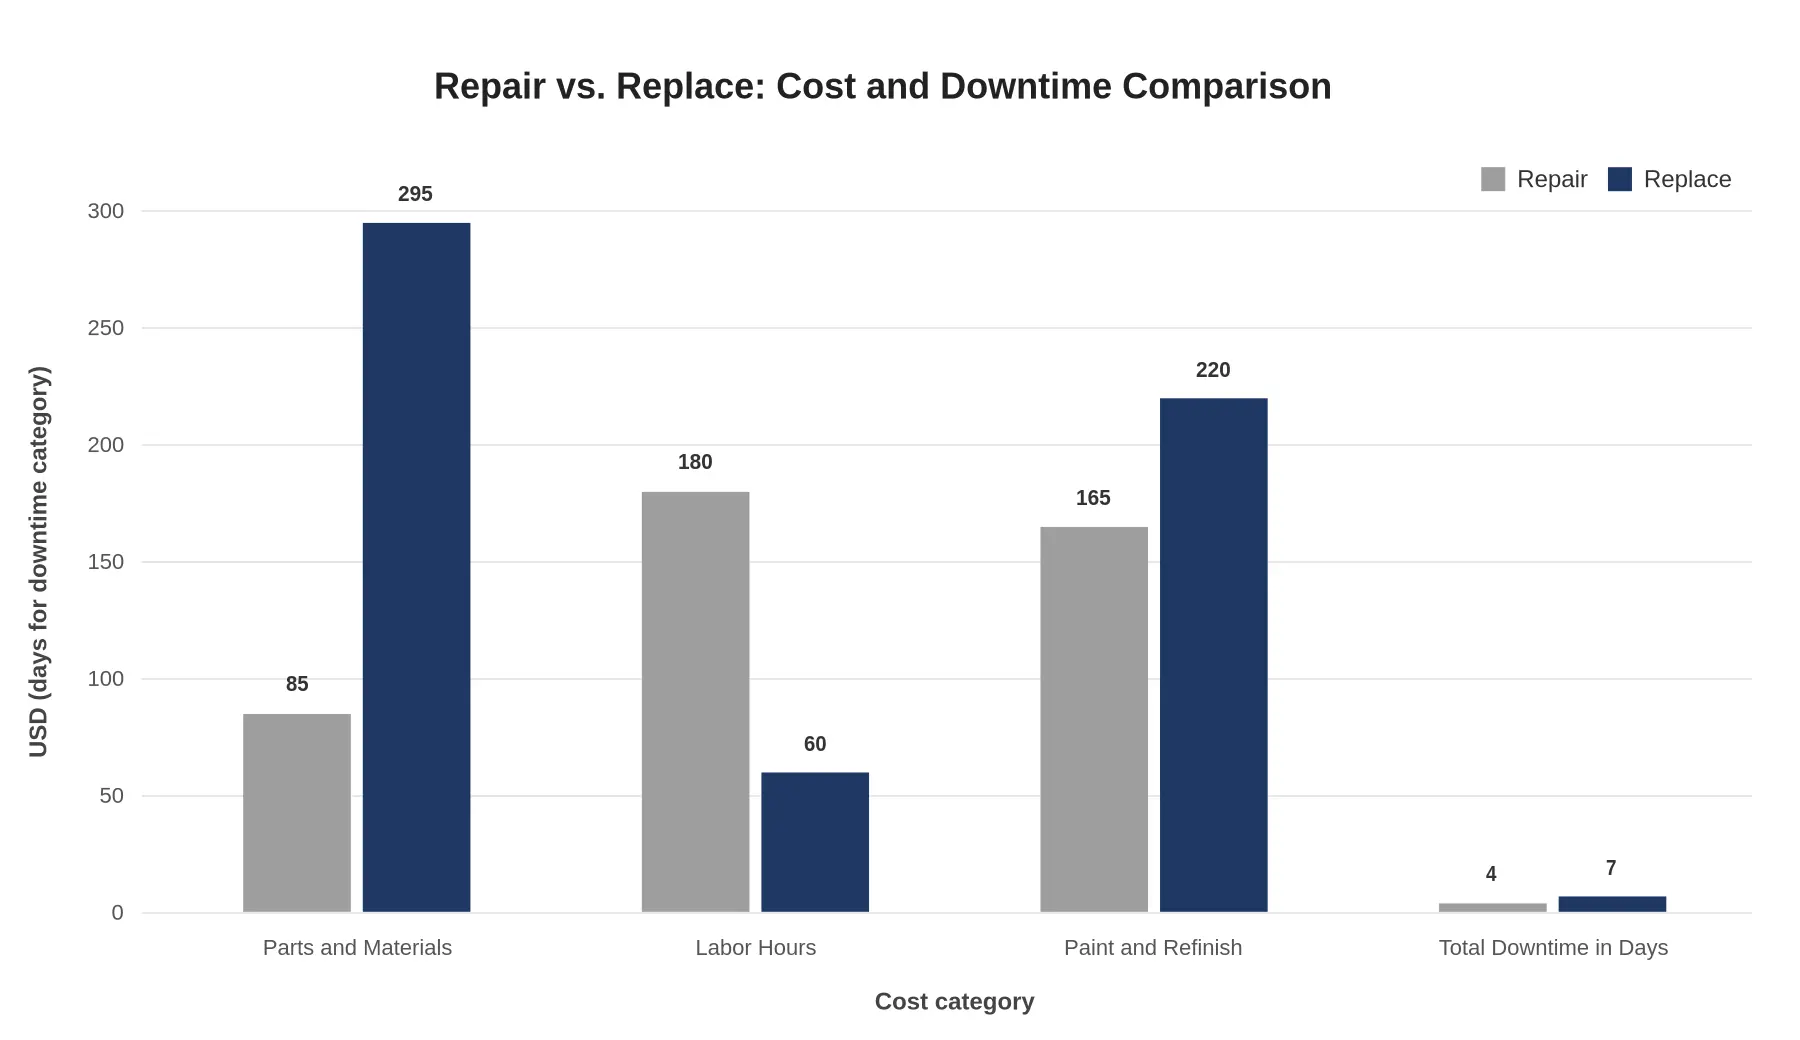
Reading note: These are the figures for the easy case – a structurally sound panel with a contained repaint – and there repair wins on money as well as time, roughly $430 against $575, and three days quicker. Repair stays ahead on labour, not on paint. Paint and Refinish is where a repair stops being cheap: it has to be color-matched and blended into the adjacent upper and lower panels, while a replacement panel arrives finished in a single colour. Add a tab rebuild, a backing plate or a coolant reservoir bracket to the repair column and the two totals meet, which is the crossover that matters. Riders weighing color-match accuracy against turnaround can review Yamaha fairing sets before committing to a path.
Step-by-Step: Repairing and Refitting the Left Fairing
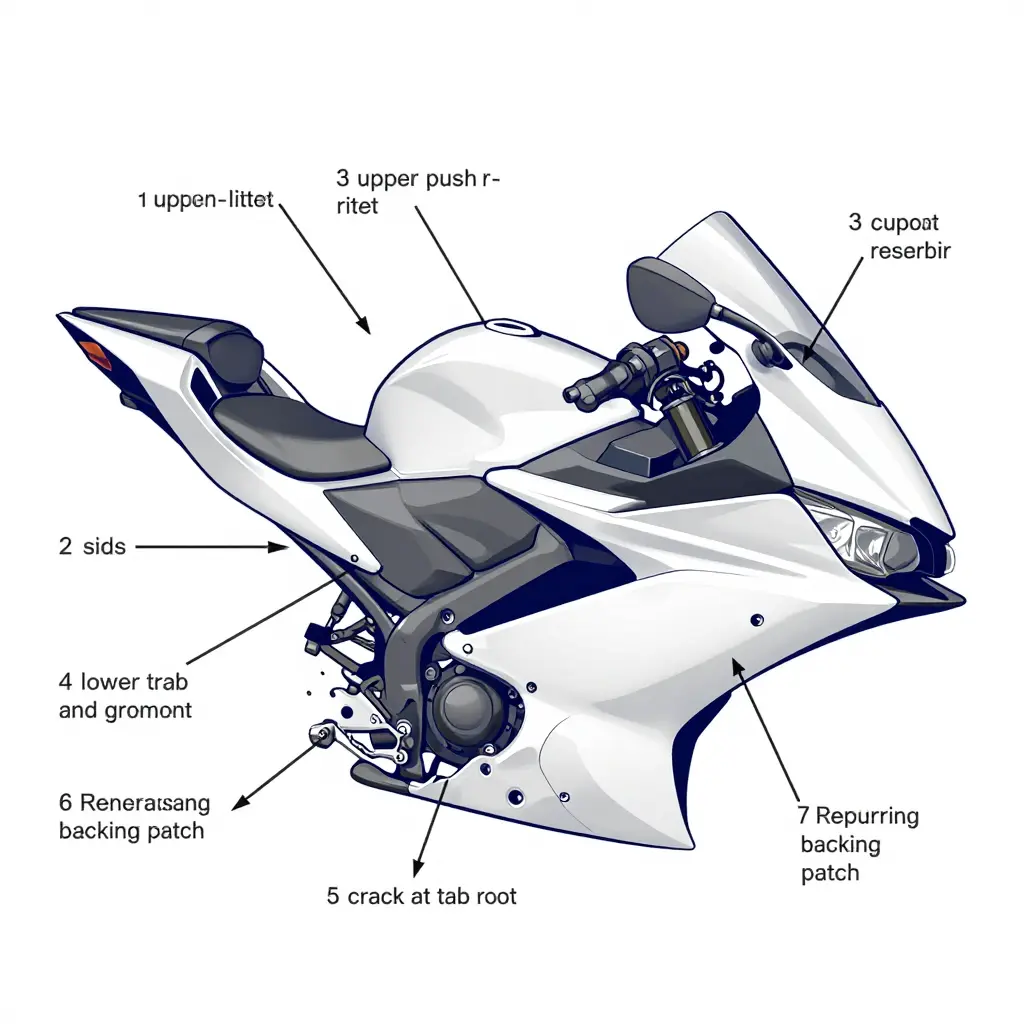
If the damage is confined to hairline cracks and a stressed mounting tab rather than torn paint across a large area, repair is almost always the smarter call. Work through the sequence below in order, matching each step to the numbered callouts in the schematic above. A panel that is still loaded while you weld it will crack again.
Isolate and support the panel (callout 1). Slide a padded stand or a soft strap under the fairing so it carries the panel’s weight before you touch a fastener. Check that the panel sits stable with no flex at the upper mounting point; if it does not, it will drop when the last bolt comes out and load the tabs you are trying to save.
Release the push-rivets and side bolts (callouts 2 and 3). Pry each push-rivet with a plastic rivet tool rather than a flathead, then remove the M5 side bolts in a diagonal pattern. Lay every fastener out in order and count them – a missing or substituted fastener is the most common cause of an uneven panel gap later.
Free the coolant reservoir bracket (callout 4). Unbolt the bracket from the fairing stay and let the reservoir hang forward, clear of the panel. Check that the hose is not under tension: a stretched hose drags the bracket rearward and loads the lower tab every time the bike is ridden.
Close the cracks with plastic welding (callout 5). V-groove each crack along its full length with a rotary burr, then weld it with matching ABS filler rod until the bead is continuous on both faces. Keep the finished weld flush or barely proud – any high spot telegraphs straight through primer and paint.
Add a reinforcing backing at the tab root (callout 6). Cut an ABS doubler around 2 mm thick and weld it onto the back of the tab root where the crack started, overlapping the crack by at least 10 mm on every side so the load spreads into sound material instead of the original stress riser.
Restore the lower tab indexing. Rebuild the locating shoulder of the lower tab with short welds or plastic rod, then file it back to shape using the opposite side as your reference. Dry-fit the tab into its rubber grommet: it should seat with light hand pressure, no rattle and no forced bending.
Test-fit with the adjacent right panel (callout 7). Hang both side panels with all bolts finger-tight and let them settle before you tighten anything. Run a fingertip along the centre seam; the panel gap should stay even and parallel along its length, ideally within about 1 mm front to rear.
Torque the fasteners and fit new rivets (callouts 2 and 3). Fit fresh push-rivets rather than reusing deformed ones, then torque the M5 bolts to the figure in your service manual, in a diagonal sequence. Most M5 bodywork bolts sit in the 5-7 Nm range, and anything threading into plastic rather than a clip nut takes less. Re-check the gap afterwards: if it has moved, a bracket is still under load and needs to be released and re-seated.
Re-inspect after the first ride. Pull the rivet line back after 50-100 km and look for fresh whitening around the repaired tab root. New stress marks mean the backing patch is too small or the reservoir bracket is still preloading the panel – both cheap to fix now and expensive later.
If the tab root turns out to be too far gone to rebuild, or the red is broken across a wide visible area, starting fresh is usually cheaper. You can compare options in this range of custom Yamaha fairings before spending more hours on welding.
Replacement Pathway: OEM Versus Aftermarket Painted Fairings
When replacement beats repair. Repair stays the economical choice while the damage is a scuff that does not cross a color break and the remaining tabs still pull the panel tight against its grommets. Replacement becomes the sounder decision as soon as tab stress reaches the mounting points. A Yamaha R3 left fairing that has lost its lower tab, or cracked at the root of the upper mount, will not hold a consistent panel gap however neatly the visible crack is filled and refinished, because the load simply migrates to the next tab. Paint follows the same rule: a repair spanning more than roughly a palm’s width across a metallic or three-stage red rarely matches under daylight, since flake orientation and mid-coat depth differ from the factory film. When a panel needs both structural tab work and a broad refinish, a new painted panel often costs less than the labour hours involved.
Verifying part number and fitment. Before ordering a Yamaha R3 left fairing red, confirm three identifiers: the model-year band, the color code shown on the parts fiche, and the mounting configuration. Yamaha changed the R3’s bodywork in 2019 and again for 2025, and left panels from different year bands use different tab counts, vent shapes and grommet positions. Cross-check the OEM part number and its color suffix against your VIN rather than the paint you see on the bike, since faded or previously refinished panels mislead. Then confirm what the listing actually includes – the duct insert, grommets and hardware are sometimes sold separately. On any aftermarket panel, dry-fit it before paint or decals: clamp every fastener finger-tight, check that the panel meets the coolant reservoir bracket without preload, and verify the gap along the upper and lower seams.
OEM versus aftermarket painted sets. The practical differences show up in three places:
| Attribute | OEM painted panel | Aftermarket painted set |
|---|---|---|
| Tab thickness | Typically 2.5-3.0 mm ABS at tab roots | Often 2.0-2.5 mm; flexes more, so snug fasteners gently and avoid over-torque |
| Bracket alignment | Indexed to factory fixtures | Varies by mold batch; dry-fit and check the coolant reservoir bracket before paint |
| Red color accuracy | Matched to the factory code for that year | Close on solid reds; three-stage and metallic reds vary more between batches |
| Availability | Year-specific, ordered panel by panel | Full sets or single panels, with a wider style range |
| Price | Highest per panel | Lower; range pricing typically runs 10-40% below other sites |
Thinner tabs are not automatically a defect, but they change how you install the panel: fairing alignment depends on even clamp force, and a thin tab pulled hard to close a gap will stress-crack later. Ask for wall thickness at the tab roots and a photo of the mounting points before you buy.
Summit Fairings lists more than 3,000 styles across nearly all motorcycle models, prices them 10-40% below other sites, and promises a reply within six hours to any question – worth using when you need a thickness or fitment confirmation before committing. Single-panel replacements in factory-matched red are listed in the custom Yamaha fairings collection; if the bike is off the road now, browse ready-to-ship fairings for stock on hand, and compare set options and hardware inclusions in the featured products lineup.
How many cracked tabs must a left fairing have before replacement is the only option?
Two is usually enough, and one is enough if it is torn rather than cracked. Each repaired tab regains its shape but not its original stiffness, so the load shifts to the surviving mounts and the next crack appears at the weakest one. Two hairline cracks at a single low-stress point can still be welded and plated; damage that includes the upper attachment point, or a torn tab, should end in replacement.
Does a repaired lower tab affect panel gaps along the whole side?
It can shift gaps along the entire left side. The lower tab sets the fore-aft and inboard position of the lower cowl, and the R3’s left fairing, side duct and nose form a chain of overlapping joints, so a 2-3 mm datum error at that tab shows up as a widened nose seam and a misaligned tank-to-fairing gap. Keep the original tab plane, thickness and shim stack and the gaps stay inside factory tolerance.
Should a cracked coolant reservoir bracket be replaced with the fairing?
Yes, replace it whenever the fairing comes off. It is thin-gauge, stressed, and already fatigued at the crack, and it locates a reservoir that vibrates constantly, so an ignored crack lets the tank move and loads mounting points that are already suspect. The part costs little next to repeating the alignment work later.
How much paint area makes blending impractical on a red panel?
Past roughly 30 percent of the visible panel area, or any damage that crosses a character line into an adjacent panel, blending stops paying on red. These reds are heavily tinted and often sit over a tinted mid-coat, so a spot repair needs a wide fade zone to hide the transition, and that fade zone usually covers more area than a full-panel refinish. At that point the full repaint is both cheaper and more consistent.
Do aftermarket painted panels match factory red closely enough for a single-panel replacement?
They match the factory color code closely but rarely match a used bike exactly. A panel painted to code looks right beside fresh, unfaded original paint; two or three years of UV exposure has dulled the factory red, so a single new panel often reads slightly brighter in direct sun. If that matters, replace the whole left side or a complete set of custom Yamaha fairings rather than one panel.
Decision Summary: Priority Order for Repair or Replace
Apply the rule in order. Tab stress first: cracking, elongation or a permanently deformed mounting point at the coolant reservoir bracket or the lower tab means alignment cannot be recovered through paint work or shimming, and replacement moves to the front of the queue. Paint area second: a scuff confined to one section of a single panel usually justifies refinishing, while cracked clear coat, stress whitening or damage that crosses panel boundaries tips the balance the other way. Cost last, and only as the full figure – prep, materials and labor hours, not the sticker price of paint alone.
The inspection runs from the bracket and lower-tab load checks through gap measurement at the adjacent panels, so every finding is documented before any money is committed, and the refit step re-torques the fasteners in sequence and confirms even gaps and flush panel edges along the entire left side. When repair is ruled out, a direct source for a Yamaha R3 left fairing red is listed in the custom Yamaha fairings catalogue.