
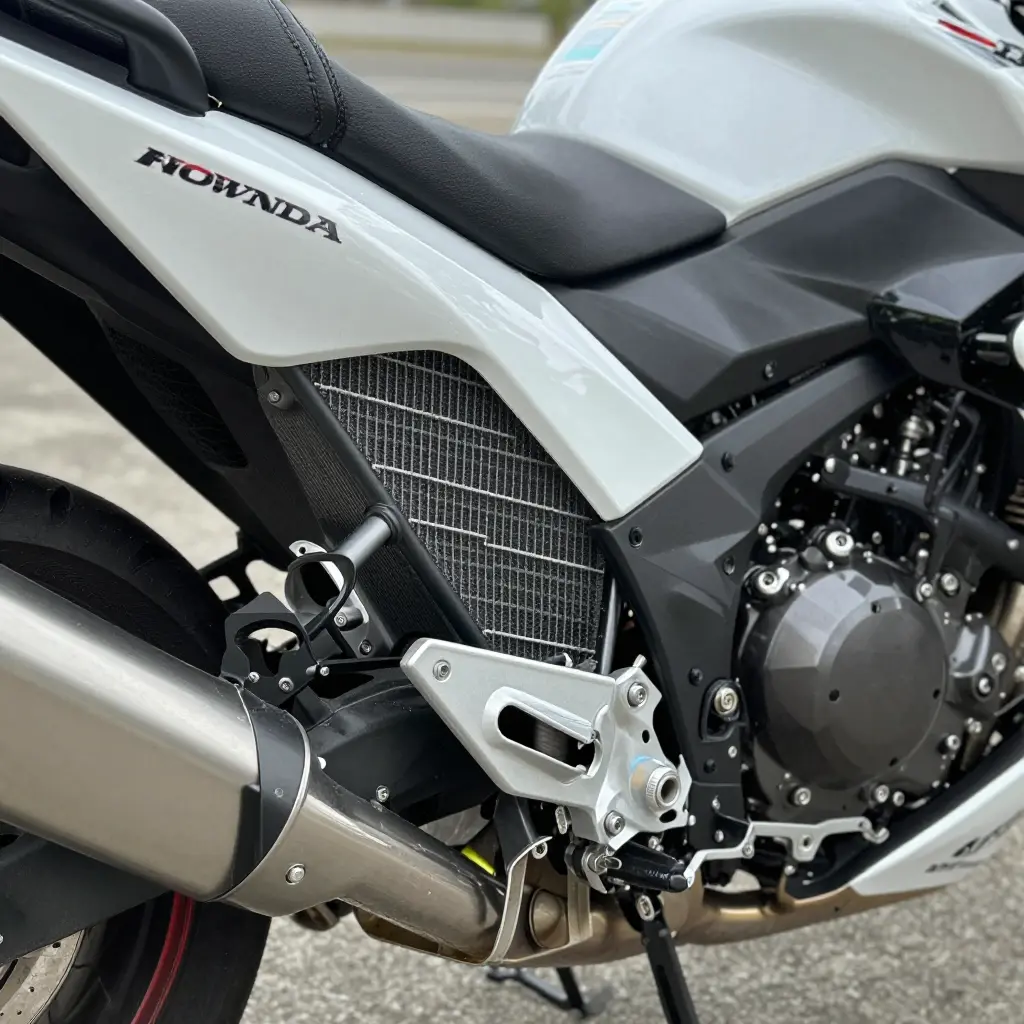
Honda NT650V Deauville Fairing Lowers: What They Are and What Sets the Fit
What the lowers cover
On the NT650V, the fairing lowers are two mid and lower side panel assemblies that close off the engine bay beneath the radiator and wrap rearward around the exhaust downpipes and collector. Each side is normally a mid side panel that continues the upper fairing’s line down past the radiator shroud, plus a lower side panel that finishes the bodywork at crankcase height. Together they form the duct that channels air through the radiator core and keep road spray and radiated engine heat off the rider’s legs.
The two variables that set panel fit
Panel fit on this model comes down to two things you can measure: the radiator airflow path and the lower bracket position. The airflow path sets the lateral clearance between the inner panel face and the radiator matrix; get it wrong and you either close the duct or preload the panel against the core. The bracket position sets the height and fore-aft alignment of the panel’s bottom edge, and every mounting tab is drilled and shimmed off that datum.
Exhaust heat as a fatigue load
Exhaust heat doesn’t break a mounting tab in one go. It works on the tabs at the lower attachment points cycle after cycle, stiffening and embrittling the material until a crack starts where a tab meets the panel face and vibration walks it outward. That is why you can’t judge a panel by its outer skin: measure the two variables first, then look at the tabs on any used Honda fairing panels before assuming a replacement shell will sit correctly.
How Radiator Airflow Dictates Lower Panel Fit
On the NT650V, radiator airflow follows a fixed path: in through the front openings of the lowers, across the core face, out around the engine and behind the lower panels. The duct the lowers form is a pressure boundary, not decoration. Its inlet area, edge alignment and downstream exit volume together decide how much air the core actually gets.
A lower that sits proud of the duct edge, or leaves an open gap at the inlet, spills air sideways past the core face instead of through it. A bent bracket that pushes the panel rearward narrows the duct and shadows part of the core. You end up with a smaller effective core area, less heat rejected per second, and coolant temperature that climbs under sustained load. Fitting a replacement set of Honda fairing lowers with the original bracket geometry intact avoids most of this loss.
Check the airflow geometry before you check how the seams look. Misalignment at the inlet raises static pressure on the inner face, the lower starts to flex and buffet, and the panel gap opens further. That movement goes into the mounting tabs and stays, which is usually where the cracking starts.
So measure clearance at the duct edge and verify bracket position before judging seams: set the bracket, confirm the core face isn’t shrouded, then close the panel gap to specification.
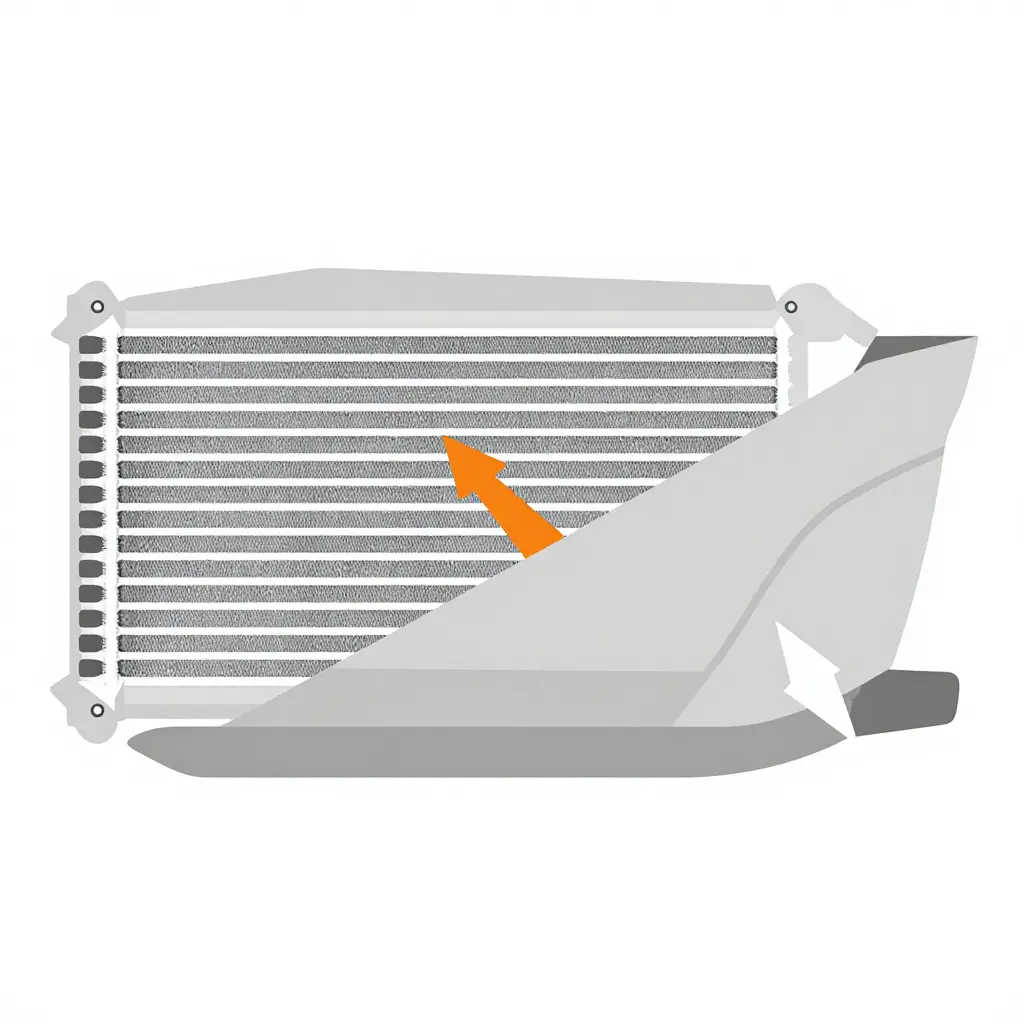
Figure – Lower fairing airflow path (2D cross-section schematic). Air enters at the duct mouth ahead of the panel, is funnelled through the radiator core, and dumps into the low-pressure zone behind the lower fairing. Note how little clearance that path has: pull the panel rearward with a mispositioned or bent lower bracket and the duct mouth closes, the pressure differential across the core collapses, and the fan runs almost permanently. That geometry is why bracket position, not the panel itself, decides whether a set of Honda fairing lowers fits and cools as intended.
Lower Bracket Position and Panel Alignment
Each lower bracket bolts to the frame at the lower rail and, on most configurations, picks up an engine-side attachment point as well. The pair sets the datum the whole lower fairing is aligned from – worth knowing when you compare replacement Honda fairing lowers. Both fixings have to be clean, straight and tightened in sequence before any trim hangs on them, because the bracket carries the frame and engine reference points up into the panel seams.
A bracket sitting too far forward pulls the panel nose toward the radiator shroud and opens the vertical seam behind the shroud; too far rearward closes that gap and crowds the joint with the upper fairing. Height is just as influential. Mounted low, the panel edge drops below the shroud line and the gap along the upper fairing goes uneven. Mounted high, the panel lifts until the fastening slots stop centring on their holes.
Correct alignment reads as parallel seams of even width – typically around 3 to 4 mm on each side – with every slotted hole concentric around its fastener. A displaced bracket gives you a tapered seam instead, tight at one end and wide at the other, with slots visibly offset to one side of their mounting points.
Fix the bracket before you trial-fit a new panel. A bent bracket, or the wrong spacer stack at either the frame or the engine attachment, turns bracket position into preload, and the tabs carry that load instead of the fasteners. They distort, cracks start at the slot roots, and no adjustment afterwards recovers the fit. Measure bracket spacing, replace bent items and fit the specified spacers so the load path stays with the bolts.
Lower bracket position, airflow effect and panel fit outcome
Before you spend money on replacement Honda fairing panels, match what you can see, feel and measure at the bracket to one of the rows below. Each row stands alone as a diagnosis.
| Bracket condition | Effect on radiator duct | Panel fit symptom | Recommended action |
|---|---|---|---|
| Correctly seated with correct spacers | Duct sits square to the core face; full airflow path preserved | Even seam gap along both flanks; tabs sit flush; slot centring true | Treat as baseline; torque to spec and record the spacer stack per side |
| Bent rearward | Duct pulled back toward the engine; airflow diverted off the core face | Leading edge of the lower panel stands proud; seam gap widens at the front | Straighten to datum or renew the bracket; recheck duct clearance to the core face |
| Bent forward | Duct pushed into the core face; lower intake partially restricted | Tab bind at the upper mount; panel bows outward beside the radiator | Reset bracket angle; confirm clearance at the core face before final torque |
| Spacer missing or doubled | Duct offset sideways; seal misaligned and air leaks past the core | Seam gap uneven left to right; slot centring off by one spacer thickness | Restore the correct spacer stack both sides; refit and re-measure the gap |
| Hole elongated from wear | Duct drifts under vibration; duct opening opens and closes with load | Slot centring wanders; fastener will not hold a set position | Replace the bracket, or weld and re-drill; fit flanged hardware |
| Mounted with incorrect torque allowing movement | Duct shifts dynamically; buffeting varies the airflow path | Tab bind plus fretting marks; seam gap changes with speed and heat cycles | Clean mating faces, torque correctly with threadlocker, re-check after heat cycles |
Work through these checks from the front of the assembly rearward before removing or replacing Deauville lower panels, so nothing gets disturbed twice. Each one pairs a physical check with the reason it matters, so a failure points at the likely cause of poor fit or heat damage.
- Look at the radiator core face for trapped debris and bent fins. Blocked airflow raises core temperature and pushes hot air onto the lower panels.
- Check each lower bracket sits square to the frame with a straight edge. A twisted bracket loads the tabs unevenly and drags the panel out of alignment.
- Count spacers and check fastener length at every fixing point. A missing spacer or an over-long bolt distorts the tab or bottoms out in the captive nut.
- Inspect every mounting tab for hairline cracks and stress whitening. Whitened plastic marks a tab that has already flexed past its elastic limit.
- Check the slot edges for elongation around the fasteners, since oval holes let the panel shift under vibration and reopen the seam gaps you are trying to close.
- Measure the gap between the lower panel and the exhaust collector. Too little clearance lets radiant heat soften and permanently deform the plastic.
- Confirm the duct edge seats flush against the radiator shroud. A lifted edge spills air around the core instead of forcing it through the fins.
- Record seam gaps at the tank and mid-panel joints with a feeler gauge before removal, so you can reproduce the original alignment on reassembly.
Correct anything that fails here before a replacement set of Honda fairing lowers goes on, or the same misalignment simply transfers to the new panels.
Exhaust Heat and Mounting Tab Fatigue
On the Deauville the lower panels sit close to the downpipes and collector, so heat reaches them two ways. Radiant heat from the pipes warms the inner panel face directly, and convective heat rises with the air flowing past the exhaust and collects around the lower edge. The inner face ends up with a temperature gradient: hotter near the exhaust and the lower mounting points, cooler toward the upper and outer surfaces. That matters because the moulded tabs are thin, load-bearing features with very little material to spread heat or stress.
Repeated heat cycles soften the tab material and cut its stiffness, while airflow around the panel keeps it moving and vibrating. Softened tabs flex more than the panel around them, so the tab root works as a hinge, and you get a fatigue crack rather than a single overload break. It usually shows first as whitening or stress crazing at the root; later a crack opens and the tab separates from the panel.
Heat fatigue leaves whitening, crazing and root cracks. Impact damage leaves scuffing, gouges or a clean fracture straight away.
Once one tab cracks it stops sharing load. The rest carry more vibration and panel movement, which speeds up further cracking and can shift the fit. A lower panel that sits unevenly or feels loose at the bottom is worth taking off and inspecting before the mounting points are gone. For owners comparing options, Honda fairing lowers with reinforced lower mounting areas are part of a durable repair plan.
Where the lowers actually break
Reports of cracked and snapped tabs on these panels cluster around the areas sitting in the radiator’s hot airflow with the least structural support behind them – not around the fastener bosses bolted to the frame.
The chart orders six common failure locations from most to least reported. Read it as a diagnostic ranking, not a laboratory result: it comes from workshop repairs and owner reports, so it tells you where to look first rather than giving a failure rate.
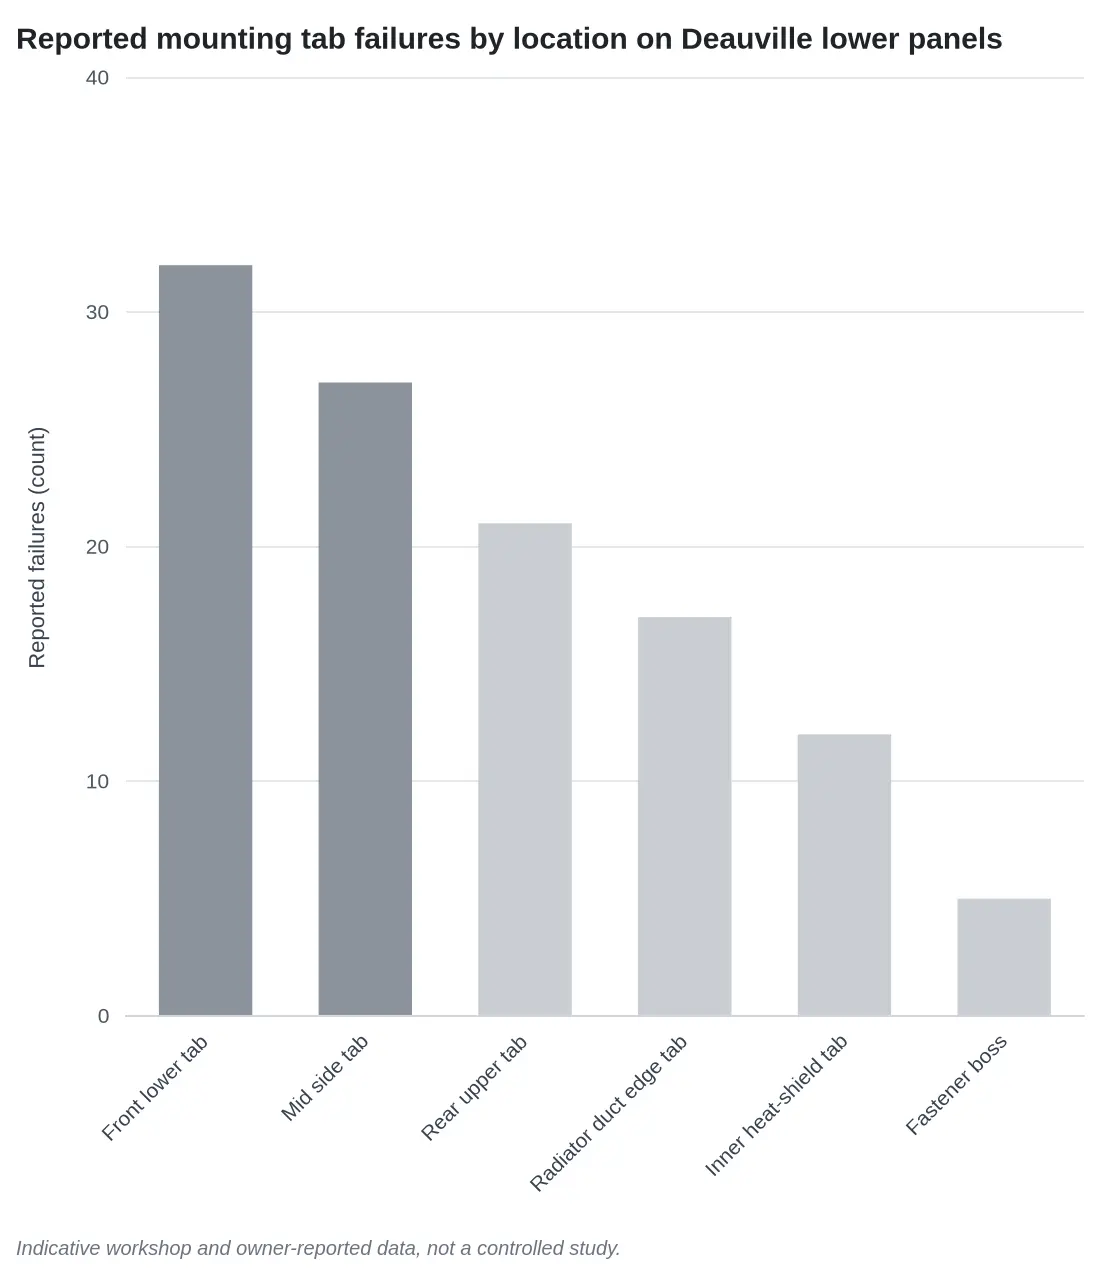
Source: indicative workshop and owner-reported data compiled from Deauville lower-panel repairs, not a controlled study.
The two hottest, most heat-cycled tabs – front lower and mid side – sit at the top, while the fastener boss, the one point bolted to solid backing, sits at the bottom. Heat and thin unsupported ABS do more damage here than mechanical load. On a used panel, start your checks at the front lower tab and work down the list. If a panel is past saving, a replacement Honda fairing set usually costs less than chasing four separate cracks.
Deciding Between Repair and Replacement
The tab decides it. A tab that is cracked but complete has kept its position, so you have a reference to work back to: solvent-weld the crack, bridge it with a backing plate, and the repair holds. A tab that has snapped off and vanished takes that reference with it. You are bonding a new tab to a guessed location, and a few millimetres of error there shows up at the duct edge and the bracket holes. A missing tab is a reason to look hard at replacement, not an easy fix.
Material comes next. Genuine Deauville lowers are ABS, which takes ABS slurry or MEK-based solvent welding and a mechanically fastened backing plate without drama. Fibre-reinforced aftermarket panels need a proper resin-and-glass layup at the repair; a filler-and-paint patch may look right and then fatigue where the fastener clamps it.
Can a heat-affected tab root be reinforced?
Only if the surrounding material still has bite. Flex the panel beside the root: if the surface is chalky, has lost its gloss, or cracks instead of bending, the polymer is embrittled, and any reinforcement just transfers load into sound-looking material that is about to fail. A clean fillet plus an aluminium or stainless plate behind a root that still flexes is a legitimate repair; a plate on powder is not.
| Condition | Repair | Replace |
|---|---|---|
| Tab cracked but complete | Yes, weld and back it | Only if root is embrittled |
| Tab missing | Marginal, reference lost | Yes |
| ABS panel, sound root | Yes | Not needed |
| Fibre-reinforced panel | Layup only | Often cheaper |
| Multiple heat-zone tabs failed | No | Yes |
| Duct edge deformed | No | Yes |
Cost and colour
Compare like with like. Repairing a partial set means one panel, one or two tabs, consumables and a paint blend across a local area. A replacement lower set means both sides in one finish, and you skip the second round of labour when the opposite tab lets go a season later. summitfairings.com stocks over 3,000 styles at 10-40% below other sites and answers fitment questions within six hours, so you can compare Honda fairing sets before committing to a repair.
Colour is the cost nobody budgets for when only one side gets replaced. Twenty-year-old paint has shifted, and a single fresh panel reads differently against a faded opposite side in daylight, even in the same code. If that mismatch won’t do, you are refinishing both sides anyway, which erases most of the saving. On a non-standard colour or a two-tone scheme, ordering custom Honda fairing finishes for both sides in one go beats blending by eye.
When to replace outright
Replace when two or more tabs at the heat-exposed mounting locations have failed, or when the duct edge is deformed enough that the airflow path along the radiator is no longer consistent side to side. Neither failure stays cosmetic: both change how the panel loads the bracket and how much air reaches the radiator, and no amount of welding restores a distorted duct lip.
Mapping the Lower Panel: A Flat Reference Schematic
Photos of a used lower rarely show what you need to know. Lens distortion, shadow and exhaust grime hide the two things that decide fit: where the six mounting tabs sit, and how close the material runs to the header. The schematic strips all of that away and leaves geometry, so you can trace tab positions and compare them with the bracket measurements further down.
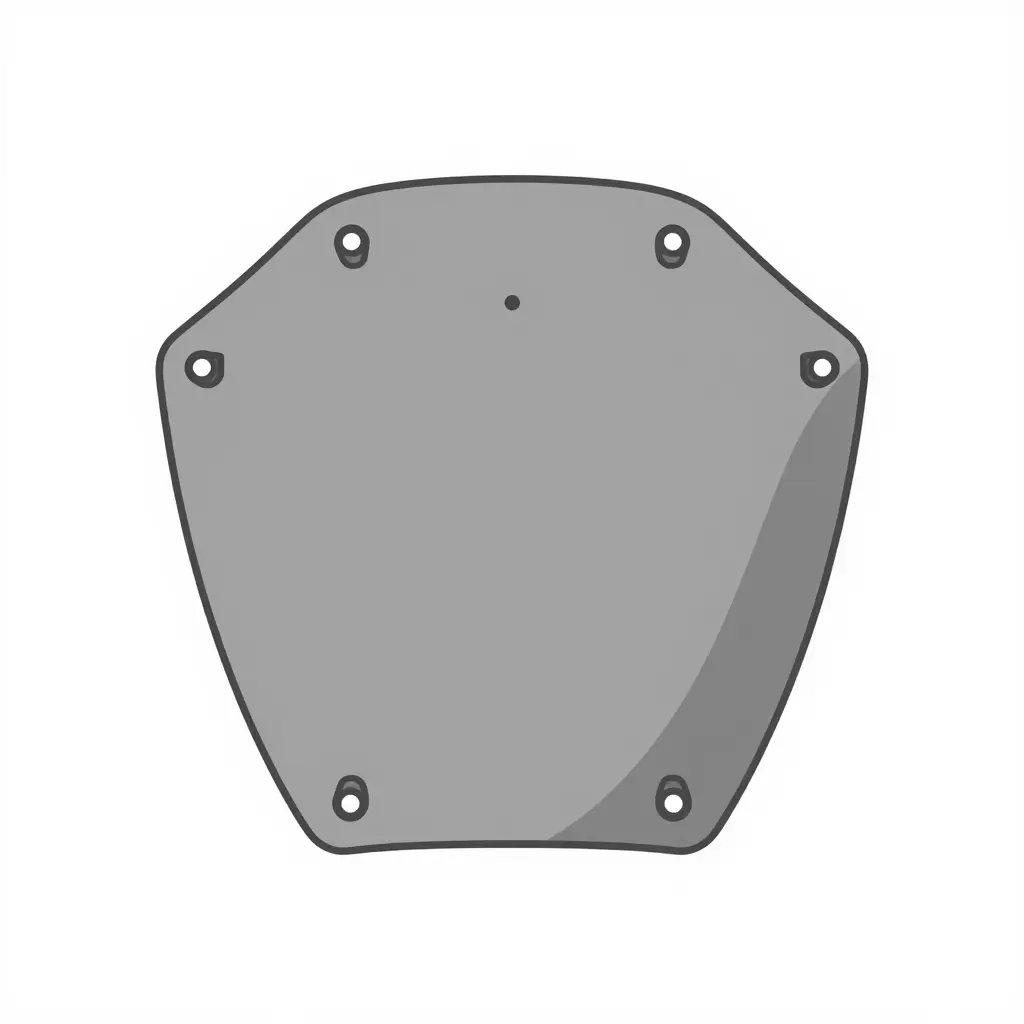
How to Read the Shapes
| Shape in the drawing | What it represents | Why it matters for fit |
|---|---|---|
| Outer outline | Inner face perimeter of the lower panel | Reveals warping or trimmed edges from a previous repair |
| Six small tabs with circles | Mounting tabs and their bolt hole centres | Tab spacing must match the bracket, or the panel will not sit flush |
| Two plain circles | Bracket contact points against the frame | Contact points carry load; cracks usually start here |
| Shaded corner zone | Area closest to the exhaust | Highest heat exposure – the first place to embrittle and crack |
The drawing is deliberately not a photo of a real part. It is a neutral map, so a panel on the bench – or a replacement you are ordering – can be compared against the same reference without arguing about lighting or paint colour. If you are weighing new panels against repairing an original set, our Honda fairing panels give you a like-for-like starting point on tab layout and material thickness.
Count tabs from the front edge, note which holes are elongated rather than round, and tape off the shaded zone on your own panel. A missing tab or a slotted-out hole almost always means the panel was forced onto a misaligned bracket – chase that before bolting anything back on.
Fitting Sequence for Replacement Lower Panels
Work through this order on each side, and don’t torque anything until steps 5 and 6 have checked out.
Verify and correct the lower bracket position. Offer the new panel up to the frame and compare the bracket eyelets with the original mounting points before fitting a single bolt. A bent or shimmed bracket puts every downstream tab off-centre, so correct the bracket rather than forcing the panel to suit it.
Check spacer length and fastener length. Confirm the correct spacer sits behind each fixing point and that no bolt protrudes further than the original. An over-long fastener bottoms out in a blind boss and cracks the tab, while a missing spacer pulls the panel inboard and distorts the duct that feeds radiator airflow.
Trial-fit the panel without fasteners. Hold or tape the panel in place dry and confirm the duct edge seats squarely against the radiator shroud. That separates a shape problem from a bracket problem, and tells you whether to adjust the mount or return the panel.
Insert the fasteners loosely and centre each tab in its slot. Thread every bolt by hand until it just catches, then slide the panel until the slots sit centred on their holes. Loose assembly lets the panel find its natural position; tightening one corner first preloads the tabs and cracks them later.
Check clearance to the exhaust collector. With the panel fully seated, measure the gap between the lower edge and the collector. Heat expansion and engine movement need a few millimetres of air, and a panel resting near the collector will discolour and eventually crack.
Verify seam gaps against the upper fairing. Run a finger or a small gauge along the joint and check the gap is even front to back. An uneven or pinched seam usually means residual bracket misalignment, and a seam that traps the panels together transmits vibration instead of isolating it.
Confirm the radiator airflow path is unobstructed. Look through the duct from the front before final tightening: no foam, wiring or bowed panel across the intake. Restricted radiator airflow is the usual cause of overheating after a fairing swap, so check it again once the bolts are torqued.
Panels from a matched Honda fairing set follow this sequence more closely, because tab positions are moulded consistently between moulds.
FAQ: Honda NT650V Deauville Fairing Lowers
Does removing the lowers improve cooling on this model?
No. The NT650V lowers are ducted panels: they guide air toward the radiator and seal the sides so it goes through the core rather than around it. Pull them and air spills around the engine instead. Most owners who strip the panels gain cooler shins and hotter coolant at cruising speed. If the bike runs hot, test the fan switch, thermostat and radiator core condition before you touch the bodywork.
Can cracked mounting tabs be repaired reliably?
Yes, provided the tab is ABS and you solvent-weld or hot-air-weld it with a matching filler rod plus a backing plate, not just cyanoacrylate. A glued tab carries no load once heat cycling begins and will crack again at the same stress riser. A welded tab with a small gusset spreads the load and outlasts the surrounding panel.
Do aftermarket replacement lowers fit the same as original panels?
They fit as well as the mould and bracket they were built to, which on a good set means every factory mounting point lines up without slotting. Cheap sets pull the bracket out of alignment, hold the panel against the exhaust, and crack the inboard tab within a season. If your originals are cracked in several places, replacement is the logical route: check the ready-to-ship fairings collection for panels that are already moulded and inspected.
Does heat shielding or wrapping reduce tab failure?
Yes, but only the reflective type. Aluminium heat-shield mat with a small air gap cuts radiant heat reaching the lower panel far more effectively than wrapping the header pipe. Header wrap on a street bike traps moisture against mild steel and accelerates corrosion, so reserve it for track use or stainless systems.
What torque and clearance checks matter most after fitting?
Snug every bracket fastener first so the panel finds its own position, then torque the M5 and M6 panel screws to the factory figure, typically 5 to 9 Nm and nothing more, because the plastic threads strip long before the bolt bottoms. Allow 10 mm minimum clearance at the header pipes and at full fork compression, and check the lower edge clears the front wheel at full lock.
Closing Reference Summary
Radiator airflow and lower bracket position decide whether NT650V Deauville fairing lowers sit correctly. A bracket that is bent, shimmed unevenly or mounted off its datum will not let the panel align no matter how carefully you offer it up, and airflow through the core suffers at the same time. Exhaust heat is the other half of the problem: sustained radiant heat cycling through the header area hardens and fatigues the mounting tabs, so a tab that looks intact may already be cracked at the root. Confirm bracket position before fitting any replacement panel. A new lower bolted onto a distorted frame simply moves the load into fresh tabs and repeats the failure.
Work through the components in order and record the results:
- Bracket set – compare both lower brackets against a known straight reference, checking for twist and elongation at the bolt holes.
- Spacers – confirm the correct spacer at each mounting point; a missing or doubled spacer shifts the whole panel.
- Correct-length fasteners – use fasteners that engage the full thread without bottoming out or crushing the tab.
- Heat shielding – inspect and renew reflective shielding between the header pipes and the lower panel.
- Tab inspection – check every tab for hairline cracks, whitening and thread damage before reuse.
- Seam gap measurement – measure the gap at each panel seam so alignment is verified with a number, not by eye.
Replacement lowers are available through the featured products range, with colour and finish variations covered under custom fairings, while remaining stock and clearance items sit in the general listings. summitfairings.com stocks over 3,000 styles priced 10-40% below other sites, and questions are answered within six hours.