

Fit Is Measured, Not Eyeballed
Two dimensions decide whether a replacement Honda CBR 600 F4i fuel tank fairing fits: side tab spacing and clearance around the fuel pump. Paint match and gloss come afterwards.
The tank cover is a structural interface, not a cosmetic panel. Its side tabs locate on the tank’s mounting points, and the spacing between those tabs has to match the tank at the seam. A shell photographed at a flattering three-quarter angle can look flawless while its tabs sit four or five millimetres wide. On the bike that error has nowhere to go. The cover rides proud along the frame spar, the seam against the tank opens into a visible gap, and the fasteners either cross-thread or pull the plastic into a warp that cracks inside a riding season.
Pump access is the second gate, and buyers forget it. The F4i carries its pump flange and retaining ring under the tank, so any panel that reaches over them must clear the ring, the pump harness and the high-pressure line. A shell pulled from a different mould revision can pass a visual check and still foul the flange, which lifts the panel and leaves a seam gap no shim will close. That is why we run every replacement shell through four checkpoints before it goes near a bike, beginning with the Honda fairing collections we stock, fitting each one to a known-good tank.
The four checkpoints, in order: tab spacing, pump access, tank mount rubber condition, heat shield clearance.
Spend five minutes with a tape measure and a set of digital calipers and write the numbers down before ordering replacement fairings through catalogued Honda CBR bodywork. A 2 mm error on a tab separates a bolt that threads by hand from one that fights you all afternoon.
| Measurement Point | What to Measure | Typical Stock Value | Acceptable Range | Failure Symptom If Out of Range |
|---|---|---|---|---|
| Left upper tab centre-to-centre | Distance between the two upper mount hole centres, left panel | 168 mm +/- 1.0 | 167 – 169 mm | Panel bows inward, upper bolt holes refuse to line up |
| Right upper tab centre-to-centre | Distance between the two upper mount hole centres, right panel | 168 mm +/- 1.0 | 167 – 169 mm | One side sits proud, visible step against the frame spar |
| Rear tab to tank seam gap | Gap from rear tab face to the tank lower seam | 3 mm +/- 1.0 | 2 – 5 mm | Tab contacts tank, rubs paint, stress cracks at the seam |
| Tab thickness at mounting boss | Caliper across the tab at the boss, not the tip | 5.0 mm +/- 0.3 | 4.5 – 5.5 mm | Too thin cracks; too thick binds the grommet and bottoms the bolt |
| Tab slot width vs bolt diameter | Slot width against the 6 mm mounting bolt | 6.5 mm +/- 0.2 (about 0.25 mm clearance per side) | 6.3 – 6.7 mm | Undersize binds and strips threads; oversize elongates and rattles |
| Overall tab-to-tab diagonal | Corner-to-corner span across all mounting tabs | 232 mm +/- 1.5 | 229 – 235 mm | Panel skews, nose gaps open, both sides cannot be aligned at once |
Treat the figures in the middle columns as workshop references to check your own panel against, not as Honda service limits: measure your original cover first, and use its numbers where they differ. Take the readings with the panel dry-fitted and the tank mount rubbers seated, then write the figures on the inside of the fairing so the next owner inherits your homework.
Side Tab Spacing: The Measurement That Decides Replacement Fit
Side tab spacing is taken one panel at a time: the centre-to-centre distance between the mounting tabs down that side, and the matching distance on the opposite side, measured along the tank’s longitudinal axis. Those two numbers set where the panel sits relative to the fuel tank, the frame spar and the bolt bosses beneath. On a CBR 600 F4i the tank cover is located by its tabs before any fastener is tightened, so tab spacing is the datum every other measurement references. Record it first.
How Tab Spacing Controls Panel Alignment
A tab pair that sits wide pushes the panel outward at that station; a pair that sits narrow pulls it inward. Because the panel is rigid between tabs, the error does not stay local. It travels forward, where the gap against the side fairing opens or closes, and rearward, where the panel either overlaps the seat unit or leaves a step. Get the spacing right and the fasteners draw down with light, even resistance while the seam lines stay parallel. Geometry first, torque second.
What a Few Millimetres Actually Does
Two to three millimetres of extra spacing at one tab is enough to open a visible gap at the opposite edge, because the panel pivots about the remaining tabs and multiplies the error across its length. The same error in the other direction forces the bolt through a misaligned hole. The bolt then clamps the boss at an angle, loading one side of the boss wall and crushing the rubber mount instead of seating flat against it. A boss pulled off-axis cracks at its root, and the crack shows up later as a white stress line around the fastener hole.
Diagonal Measurements Reveal a Twisted Moulding
Straight-line spacing alone will not catch a twist. Measure diagonally from the front-left tab to the rear-right tab, then from the front-right tab to the rear-left tab. The two readings should agree within about a millimetre. A consistent difference means the moulding is twisted rather than simply wide or narrow, and filing the slots will not seat it flat. Write both diagonal figures down before you modify anything.
The Measurement Routine
Work on a clean, supported panel at room temperature and log every number. Fitment problems on CBR 600 F4i replacement fairings usually trace back to one out-of-tolerance station, not a general build fault.
- Tape or caliper: use a steel tape for spans over 100 mm and a vernier or digital caliper for tab thickness and slot width.
- Left-right symmetry: measure each tab station on both sides and compare them. Record the difference, not just the absolute value.
- Tab thickness against boss depth: measure the tab at its base and compare it with the depth of the OEM boss recess. A tab thicker than the recess bottoms out before the panel contacts the boss face.
- Slot width against bolt diameter: measure the slot with the caliper and confirm it clears the OEM bolt shank with the washer seated.
A two-millimetre error at the tab becomes either a gap you cannot shim out or a boss you cannot save, so measure side tab spacing and both diagonals before you tighten a single bolt.
Keep each side within 1 mm of your original panel’s spread, and expect small differences to close up under bolt torque. Once a tab is 3 mm or more out, the panel is wrong and no amount of shimming will make it right. A new moulding that measures outside tolerance should go back to the supplier rather than under a file; compare it against a known set of custom Honda fairing sets and replace the panel.
Side Tab Spacing Measurement Points (Inner Face)
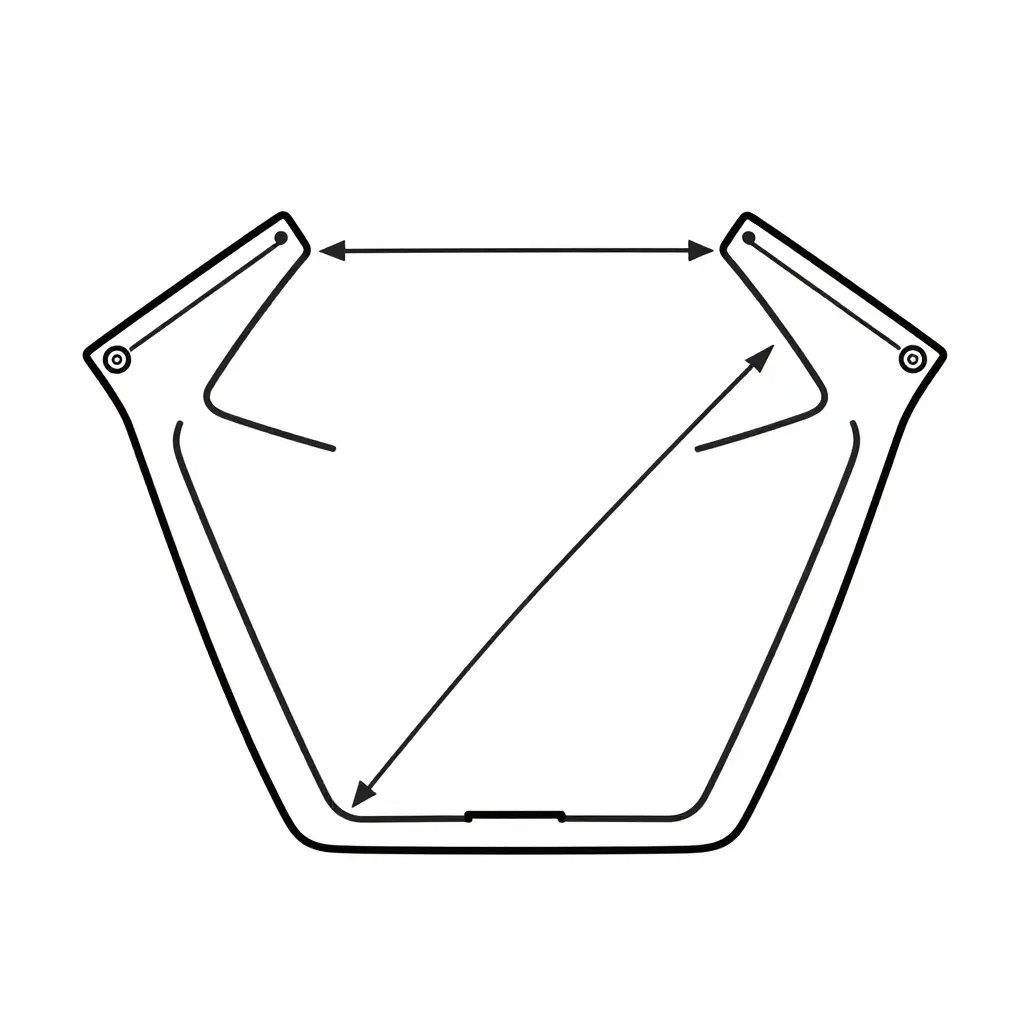
The schematic marks the six reference points used throughout this guide: the upper left tab centre and the upper right tab centre, the horizontal centre-to-centre span between them, the vertical span from the tab line down to the lower locating point, the diagonal corner to corner, and the tab slot width at the retaining notch. Check your original panel at those same points before ordering custom Honda CBR fairings, so the replacement drops onto the existing grommets without slotting or shimming.
Measure Before You Buy
Before you place an order, run this bench checklist with a tape measure, calipers and a straightedge on the panel, not on the bike.
- Measure tab spacing across both sides of the tank cover and record each side against your original panel’s spread, aiming for 1 mm or better.
- Compare the two diagonals, front-left to rear-right and front-right to rear-left; they should differ by no more than 2 mm.
- Mic tab thickness at three points on each tab and check the reading against the boss recess depth, not just the tab tip.
- Measure slot width and confirm the slot clears a 6 mm bolt shank with roughly 0.25 mm per side left over.
- Measure the pump cutout against your stock retaining ring, checking diameter, centring and the position of the hose exit.
- Inspect the rubber mounts and heat shield on the tank itself, since hardened rubber and a swollen shield will hide a good panel’s true fit.
- Verify fastener hole diameters and thread pitch against your OEM bolts, so you are not drilling a brand-new fairing.
If any number comes up outside spec, compare it against the listed dimensions in our Honda fairing collections before you commit to a tank panel.
Fuel Pump Access and Flange Clearance: The Second Fitment Gate
Side tab spacing sets the first gate; fuel pump access sets the second. A replacement tank fairing only mounts cleanly if its cutout is concentric with the fuel pump flange, wide enough to expose the full retaining ring, and oriented so the pump connector and hose path exit without side load.
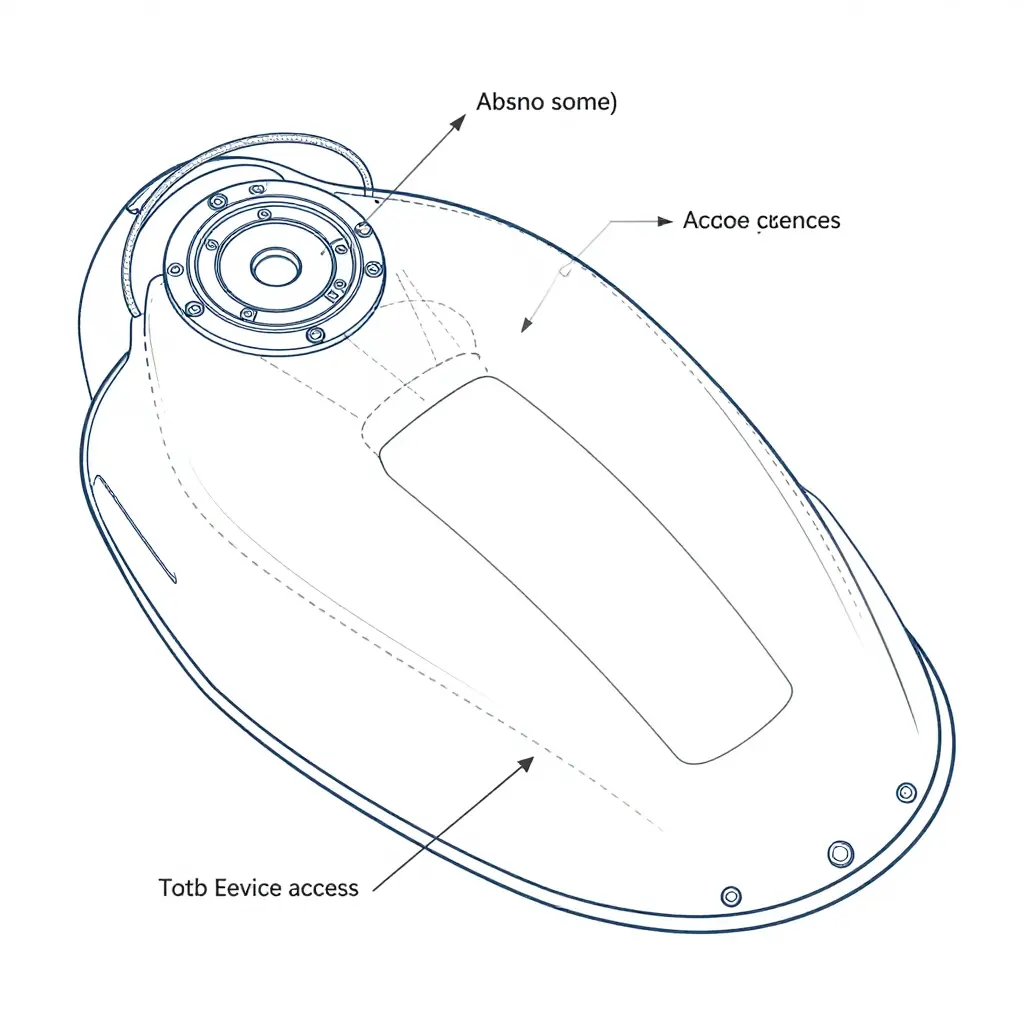
Measure the Cutout, Not the Panel Outline
Set a caliper across the cutout in two axes and compare it with the outside diameter of the flange plus the retaining ring sweep. The opening should clear the ring by roughly 3-5 mm per side. Any less, or any offset from centre, and the ring cannot be turned with a tool once the panel is bolted down.
Check the cutout’s fore-aft position against the pump body and the outlet spigot as well. A cutout that is correct in diameter but shifted rearward forces the hose to run a tighter radius than the OEM routing and pushes the connector housing into the panel edge.
What an Undersized or Offset Cutout Does to Fitment
When the cutout is too small or shifted, the pump flange holds the panel away from the tank fairing seating surface. The panel sits off the tank seam by the interference amount, the tab screws go in at an angle instead of square, and every tab is loaded in tension rather than clamped flat. That constant preload plus engine vibration is what produces stress cracks at the tab roots, typically within the first few hundred miles. Trimming the cutout afterwards is possible, but by then the tab geometry has usually been strained.
Clearance Checks With the Tank Installed
Mount the tank and panel on the bike, then verify three things before final torque:
- Pump connector: the lock tab must clear the cutout edge with 2 mm or more of gap, and the wiring harness must carry no pressure.
- Hose path: the supply line should follow a smooth arc, with no pinch point at the cutout lip and no contact with the panel underside through the full range of steering and suspension travel.
- Ring service access: a ring spanner or the OEM tool must reach the retaining ring through the cutout without removing the fairing panel. If the ring is not serviceable in place, the cutout is wrong however well the tabs line up.
Dry-fit the panel, torque the tabs progressively, then re-check connector and hose routing, because clamping force can shift a marginal cutout into contact. Fitment details on matched Honda fairing sets follow these same flange and cutout dimensions.
If the retaining ring cannot be fully serviced and the hose routed without a pinch while the panel is installed, the cutout is undersized or offset. Send the panel back rather than forcing it onto the tank seam.
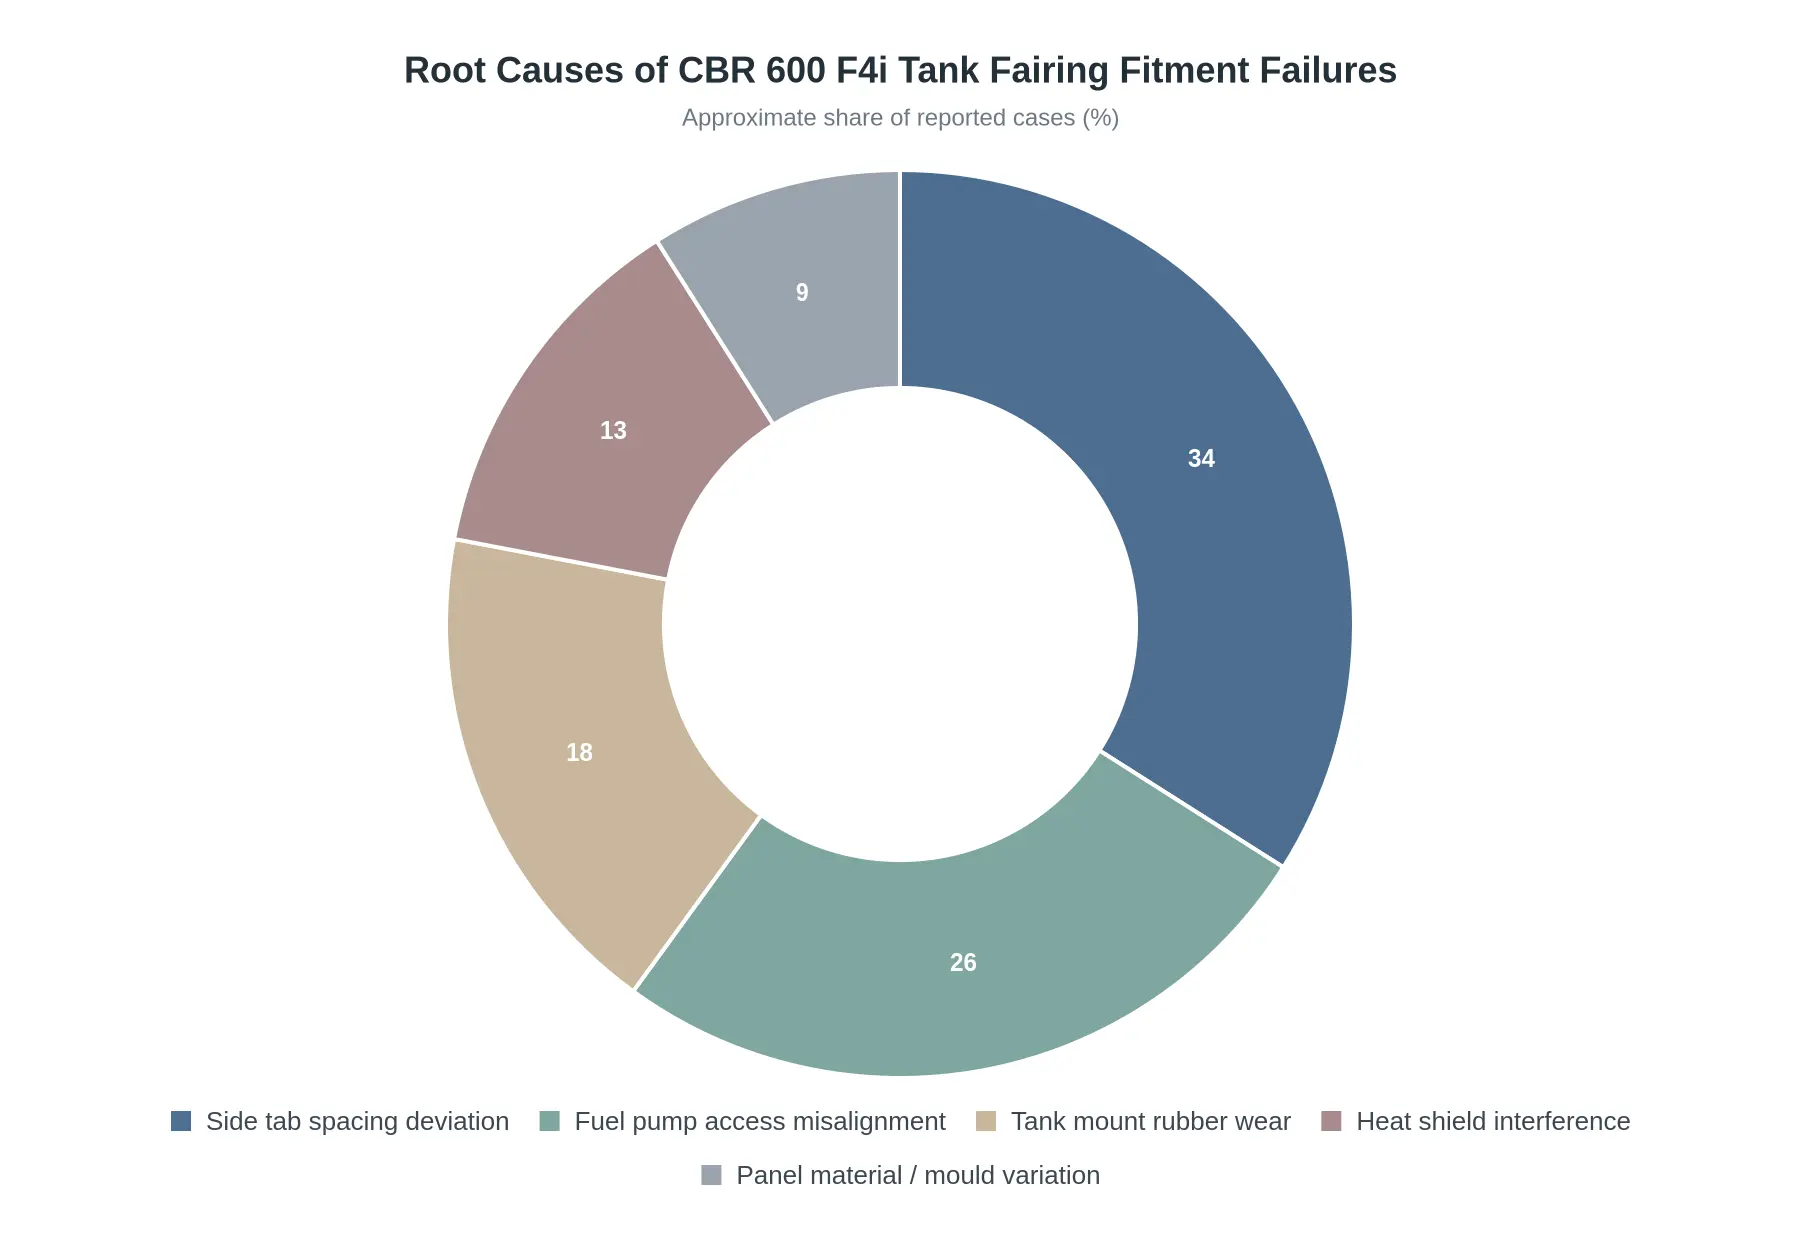
Knowing where fitment actually goes wrong saves the guesswork before you buy a replacement tank cover or reach for a file. The chart below ranks the five causes that account for most CBR 600 F4i tank-fairing returns we handle, so you can inspect in that order instead of chasing gaps blindly.
| Root cause | Share of returns |
|---|---|
| Side tab spacing deviation | 34% |
| Fuel pump access misalignment | 26% |
| Tank mount rubber wear | 18% |
| Heat shield interference | 13% |
| Panel material or mould variation | 9% |
Side tab spacing and pump access together account for roughly six in ten fitment complaints, which is why both deserve a caliper before you commit to a panel set. If you are still shopping, start with our custom Honda fairings and compare tab geometry against your original tank.
Caption: Where our returns come from, by our own tally rather than a survey. Use the order to decide what to check first.
Tank Mount Rubber and Heat Shield Clearance
Two easily missed details decide whether a replacement side panel lands: the tank mount rubber and heat shield clearance. A moulded panel can only be as accurate as the surface it bolts to, so check both before you blame the bodywork.
Tank Mount Rubber: The Silent Height Adjuster
The fuel tank rests on rubber pucks, two at the rear tunnel and one or two locating the front depending on the year, which isolate vibration and set tank height. After twenty-odd years those pucks take a compression set, harden, or crack open. A puck that has collapsed 2-4 mm drops the tank, and with it the panel’s upper mounting surface. The result is predictable: the side panel’s top edge rides low against the frame spar, the forward tab sits beneath its slot instead of clicking into it, and the rear tab registers against the wrong part of the opening. You end up with a gap along the tank seam and a stress crack at the tab corner within a season.
Inspection takes five minutes. Lift the tank and pinch each puck between thumb and forefinger; fresh rubber should feel resilient, not like a pencil eraser left in the sun. Measure thickness with calipers: anything crushed below roughly 8 mm, against 10-12 mm when new, or rock hard needs replacing. Oil-soaked pucks swell and soften, which is just as bad for tab registration. Replace the whole set, seat them dry in clean recesses, and snug the tank bolts by hand, since over-torquing flattens fresh rubber immediately.
Heat Shield Clearance: Protecting the Fuel Pump Area
Heat shield material on the tank underside and panel inner face keeps radiant heat away from the fuel pump. Two things go wrong. First, thickness: aftermarket or layered shielding can add 3-5 mm where the factory had 1-2 mm, pushing the panel outward and skewing side tab spacing. Second, adhesive condition: a sagging or lifting shield loses its air gap and bulges toward the pump area, where the outlet and connector sit closest to the panel.
Check clearance with the panel fully fastened but hand-tight. Work a 3 mm feeler blade around the pump area; if it will not pass anywhere, you have contact. Aim for 3-5 mm of air gap at the closest point, and repeat the check after a 15-minute ride, since shielding expands when hot and a warm-tank rub only shows up in service.
Never solve a clearance problem by peeling coverage off the pump. Trim only overhanging edges or a bulge beyond the shield’s footprint, reseal cut edges with aluminium tape, and re-bond lifted sections with high-temperature contact adhesive. If the foil is cracked or the foam is oil-soaked, replace the sheet entirely, because a patch that fails at 90 °C is worse than no shield at all. Sound mounts and clean shielding, paired with quality custom Honda CBR fairing sets, give you the best chance of an out-of-the-box fit.
Fresh tank mount rubber sets the panel height and correct heat shield clearance keeps it there. Fix both before you judge any replacement panel’s fit.
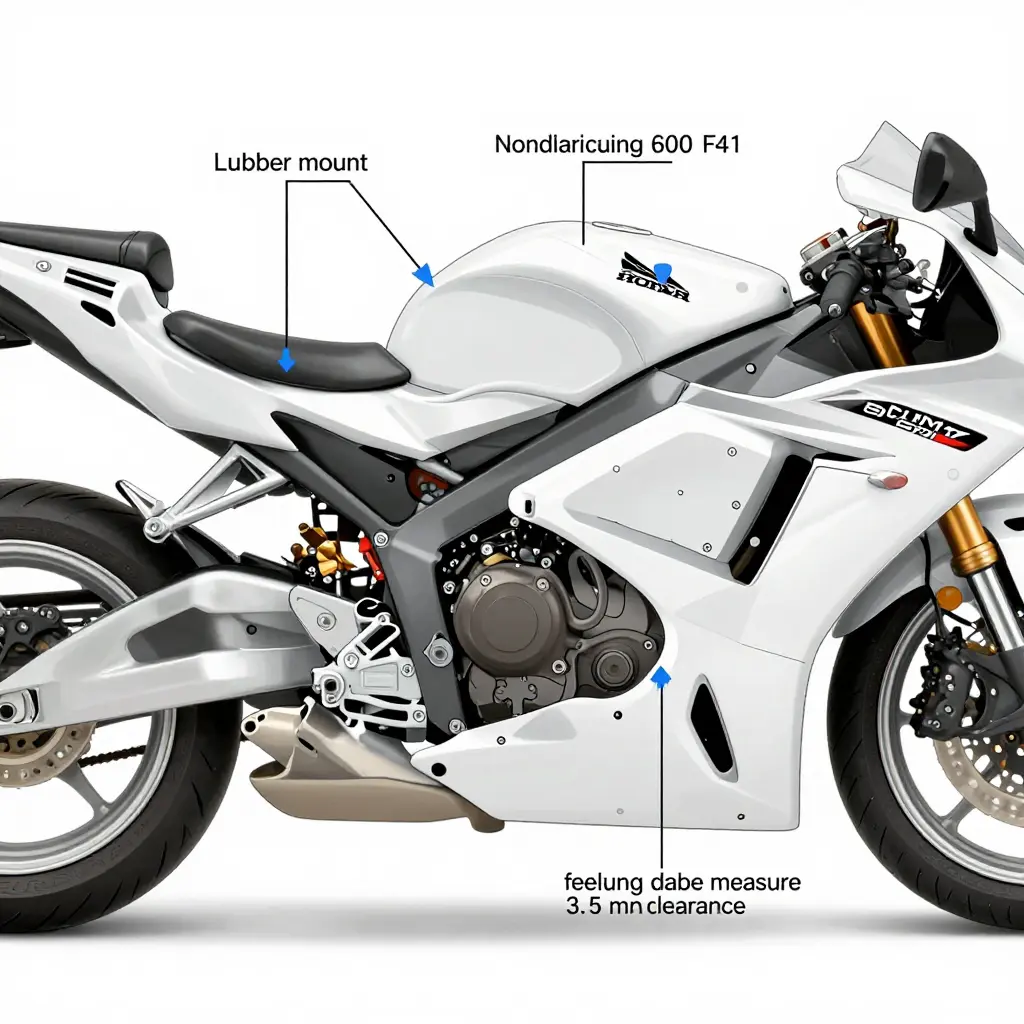
Reading the Mount Rubber and Heat Shield Stack in Cross-Section
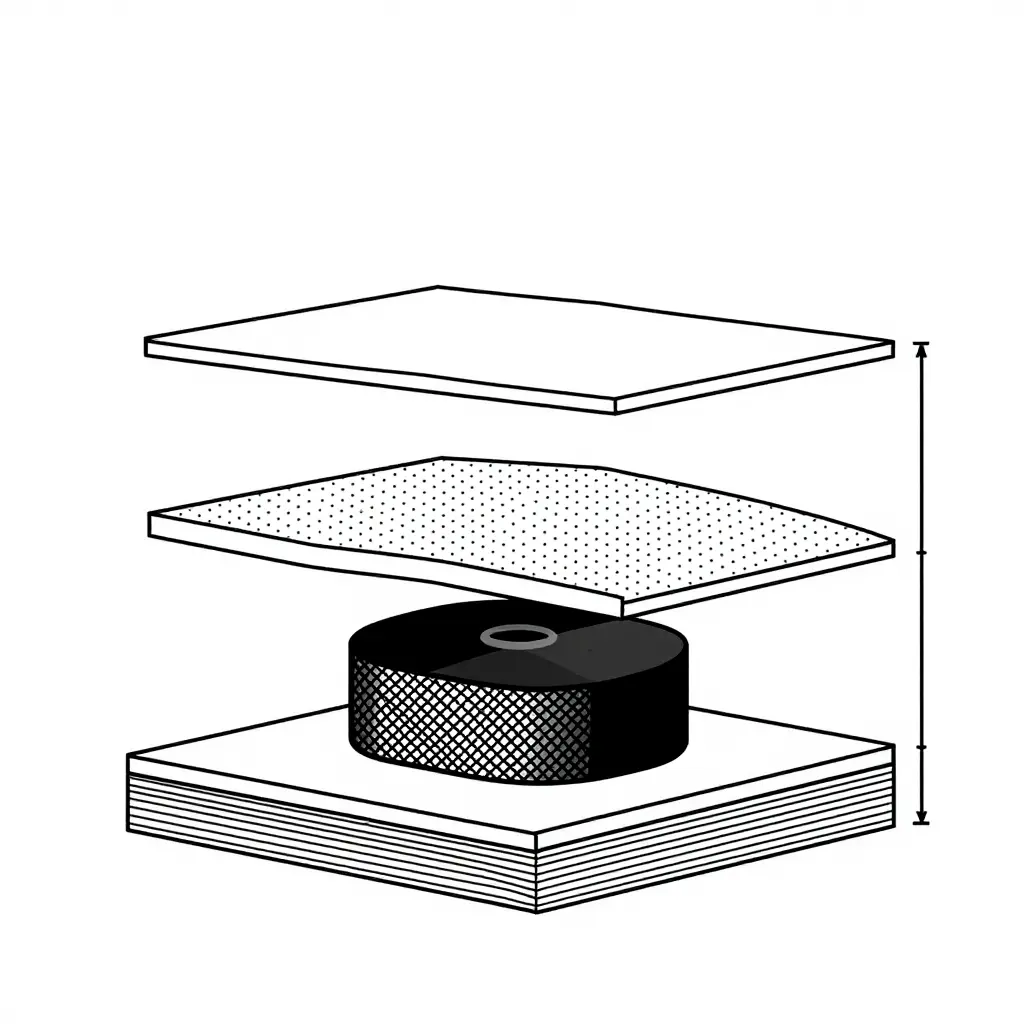
This stack settles more F4i tank-fairing arguments than any other part of the bike. Four elements share one narrow vertical envelope: the tank surface, the rubber mount puck, the heat shield layer and the fairing side tab. Change the thickness or compression of any one and the others move with it, which is why a fairing that “almost” lines up is often not a moulding problem at all but a stack-height problem.
Read the stack from the bottom up. The tank surface is the fixed datum, hatched solid because it does not move. The rubber puck sits on it, carrying the fairing load, isolating vibration and holding the panel at a repeatable height. Above that, the heat shield is a thin, non-structural barrier protecting the fairing shell from radiated tank and engine heat. The fairing tab rides on top of the stack, and the dimension arrow between tab and heat shield is the clearance gap you are really chasing when a side panel sits proud, rubs, or cracks at the mounting hole.
What each layer actually controls
| Layer | Structural role | What it decides at fit-up |
|---|---|---|
| Tank surface | Fixed reference datum | Baseline height for every layer above it |
| Rubber mount puck | Vibration isolation, load carrying | Tab height and how much the panel can settle |
| Heat shield layer | Thermal barrier, no load path | Effective stack height and tab-to-shield clearance |
| Fairing tab | Locates and secures the side panel | Gap consistency, stress at the mounting hole |
Why compression is the variable that bites you
Rubber is the only compressible part of the stack, so it is the only one that changes dimension under torque. A new puck at nominal height holds the tab at the intended gap. An old puck with a permanent set, or a new one tightened too far, pulls the tab down and closes the clearance arrow in the diagram. The panel then contacts the heat shield, buzzes at speed and eventually cracks around the fastener. The tell-tale is a gap that looks right with the bolt loose and vanishes once you torque it.
Measure the puck’s free height before installation, then again with the fastener snugged to spec. If the compressed height has collapsed well beyond what healthy rubber should give, replace the puck instead of shimming the tab. Shims hide the symptom and add a hard interface that sends vibration straight into the plastic.
Why heat shield thickness matters more than it looks
Heat shield material comes in several thicknesses, and aftermarket sheets are often thicker than the original part. That extra millimetre or two comes straight out of the tab clearance arrow. The shield is doing its thermal job, but it has eaten the air gap the fairing needs. If you have just replaced or re-lined a shield and the side panel now fouls, compare installed thickness against the original before touching the fairing alignment. Trimming shield material back around the tab contact area, rather than thinning the whole panel, keeps the thermal protection where it belongs.
The clearance gap is a diagnostic, not a cosmetic detail
That small dimension arrow between tab and shield is the cheapest test you own. A consistent gap along the tab means the stack is healthy. A gap that tapers toward one end points to a twisted tab or a puck seated off-centre. A gap that is closed at the fastener and open at the tip usually means the tab is being pulled down by an over-compressed rubber. Check the gap with the panel fully fastened, not hanging loose, and check it again after a heat cycle, because rubber relaxes as it warms.
Get the stack right and panel alignment follows. If you are replacing damaged bodywork at the same time, start with a Honda fairing set that matches your model year, then set the rubber and shield heights to the original envelope before judging tab spacing. Fit the stack first, fit the panel second, and the side gaps on a CBR 600 F4i close the way they were designed to.
Troubleshooting Gaps and Cracks After Fitment
Two faults account for nearly every poor-fit complaint on the CBR 600 F4i tank fairing: seam gaps that open between the side panel and the tank, and fractures that start at the tab roots where the panel bolts to the frame. Both are fixable without discarding the panel, but each repair follows a fixed sequence. Repair starts with diagnosis, not with force.
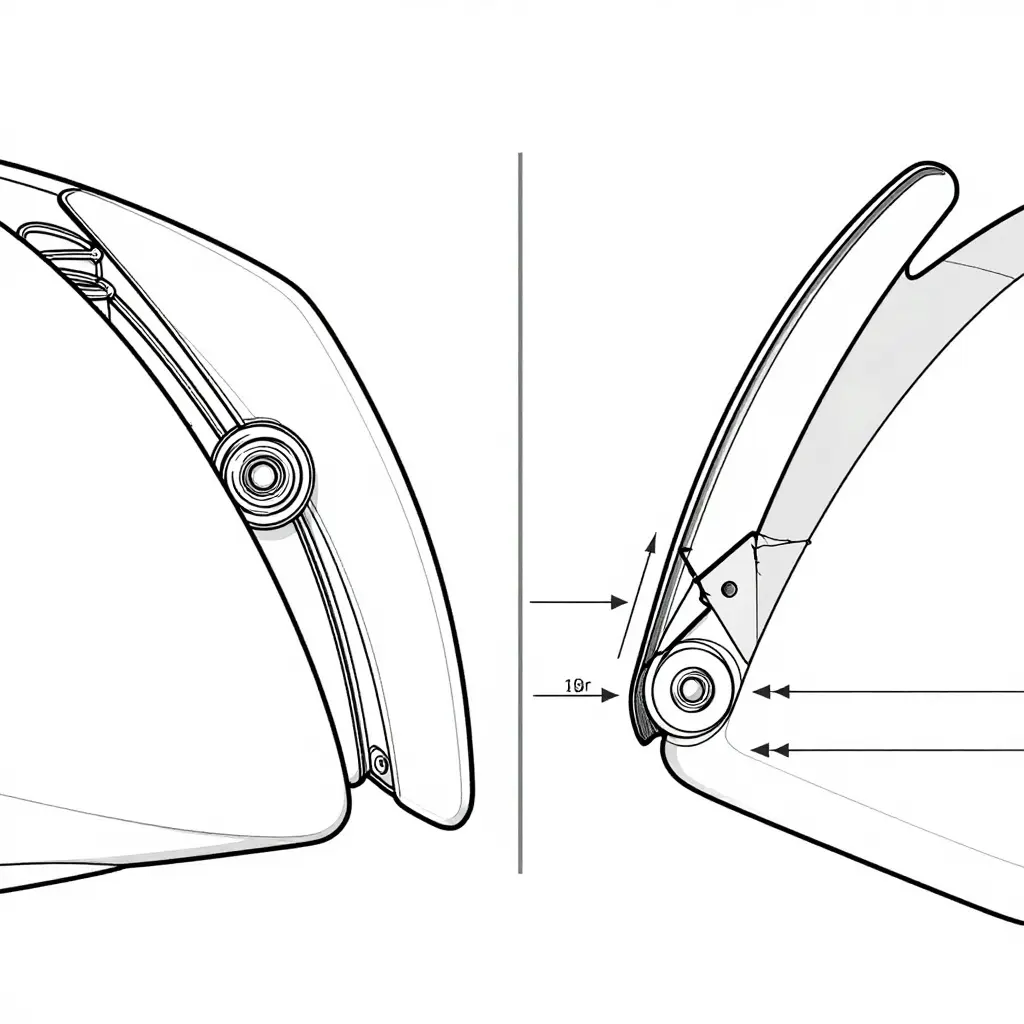
Correcting Fairing Gaps
Measure the gap at its widest point before loosening a fastener. If the gap closes when you lift the panel by hand, the cause is spacing, not the panel itself.
Tab shimming. Insert stainless or nylon shims between the tab face and the slot wall, adding thickness in 0.5 mm steps until the seam closes. Shim the whole contact face rather than one corner so the fastener clamps flat. Never close a gap by over-torquing the bolt; that distorts the tab and pre-loads the panel toward a crack.
Slot elongation with fastener support. When the tab bottoms out before the seam closes, elongate the slot 2 to 4 mm with a round file, working outward from the original centre. Fit a wide-flange washer or a bonded backing plate so the fastener still clamps full material. An unsupported fastener on an opened slot crushes the composite and works loose within a few heat cycles. This is a correction for a panel that is otherwise sound. A new moulding whose tab centres are out of tolerance should be returned, not filed.
Seam alignment checks. With the fasteners finger tight, trace the tank-to-panel seam by feel along its full length, then confirm the panel sits square to the frame reference points on both sides. Torque only once the seam reads even, since uneven torque on one side pulls the opposite seam open.
| Measured gap | Probable cause | Correction |
|---|---|---|
| Under 1 mm | Panel not fully seated | Re-seat panel, re-torque evenly |
| 1 to 3 mm | Tab-to-slot clearance | Stack 0.5 mm shims on the full contact face |
| 3 to 6 mm | Tab bottoming in slot | Elongate slot 2 to 4 mm, add flange support |
| Over 6 mm | Wrong panel or collapsed mount rubber | Verify part number and tank mount rubber before trimming |
Correcting Cracked Fairing Tabs
Cracked fairing tabs fail from a stress riser at the root, not from impact alone. A repair has to remove the riser and restore stiffness at the same time.
Stop-drilling. Drill a 3 mm hole through the panel at each visible crack tip, centred on the crack line, before any welding or bonding. The hole spreads the stress and stops the crack running further under vibration.
Plastic welding or reinforcement. On ABS panels, plastic-weld with a compatible rod, achieve full penetration, then dress the weld flush. Where welding is impractical, bond a reinforcement plate of the same material behind the tab, extending 15 mm past the crack on each side, and clamp it until fully cured. Do not bridge a flexible tab with metal alone, and do not rely on general-purpose epoxy.
Re-check tab spacing after repair. A repaired tab is thicker and stiffer, so refit the panel and re-measure tab-to-slot clearance before final torque. If the tab now bottoms in the slot, correct it with shims or a controlled file pass. Skip this step and you restore the original stress path, and the repair fails.
Run the panel through one full heat cycle, then re-check fastener torque and seam alignment. For replacement panels matched to this mounting pattern, review our Honda fairing collections.
Installation Sequence That Prevents Rework
Work the tank fairing onto the bike in this order and every gap, tab and clearance problem shows up while the panel is still loose enough to fix by hand rather than with a drill. That discipline is most of the difference between a clean custom Honda fairing install and a weekend spent chasing cracks.
- Fit the panel dry before fastening anything. Press it onto the frame with no bolts installed and confirm the front index pin seats fully into its grommet.
- Verify side tab spacing on both flanks. Measure the gap between each side tab and the air duct or frame edge; it should read an even 3-5 mm left to right, never zero on one side and 8 mm on the other.
- Check fuel pump access before you commit. With the panel held in place, confirm at least 2 mm of clearance around the pump connector and that the supply hose routes without pinching.
- Seat the tank mount rubber fully into its cup. Press until no more than 1 mm of the rubber lip stands proud of the bracket.
- Confirm heat shield clearance with a gauge. Slide an 8 mm feeler, or two stacked 4 mm blades, between shield and header, and treat any point it will not pass as too close.
- Start every fastener by hand for at least two full turns. If a bolt binds, back it out and re-seat the panel rather than forcing it with a ratchet.
- Torque the fasteners in a cross pattern, snugging in two stages to the figure in your workshop manual, which is typically 6-8 Nm for M5 bodywork bolts. Never chase a gap by over-tightening one corner.
- Re-check all gaps after the first heat cycle. Ride 15-20 minutes, let the bike cool fully, then re-measure side tab spacing and heat shield clearance and re-torque any fastener that has relaxed.
- Finish with a flex test, bars turned lock to lock. Listen and feel for tab contact and correct it now, while the paint still has its original shape.
Each step leaves you with a number you can read off a tool, so nothing hides behind a tight bolt.
FAQ: CBR 600 F4i Tank Fairing Fitment
The five questions that come up most often when fitting a replacement tank fairing to a CBR 600 F4i.
What side tab spacing tolerance is acceptable on a CBR 600 F4i tank fairing?
Keep each side within 1 mm of the measurement on your original panel, and measure centre-to-centre between the tab mounting holes on both sides. Small differences close up under bolt torque. Past 3 mm the panel is mis-moulded or bent, and shimming only disguises it.
Can the fuel pump stay installed during panel fitting?
Yes. Leave the pump, its flange and the harness in place; the panel locates on its tabs, not on the pump body. Only remove the pump if you need clearance to reach a hidden bolt. Keep the pump connector clipped back from the panel edge while you work.
Why does a new fairing contact the tank at the heat shield?
Aftermarket panels often sit 3 to 4 mm closer to the tank than OEM plastic, and the heat shield foil adds thickness on top of that, so contact appears at the upper inner corner. Trim or re-glue the shield flat, then check clearance with the panel fully bolted, not hanging loose.
Does collapsed tank mount rubber cause tab misalignment?
Yes. Worn rubber lets the tank drop 2 to 3 mm, which pulls the front tabs out of alignment and closes the side gaps. Replace the full set of pucks and the collar washers before blaming the fairing. Old rubber is the most common cause of repeated fitment failures.
How do I confirm a replacement panel is correct before ordering?
Match the Honda part number stamped inside the original panel, then verify model year and paint code. Cross-check tab count, pump cutout shape and heat shield location against the listing photos in the Summit Fairings Honda CBR catalog before you pay.
Closing Buyer Guidance: Order the Checks, Then Order the Paint
Work the fitment sequence in strict order before you commit to a colour code or a gloss level. First, measure side tab spacing against the F4i tank mounting points, because a panel that will not sit flush at the tabs will never seal at the seams, whatever the finish. Second, confirm fuel pump access with the fairing test-fitted, so servicing does not require panel removal. Third, inspect the rubber isolators and heat shield for hardening, compression set or heat damage, since those parts transmit vibration and protect the panel from exhaust and engine heat. Finish and colour come last. A perfect colour match on a fairing that fouls the pump or rattles on a hardened grommet is a return waiting to happen.
On the sourcing side, the practical numbers matter. Summitfairings.com carries over 3,000 styles across nearly all motorcycle models, prices 10-40% lower than comparable sites, and answers enquiries within six hours. Honda owners can start with the Honda fairings collection to confirm model-year coverage, while riders who need bodywork without a production wait should look at the ready-to-ship fairings range.
Summary
Confirm side tab spacing, then fuel pump access, then rubber and heat shield condition. Choose finish and colour only after all three pass.
Source from a catalogue that states fitment up front: 3,000+ styles, 10-40% lower pricing, six-hour enquiry response.