

The Two Variables That Actually Decide Finish Quality
Two process settings in motorcycle fairing spray painting affect surface defects more than gun technique or paint brand: booth airflow and flash-off time. When both are under control, most finish problems stop appearing. When they are not, a better painter or more expensive paint will not rescue the panel.
Booth airflow is the engineered movement of air through the spray enclosure: its direction, velocity and volume, the filtration that cleans it, and the balance kept between supply and exhaust. Flash-off time is the interval between coats, during which solvent leaves the wet film before the next layer goes on.
Both govern the defects that cost money: orange peel, solvent pop, dust nibs, runs and dry spray. Each of them follows from a condition you can measure rather than from luck at the gun. For shops painting replacement fairing sets, the useful question is not which gun or brand to buy but whether air and time are specified, measured and held constant.
How Booth Airflow Governs Defect Formation
Air carries everything the gun releases. Overspray that the booth does not capture has to land somewhere, and the worst place it can land is the wet film. Particles settling into a still-tacky base coat show up as dust nibs after cure; particles that dry in flight before they touch the panel produce the sandy, non-levelling texture called dry spray. Which of the two dominates depends on capture efficiency, not on how smoothly the painter moves the gun.
Direction matters as much as volume. A downdraft booth moves air vertically, so overspray crosses the panel once and leaves, which suits the broad convex surfaces of a fairing. Crossdraft moves air horizontally, and where it meets curved bodywork the flow separates. Behind winglets, inside ducts and around recessed fastener pockets, low-pressure zones form, overspray recirculates, and it deposits in heavier concentrations. Those recesses show defects first, and the panel set you are finishing decides how many of them there are. Supply and exhaust also have to stay balanced: too much exhaust draws contamination out of seams and floor gaps, while too much supply pressurises the booth and pushes air outward. Either imbalance produces turbulence and eddies, and eddies bring filtered contamination back into the work zone.
Filter loading is the failure that arrives slowly. As the media saturates, static pressure rises and face velocity falls with no visible warning, so a booth that passed inspection last month now lets solvent flash off far too slowly. The velocity trade-off runs both ways: too little air leaves a solvent-rich atmosphere, slow flash and sagging; too much strips solvent early, drives overspray onto the wet film, causes dry spray and poor levelling, and leaves orange peel that polishing cannot cleanly remove.
Booth Airflow Velocity: Find the Band Where Your Fairings Stop Fighting You
Most painters treat booth airflow as a fixed plant setting, something the HVAC contractor decided rather than something they tune. Airflow velocity is what rewrites your flash-off timing, your overspray behaviour and eventually your rework bill. Too low and the panel sits in a fog of solvent; too high and the basecoat dries before it ever lands.
Neither mistake announces itself. Both turn up later, on a cured fairing, as texture, mottling, or a halo along the edge of a decal line.
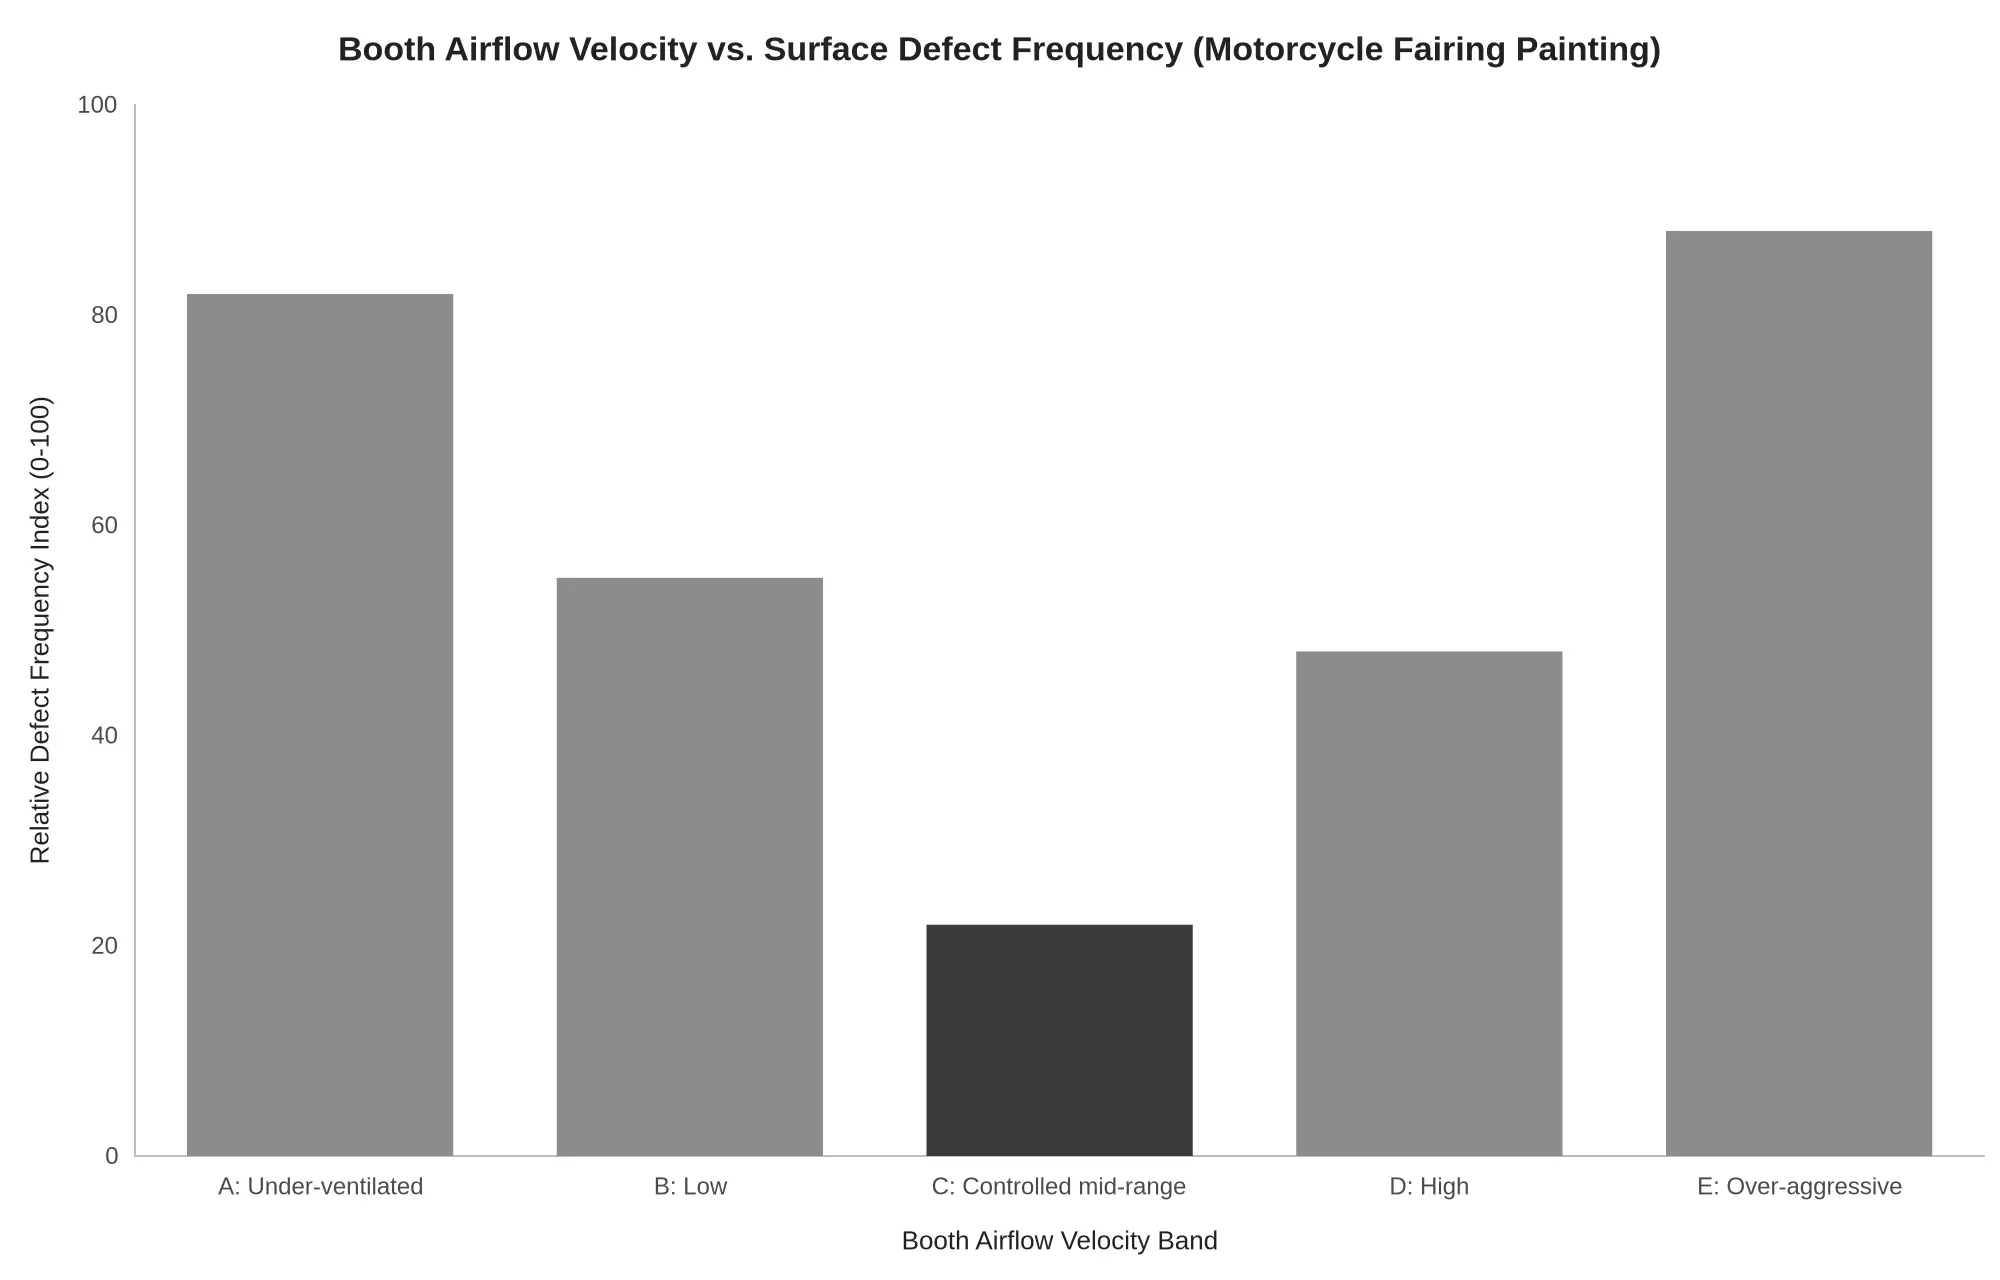
Defect frequency bottoms out in the controlled mid-range band and climbs sharply at both extremes, which is why airflow should be read as a measurable predictor of defect risk rather than a background condition.
The relationship is a valley, not a slope. Defect frequency falls as airflow rises out of an under-ventilated crawl, flattens somewhere around 0.3-0.5 m/s, then climbs again once the booth behaves more like a wind tunnel than a spray environment. For a shop owner that shape matters more than any single number: both too little air and too much of it generate defects, and the safe band is narrower than most people assume.
The two failure modes look completely different
Under-ventilated air releases solvent slowly, and the panel stays wet far longer than the flash-off schedule assumes. Overspray hangs in the air and settles back onto the film, giving heavy orange peel, solvent pop, and a finish that seems to sag into itself.
Over-aggressive air does the opposite. Droplets partly dry in transit, so the film arrives powdery and poorly coalesced. Metallic colours turn patchy, edges build dry halos, and blends refuse to melt together however carefully you overlap.
| Airflow band | Typical booth reading | What you see on the panel | Relative defect index |
|---|---|---|---|
| Under-ventilated | below 0.2 m/s | heavy orange peel, solvent pop, sagging | 82 |
| Low | 0.2 – 0.3 m/s | soft edges, mild solvent boil | 55 |
| Controlled mid-range | 0.3 – 0.5 m/s | tight peel, clean metallic laydown | 22 |
| High | 0.5 – 0.7 m/s | dry overspray, dusty texture | 48 |
| Over-aggressive | above 0.7 m/s | dry spray, mottled metallic, halo edges | 88 |
The index is relative, not absolute. It is a scoring tool for comparing your own booth settings across jobs, not a laboratory measurement. What you want is the shape of your own curve.
Turning the curve into a prediction habit
Once you know where your valley is, the guessing stops. Log three things on every batch: measured airflow at the panel face, booth temperature, and the defect found at inspection. After a dozen jobs the pattern is obvious, and you can call trouble before the gun comes out.
- Fix one variable at a time. Change airflow, keep gun settings and reducer ratio constant, then judge the film.
- Measure at the part, not at the filter. Face velocity at the panel is what your wet film actually experiences.
- Re-check after every filter change. A clogged intake can drop you into the under-ventilated band without setting off any gauge alarm.
- Watch complex shapes. Tight recesses and layered side panels, the sort of geometry you find across these Ducati fairing sets, create local dead zones that a single average reading will hide.
For a business, a booth sitting outside the mid-range band is not producing slightly worse work; it is producing a predictable volume of rework. Move the airflow into the valley and defect frequency stops being a matter of luck.
Flash-Off Time Mechanics: From Wet Film to Stable Layer
Flash-off time is the interval between the end of a spray pass and the moment the film is ready for the next coat or for the bake. Solvent diffuses out of the film into the booth air, viscosity climbs, and the film finishes levelling before it stops flowing. That balance is what separates a clean finish from a defective one in motorcycle fairing spray painting, and it is the level of control visible on a production Ducati fairing collection.
Cut the interval short and solvent stays trapped beneath a skin that has already stiffened. When the film is heated, that solvent boils and escapes as solvent pop, pinholes or blisters. Stretch it too long and the surface cures hard enough that the next coat cannot bite: intercoat adhesion drops, dust settles during the open window, and flow between coats is lost, leaving a dry, textured interface.
The requirements differ by coat. Primers tolerate shorter intervals, base coats need a tight window to keep metallic orientation even, and clear coats need longer flash-off because their solvents are slower and their films heavier. Airflow, temperature and film thickness all shift the window: faster air and more heat shorten it, thicker films lengthen it.
All the figures in this article assume a booth at 20-25 °C with airflow inside the band described above. Flash-off should be a documented parameter, measured, recorded and adjusted on purpose, not an operator judgement call.
Printable Booth Airflow and Flash-Off Reference
Two settings decide whether a booth produces a clean panel or a rework job: airflow pulls solvent away at a controlled rate, and flash-off gives that solvent time to leave before the next coat lands. Print the table, post it in the booth, and use it to match airflow direction and relative velocity to each coating stage.
| Coating stage / condition | Target booth airflow (downdraft direction and relative velocity) | Minimum flash-off between coats | Risk if airflow too low | Risk if airflow too high | Check that confirms the setting |
|---|---|---|---|---|---|
| Primer – standard build | Straight down, low-moderate | 10-20 min | Solvent pooling, slow tack | Skin-over, dry overspray | Even tack, no wet edges |
| Base coat – metallic | Straight down, moderate, steady | 10-15 min | Mottling, trapped solvent | Dry spray, rough flake | Even pattern, dry to touch |
| Base coat – high humidity | Straight down, moderate-high | 15-25 min, extend as needed | Blush, solvent pop | Dry spray, dull flake | Clear film, no haze |
| Clear coat – standard build | Straight down, moderate, steady | 10-20 min | Runs, solvent pop | Dry spray, orange peel | Wet gloss, no soft spots |
| Clear coat – thick film build | Straight down, moderate, longer purge | 20-30 min, plus final hold | Sagging, solvent pop | Skin-over, trapped solvent | Full cure, hard film |
| Primer or sealer – thick build, high humidity | Straight down, high, dry air | 20-30 min, until tack-free | Trapped solvent, bridging | Dry overspray, sanding dust | Tack-free, even sheen |
Each row describes one relationship: airflow sets how fast solvent leaves, flash-off sets how long you wait, and together they decide which defects show up on the finished panel.
Keep the sheet at the gun station and treat the numbers as starting points. The fairing on the stand still sets the pace, so check the prep notes for the panels you coat most often, such as these Honda fairing sets.
Run this checklist before and during every batch so that airflow, flash-off and the risk of surface defects stay predictable.
- Confirm the intake filter is clean and undamaged; replace it once pressure drop exceeds the documented limit.
- Check airflow direction at panel height with a smoke pencil; it must move evenly toward the extract, with no dead zones or eddies.
- Measure face velocity in the spray zone and confirm it sits inside the specified range before mixing any material.
- Verify supply and exhaust balance against the differential pressure gauge; it must stay inside its band for the full coat.
- Record booth temperature and humidity, and confirm both sit inside the paint datasheet window.
- Start a timer at the end of every coat and log the flash-off interval for each stage, not just the first.
- Check film build with a gauge before the next coat; apply it only when build is within range.
- Hold each part in the flash zone until it is tack-free to a gloved touch, then move it on without delay.
- Log filter status, velocity, balance, climate, intervals and film build per batch so every job stays traceable.
Logging airflow and flash-off batch by batch turns them into a repeatable standard, which is the most reliable way to keep surface defects out of your finished motorcycle fairings.

The schematic shows how evenly distributed ceiling air travels straight down past a smooth fairing surface, while the same airflow deflects and curls into eddies around a recessed or irregular area, the point where overspray lingers and defects begin.
Why the Shape of the Part, Not Just the Booth, Decides Your Finish
The booth is half of the airflow story. The other half is the geometry hanging inside it. A flat, gently curved panel lets the column of filtered air slide past in an orderly sheet, carrying overspray down and out through the floor exhaust before it can settle back on the wet film.
Now add a recess: an air intake pocket, a layered vent insert, a tight inner lip where two sections overlap. The air has to go somewhere, so it splits, curls and briefly reverses. Pigment that was on its way to the filter floats in that pocket instead and lands as dry spray, a rough patch, or a faint halo around the edge. That is the defect that appears after the clearcoat goes on, when polishing can no longer hide it.
Parts with complex vent and recess geometry therefore need slower passes, a slightly reduced fluid setting, and a moment of patience at the edges. It is also why the shape of a panel comes before any discussion of spray technique.
Defect Economics: What Rework Really Costs Your Shop
Every defect described above starts upstream, in airflow and flash-off. Unstable air movement or a rushed flash-off traps solvent, lifts metallic, or leaves dust nibs. Each defective set then consumes rework labour hours: sanding back, re-cleaning, re-sealing, re-basing, re-clearing, plus fresh material for every layer stripped. Those hours occupy a booth that should be earning: booth time, painter time and consumables are paid for twice, and none of it is billable.
Timing decides the size of the loss. A defect caught before clear coat is a sanding and touch-up job. One found after assembly means disassembly, handling risk and a second full cycle. Booth occupancy doubles, throughput falls, and a single rework can displace a scheduled motorcycle fairing spray painting job. When defects reach the customer, the cost shifts to warranty claims, return freight and replacement parts, none of which carry margin.
Inconsistency is the quieter expense: variable results force 100% inspection, sorting and buffer stock on every batch. Stable airflow and disciplined flash-off windows remove both problems at the source, before a single panel is masked. See our painter-ready fairing collections.
Why Flash-Off Time Has a Sweet Spot (and Why It Moves per Coat)
Flash-off is a dial, not a switch. Pull the panel out of the booth too early and the solvents under the skin have nowhere to go; leave it sitting too long and the surface stops gripping the next layer. Either mistake ends the same way: a defect that has to be sanded out and sprayed again.
The chart below plots defect rate index against flash-off interval for all three coating stages. Each curve dips into a trough and climbs again on either side; the flat stretch at the bottom is the window you want to work inside.
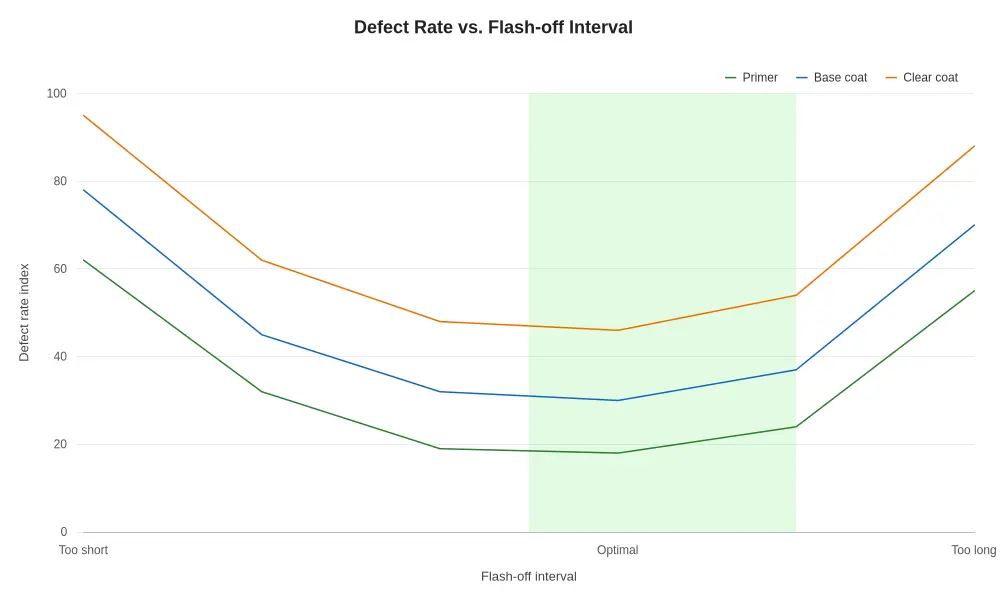
Defect rate index versus flash-off interval: primer, base coat and clear coat each bottom out at a different point, and clear coat sits highest on the risk scale.
One shop-wide waiting time will therefore be wrong for at least one layer.
Reading the two arms of each curve
The left arm is solvent entrapment. Spray the next coat while the previous one is still off-gassing and you trap vapour underneath it. The result shows up hours later as solvent pop, a hazy bloom, or a wrinkling that polishing will not fix. The steeper that arm climbs, the faster the stage releases solvent, which is why clear coat, the wettest and most heavily thinned layer, punishes a short flash hardest and sits highest on the chart.
The right arm is a different failure. Once the film passes its tack window, the surface has cured enough that the incoming coat sits on top instead of biting in. Adhesion drops, and the defect shows up as peeling edges or chipping on the first ride. Primer is the most forgiving curve here because it is designed to be sanded and keyed anyway; clear coat is the least forgiving because there is no mechanical prep to rescue it.
What each stage looks like when it goes wrong
| Stage | Too short a flash-off | Too long a flash-off | Practical window |
|---|---|---|---|
| Primer | Solvent pop, pinholing in sealer | Loss of intercoat bite, sand-through | 10-20 min at 20-25 °C |
| Base coat | Mottling, trapped moisture haze | Dry edges, metallic striping | 10-15 min between coats |
| Clear coat | Runs, solvent boil, orange peel | Poor adhesion, peeling on flex points | 20-30 min before bake |
Those windows are ranges. They shift with booth temperature, airflow velocity, film build and reducer speed, so calibrate them against your own booth the way you calibrate gun distance.
The economics side of the curve
A reflow-and-reclear cycle on a single fairing panel typically takes two to three labour hours plus material, and it tends to land in the busiest week of the season. Move your defect index from the 60s into the 20s by tightening flash-off discipline, and the saving repeats on every set that leaves the shop.
The trough is wide: not a single magic minute, but a comfortable band. That is good news operationally. You do not need stopwatch precision; you need a written interval per stage, a booth log recording actual clock times, and airflow stable enough for those intervals to mean something. Shops that run a consistent process around ready-to-paint fairing sets tend to find the same thing we do: the panels were never the variable, the schedule was.
Once you have plotted your own numbers, the minimum-risk window stops being guesswork and becomes a production target.
Process Control Is What Makes Finish Quality Repeatable
Controlled airflow and a disciplined flash-off window are what separate a clean panel from one that comes back. Air that moves too fast skins the coat before solvents escape; too slow and the film sags. Get either wrong and solvent pop, orange peel or dust nibs appear on some panels but not others, which is how batch-to-batch inconsistency starts.
For buyers, the question is whether a supplier can reproduce the same finish next month. The answer is in documented parameters: film build, booth velocity and flash-off windows recorded per run, so results stay repeatable and comparable. That is the difference between specifying Ducati fairings, Honda CBR1000RR fairings, or BMW S1000RR fairings on appearance alone and specifying them on evidence.
Summit Fairings states that it stocks over 3,000 styles across nearly all motorcycle models, prices 10-40% below comparable sites, and replies to questions within six hours.

The diagram lays out the application timeline as seven blocks: primer, flash-off, base coat, flash-off, clear coat, flash-off and cure, with solvent level falling along the bar beneath them. Flash-off is a scheduled block with its own duration, not empty space between coats.
Treating those blocks as real production time is what keeps finish quality consistent across batches of fairing bodywork.
Frequently asked questions
These are the questions that come up most often from shops setting up motorcycle fairing spray painting.
How do I tell whether booth airflow is too low or too high?
Compare the gauge reading against the booth’s spec sheet, then confirm with a smoke or tissue test at panel height. Too little airflow leaves a wet, hazy overspray cloud and slow tack because solvent lingers in the cabin. Too much strips solvent and throws overspray dust onto the wet film, where it lands as dry spray. Both extremes surface later as orange peel or trapped-solvent blisters.
Can flash-off time be shortened in a heated booth?
Yes, but only inside the coating’s published window. Heat speeds solvent release, so a 10-minute ambient flash may drop to 5-6 minutes at elevated booth temperature, yet the film must still lose most of its solvent before clear coat. Cutting flash-off past the point where the film stays tacky traps solvent under the next layer and causes solvent pop during bake.
Do moisture or debris problems point to airflow or filtration?
Debris is almost always filtration: torn intake filters, gaps at the ceiling plenum, or a dusty floor re-entraining particles. Moisture usually traces to airflow, since low movement lets humid air sit and lets a hot compressor push water and oil through the line. Check the filters first, then verify airflow and dryer performance.
Why does solvent pop appear on only some panels?
Solvent pop needs a heavy film, a fast reducer or a cool substrate to trap vapour. Panels with recesses, edges and inner curves hold more paint and release solvent unevenly, so they pop while flat side panels stay clean. Inconsistent gun distance or overlap across a set can also leave one part much heavier than the rest.
Does a smaller booth change the required airflow?
Yes. Air volume scales with booth cross-section, so a compact cabin needs fewer cubic metres per minute at the same face velocity, typically 0.3-0.5 m/s, with crossdraft booths usually running at the top of that band. Running a large booth’s fan setting in a small cabin produces turbulence and dry overspray instead of faster drying.
Should airflow and flash-off settings change for different fairing materials or panel sizes?
Adjust for geometry and substrate, not brand names. ABS and fibreglass tolerate heat differently, so bake temperature and flash-off must stay inside the tighter of the two, and small trim pieces in a Ducati fairings set flash faster than a full upper cowl because they carry less film and less thermal mass. Batch similar panel sizes together so airflow stays consistent.
Conclusion
Booth airflow decides whether contamination and overspray ever reach the film; flash-off time decides whether that film can release solvent and level before the next coat goes on. Neither is a matter of operator feel. Verify airflow with readings at the filter face and at panel height before the first coat, and write flash-off windows per stage (sealer, base, clear) into the booth sheet, because each releases solvent at a different rate. Then log every batch at the parameter level, tying airflow, ambient conditions and flash-off interval to the defects found on finished panels. That record is what makes motorcycle fairing spray painting repeatable rather than a craft of individual judgement: one verified standard applied to every finished fairing set.