

Yamaha Original Fairings vs. Aftermarket Fairing Sets: Impact Resistance and Replacement Cost
For an organization that runs more than one motorcycle, bodywork behaves differently than it does for an individual owner. Dealerships, rental operators, workshops and fleet owners replace panels on a cycle rather than on impulse: units get dropped in service bays, tipped over in storage, compressed during transport, and returned from hire with cracked tabs and scuffed lowers. In that setting a fairing set is a recurring consumable, budgeted and reordered alongside tires, levers and service parts. The purchase decision belongs to procurement, not to styling.
This comparison sticks to two variables: impact resistance and replacement cost. Under impact resistance it covers how each option is built – materials, wall thickness, ribs, tabs, mounting hardware – and how that construction behaves under impact, flex and repeated removal. Under cost it covers purchase price per set, cost per replacement cycle, fit and labor time, and the downtime a swap imposes on a unit. A per-bike, per-year planning figure at the end combines both so a buyer can apply it across a mixed inventory. Figures here are indicative, not quotes, and a closing note sets out what they rest on.
Finish and graphics are treated as secondary throughout, and no single answer is assumed to suit every operator: a track-day bike and a rental fleet pull in different directions.
Materials and Construction: What Actually Determines Impact Behavior
Two fairing panels can look identical once bolted to the same bike and behave nothing alike the moment something touches them. That difference comes from polymer grade, wall dimensions and how the part was built, not from the paint sitting on top.
ABS and ABS blends dominate production bodywork because the base resin is stiff enough to hold a shape and tough enough to bend before it breaks. Yamaha’s original panels on most faired sport models are injection molded in ABS, sometimes with impact modifiers that let a panel deform and spring back instead of fracturing. Those modifiers change the reaction to a sharp knock: the panel absorbs energy by flexing and recovering rather than cracking. Not every original panel is ABS, though. Inner and lower pieces on some models are molded in polypropylene, which is worth knowing before you assume a factory part and an aftermarket part share a material.
Polypropylene sits at the softer end of the range. It trades stiffness and paint-friendly surfaces for flexibility and low weight. Panels made from it deflect under pressure, which helps in slow contact but leaves the part prone to distortion, and paint adhesion depends on an adhesion promoter rather than on the plastic itself – one reason many PP parts ship in textured black instead of body color. Its limits show up less on the first touch than in how the panel holds its shape afterward.
Fiberglass and reinforced thermoplastics take a different route, using a fiber matrix to build stiffness rather than relying on resin alone. Many aftermarket Yamaha fairing kits use these constructions, and their reaction to contact depends heavily on fiber content, resin quality and cure consistency. Two kits sold as “fiberglass” can differ more from each other than either differs from ABS, so compare how parts are specified across these fairing collections before assuming two kits are built the same way.
Panel thickness is the variable most riders never check. A part that measures consistently across its surface spreads load evenly, while thin spots become the place where a crack starts and travels. Calipers at several points on a single panel say more about likely behavior than any spec sheet – and on painted parts, measure the substrate at an edge or a cut line, not through the paint.
What happens around mounting tabs, screw bosses and leading edges matters just as much. Extra material and molded-in ribs at those points decide whether a panel flexes as one piece or splits at its weakest corner, and so do backing plates and the direction material flowed during molding. An injection-molded panel has no laminate to speak of, so the only real layers are the coating stack; the structural differences live in wall gauge, ribbing and tab design.

Simplified for contrast: wall thickness, ribbing and reinforcement points are what separate a factory panel from a budget replacement.
The diagram cuts a panel in half and exaggerates the difference. On the left, the original panel reads as a controlled build: a thick, even wall, load spread across the whole section, and reinforcement placed where the panel flexes on impact. On the right, the aftermarket part achieves its shape with a thinner wall and minimal reinforcement – cheaper to produce, with less capacity to absorb and distribute a hit before it cracks. Treat the drawing as a schematic of where material was saved, not as a literal cross-section of any specific part.
That matters at the point of contact. When a bike tips over in a parking lot or a panel takes a stone at speed, the outcome was decided at the mold, in the wall gauge, and in how much material was left out to hit a price point. If you are weighing replacement routes for a specific machine, it helps to see how these sets are built and finished before committing: browse complete fairing collections.
Impact Resistance: A Property You Can Measure, Not a Claim You Repeat
Impact resistance is usually presented as a badge rather than a specification. It describes how a panel responds to a defined amount of kinetic energy delivered over a defined area in a defined time, and the response is not constant across energy levels. The variables worth tracking are elastic recovery (whether the panel returns to its original shape), strain tolerance before a crack starts, notch sensitivity around drilled holes and cut edges, and the bond between substrate, primer and topcoat. Assessed that way, impact resistance becomes a set of observable behaviors rather than a slogan, and a durability comparison that skips them is really only comparing photographs.
Almost no fairing sold to a fleet buyer comes with that data. What you can do instead is check the construction features that drive each behavior, and inspect returned panels to see which failure mode actually shows up.
Four Failure Modes and What Each One Reveals
Hairline cracking. Fine cracks usually begin at the gel coat on fiberglass, or in the clear coat of a painted panel, and reach the substrate only under continued flexing. They point to limited strain tolerance, a brittle surface layer, or a panel thin enough to deflect repeatedly in service.
Tab and mounting point breakage. Tabs concentrate stress into a small cross-section. Failures here typically indicate thin local reinforcement, sharp internal corners, or a mounting scheme that transfers load rigidly instead of distributing it.
Edge chipping. Edges and cut lines have no surrounding material to share load, so a brittle surface layer chips where a more compliant one would deform and recover.
Panel deformation. Permanent set – a panel that no longer follows its original contour – reflects mechanical load applied alongside heat, and is common where stiffness or heat-deflection tolerance is marginal.
| Failure mode | Typical trigger | What it indicates about construction |
|---|---|---|
| Hairline cracking | Repeated low-energy flex and vibration | Low strain tolerance or a brittle surface layer |
| Tab / mounting breakage | Concentrated load at a fastener or tab | Thin local reinforcement, rigid mounting |
| Edge chipping | Direct contact with a hard object | Brittle outer layer, sharp edge geometry |
| Panel deformation | Sustained load combined with heat | Low heat-deflection tolerance, low stiffness |
Mounting Design and Panel Flex Decide Where the Energy Goes
A fairing is a system, not a shell. Whether incoming energy is absorbed or transmitted depends largely on how the panel is attached. Rubber grommets, shouldered bolts and compliant isolating washers allow a small amount of relative movement, which turns a peak load into a longer, lower-amplitude pulse. Rigid bolt-through mounting does the opposite: panel and frame become one stiff load path, so energy the panel could have dissipated locally passes into tabs, bosses and the subframe.
Panel flex works the same way. A panel with controlled compliance deflects, spreads load across a wider area and recovers. A panel that is either too thin or too stiff concentrates strain at its weakest geometric feature, usually a fastener hole or an internal corner. Local reinforcement at those points often matters more than overall laminate thickness – which is why a thicker panel with poor tab design can fail before a thinner one with good tabs.
How Paint and Clear Coat Behave Under Deformation
The coating system is part of the impact structure, because it fails at much lower strain than the substrate beneath it. Flexible primer and elastomer-modified clear coats stretch with the panel and tend to craze rather than flake. Hard, highly crosslinked clear coats hold gloss well but crack early and can lift at the crack line, which lets moisture reach the substrate. Adhesion quality decides whether a crack stays cosmetic or the coating delaminates in a patch. Since refinishing a complete set can cost more than the panels themselves, coating behavior is a commercial variable, not a detail.
Construction Approaches and Where They Tend to Hold Up
Thermoplastic panels – injection-molded ABS and comparable blends – generally recover from low-energy contact because the material deforms and springs back rather than fracturing. Thermoset fiberglass laminates, particularly with adequate thickness and reinforcement at attachment points, generally tolerate a single higher-energy event better, since the laminate absorbs energy through controlled local damage rather than wholesale deflection. Molded polypropylene and similar olefin thermoplastics sit between the two, with good repeated-flex behavior but lower stiffness. For readers comparing fitments across models, the same logic applies to injection-molded replacement sets as to original panels: the material system and the mounting hardware matter more than the badge on the box.
The Trade-Off, Stated Plainly
- Repeated low-energy contact favors compliant thermoplastics on isolated mounts. These panels deform and recover, spread load through grommets, and resist crack initiation, but they deflect more and offer less stiffness under a single severe load.
- A single high-energy event favors thicker thermoset laminates with reinforced tabs. These resist penetration and hold shape, but they are less forgiving of sustained vibration and can crack at concentrated load points.
- Mounting hardware moves the outcome in both directions. Compliant, well-distributed attachments raise performance under repeated contact; rigid attachments concentrate energy and lower the threshold at which either material fails.
Match those three points to how often, and how hard, your bikes actually get hit. That beats any single claim about strength, and it keeps the decision on measurable ground.
OEM vs Aftermarket Fairing Sets: Side-by-Side
Before signing off a repair budget, it helps to see where the two options diverge on the details that drive cost, downtime and rework.
| Criteria | Yamaha Original (OEM) | Aftermarket Set |
|---|---|---|
| Base material | ABS, often impact-modified; PP on some inner panels | ABS or ABS blend, fiberglass, or reinforced thermoplastic; grade varies by supplier |
| Typical panel thickness | About 2.5 – 3.0 mm on faired sport models | About 2.0 – 2.8 mm, and often uneven across a set |
| Impact behavior | Deflects and recovers on low-energy hits; can still crack at a tab under a sharp, high-energy hit | Depends on material: fiberglass cracks locally, thin ABS can shatter at tabs |
| Fitment accuracy | Factory tooling, direct bolt-on | Molded from OEM or scanned parts, light trimming possible |
| Paint and finish process | Factory multi-stage paint, UV-stable clear | Hand-sprayed primer, base and clear; quality varies by supplier |
| Typical price band per full set | USD 1,800 – 3,500 | USD 450 – 1,200 |
| Lead time and stock availability | Backorders common, 2 – 8 weeks per panel | Usually stocked, ships in 1 – 3 weeks |
| Warranty or after-sales support | Manufacturer warranty through the dealer network | Supplier warranty only, often 30 – 90 days |
Ranges are indicative for full sets on middleweight sport models, in USD, before local tax and freight. Dealer parts pricing and aftermarket quotes move by region and model year, so confirm against your own parts list before you budget.
The price and lead-time rows decide most budgets. If a bike off the road costs you more than the parts bill, OEM wins on fit and support. If the bike is a track tool, a cosmetic refresh or a tight budget line, a well-chosen aftermarket set is usually the better spend – provided you have checked panel thickness, tab design and whether single panels are sold separately. Buyers can browse aftermarket fairing sets by model to confirm panel coverage before ordering.
The Eight-Point Fairing Evaluation Checklist
Run every candidate through the same short checklist so you are comparing like with like. Ten minutes of verification up front beats a month of fitment problems later.
- Get the material specification in writing – ABS, polypropylene or fiberglass, and the grade if the supplier will name it – plus any impact data they hold.
- Ask for replacement cost quoted both ways: per full set and per individual panel, so future crash repairs stay budgetable.
- Verify fitment and pre-drilled hole accuracy against your exact model year, trim and mounting points before paying a deposit.
- Confirm that individual panels are sold separately, then browse full fairing sets by model to see how each kit is grouped.
- Ask how the paint is matched: factory color code, a physical sample, or plain primer.
- Check packaging: foam density, corner guards, and whether transit damage is insured.
- Get the lead time for repeat orders in writing, not just the estimate for the first shipment.
- Test response time before buying by asking something specific, such as torque values for the mounting hardware.
Treat impact resistance and fitment as pass/fail gates, then score cost per panel and repeat-order lead time against your actual crash-repair volume. A supplier that is cheap and fast but vague about individual panels is a false economy.
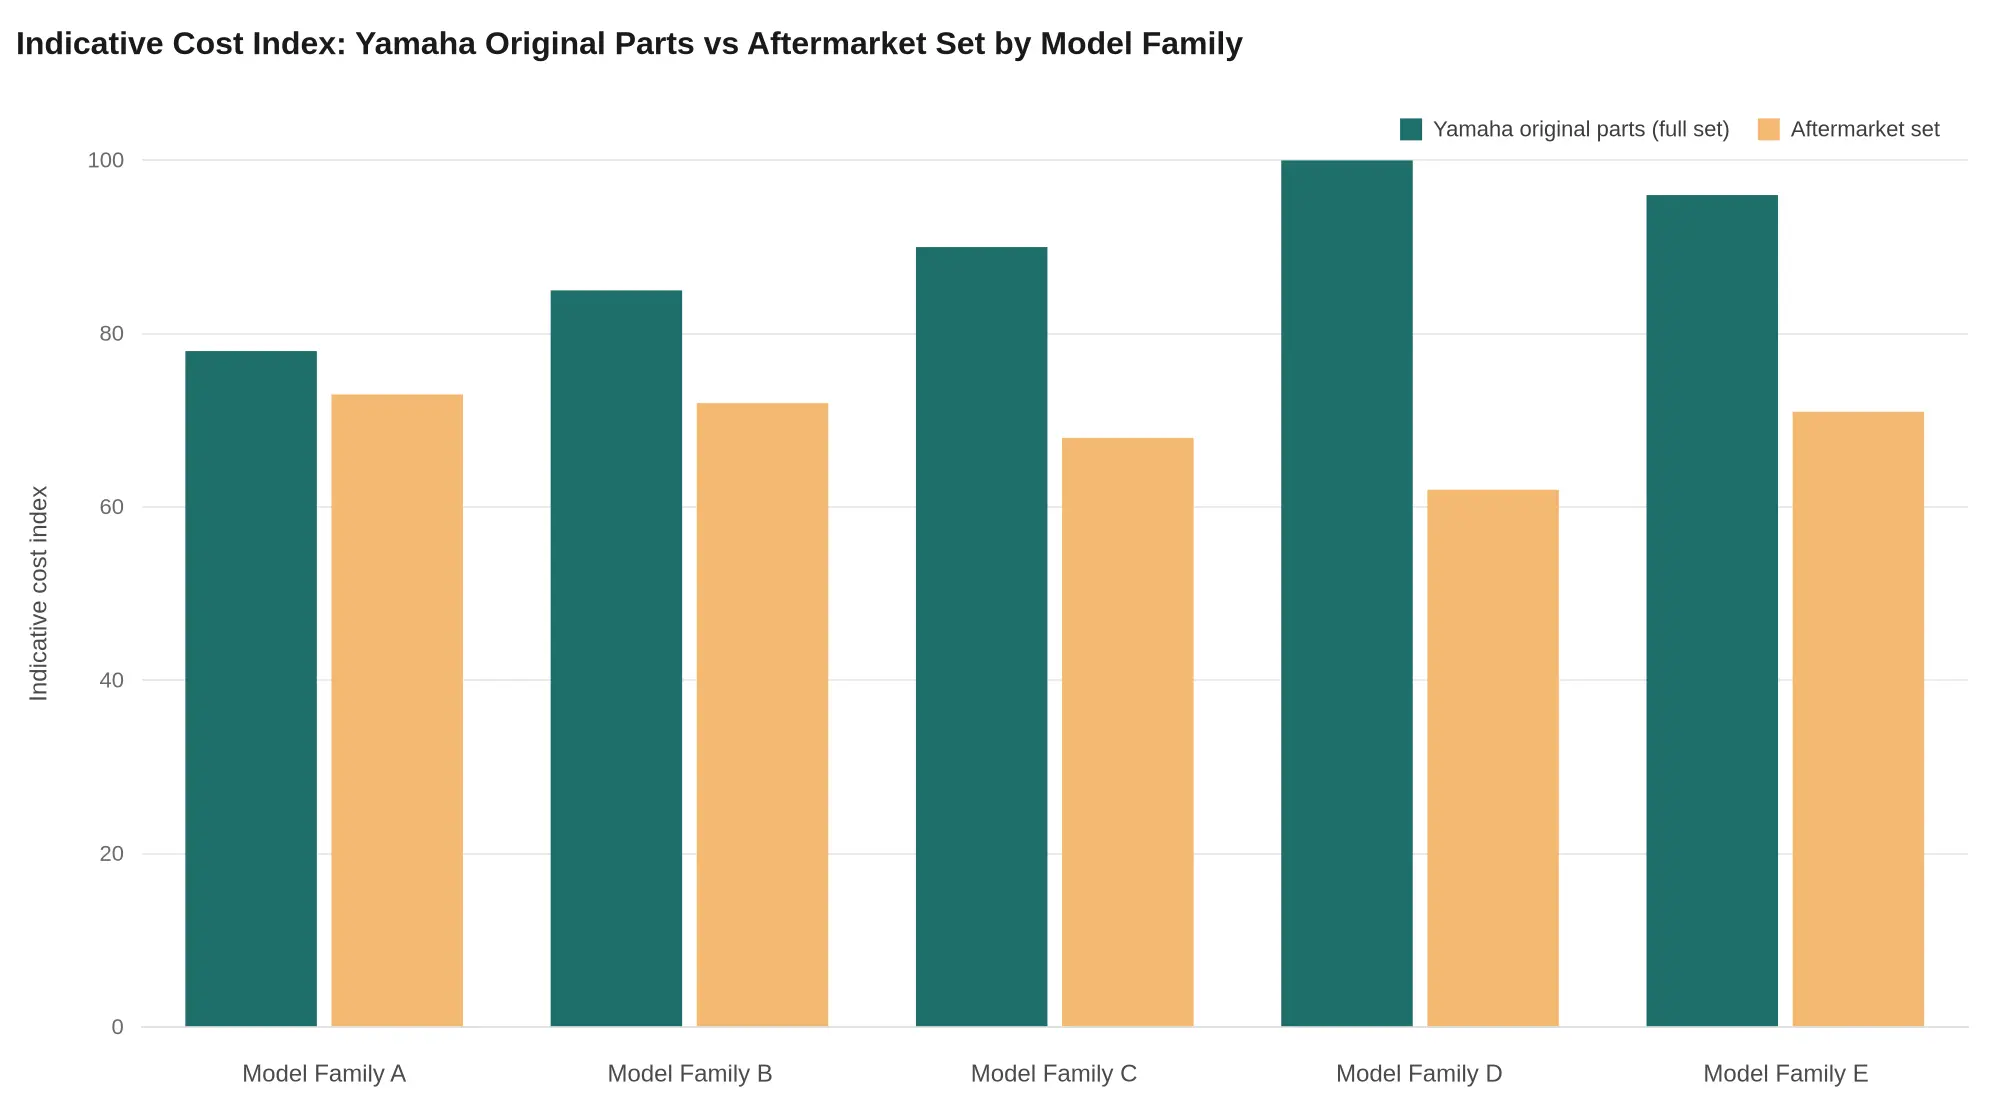
The chart uses an indicative cost index rather than currency, so read it as a shape, not a quote. The point for a business owner is that the distance between the two bars is not a constant slice. On one model family the bars nearly touch; on another the original set stands well above the aftermarket option. That gap undermines the most common shortcut in this decision – assuming an aftermarket set always saves the same percentage.
How to read it when you are quoting a job
- Look at the gap, not the price. Where the two bars nearly meet, an aftermarket set buys little headroom, so impact resistance and fitment should carry the decision.
- Wide gaps change the math. Where the spread is largest, a crash-repair budget can absorb a spare set or extra hardware and still come in under the original route.
- Bigger bodywork tends to widen the spread, because original panels carry more premium per piece.
So price the model family in front of you, then let the impact-resistance comparison settle the rest.
Total Cost of Ownership: Why the Invoice Price Is Not the Real Price
Purchase price starts the conversation. Total replacement cost ends it. For a business buyer, the number that matters is not what a set costs on one invoice but what it costs to keep a unit presentable, safe and bookable across its service life. The price gap between original bodywork and aftermarket sets is real and deserves the scrutiny fleets give it, but on its own it is only the opening bid.
Purchase price versus total replacement cost
Purchase price is one transaction. Total replacement cost is every transaction a unit will need, built from four parts: how often bodywork gets replaced during the service period, whether a replacement means one panel or a whole set, the labor absorbed when fitment is imperfect and a technician has to make a second pass, and the revenue lost while a unit sits off the road or off the rental line. Only the first ever appears in a quote.
The arithmetic in plain prose
Take an illustrative case: a service period long enough that a lower-priced set has to be bought twice while a higher-priced set is bought once. Start with the difference in purchase price, add the cost of that second purchase, add any rework hours caused by poor fitment, then add daily downtime cost multiplied by the days the unit was unavailable. Divide the total by the months the unit stays in service and you have cost per unit per month, which is the only figure that compares across suppliers.
Two details move that number more than most buyers expect. The first is panel-level versus set-level replacement: a design that lets you swap one damaged side is a different long-term proposition from one where a single scuff triggers a complete set. Replacement cost stops being a rounding error the moment a supplier can only sell the whole package. The second is rework. Extra technician hours, trimmed tabs, redrilled mounting points and second visits never appear on the purchase order, but they appear on the payroll.
Downtime is usually the largest line of all. A unit off the road earns nothing while it waits for panels, approvals and rework, and in a rental or training operation that lost utilization often outweighs the parts. Yamaha fairing replacement cost works the same way in practice: the part is a fraction of the story, and availability plus fitment quality do the rest.
| Cost component | What it depends on |
|---|---|
| Number of replacements | Damage frequency and durability across the service period |
| Single panel vs full set | Whether the supplier supports individual panel purchases |
| Labor rework | Fitment precision and mounting-point accuracy |
| Downtime | Daily revenue per unit and how long the swap takes |
Where the break-even sits
Break-even is a trade. A lower-priced set costs less overall only when the price saving is larger than the extra replacements, rework labor and downtime it generates before the unit leaves the fleet. That happens most often when units are retired early, damage frequency is genuinely low, labor rates are modest and fitment proves dependable, or there is idle capacity to absorb the downtime. It does not happen when a high-revenue unit keeps coming out of service for fitment fixes, when bodywork gets bought more than once, or when every incident demands a complete set.
Before committing a fleet budget, compare options on that per-unit-per-month basis rather than on sticker price. Owners weighing the trade can start with fairing collections organized by model, which shows quickly whether single panels and full sets are both supported for each bike you run.
Fitment Accuracy Is the Real Installation Cost Driver
If you pay a technician by the hour, the price on the fairing box is only half the invoice. The other half is decided by how closely the panels match the mounting points on your bike. A set that lines up is a straightforward bolt-on job. A set that does not turns a two-hour job into a five-hour job, and every extra hour is billed at your shop rate, not the supplier’s.
This is where the gap between OEM and cheap aftermarket sets becomes a commercial decision rather than a cosmetic one. Impact resistance gets the headlines; fitment accuracy shows up in your labor line.
Pre-drilled hole alignment
Pre-drilled holes are the first cost checkpoint. On a well-tooled set, the mounting holes index to the frame and subframe within a millimeter or two, so fasteners start by hand. When the pattern is off by three to six millimeters, your technician has two bad options: elongate the holes in a finished painted panel, or slot the brackets behind it. Both consume time, and the first risks cracking the paint around the fastener.
Mounting tabs, brackets and hardware quality
Molded tabs are where low-cost tooling shows up. Undersized tabs, tabs in the wrong plane, or tabs that break the first time a bolt is torqued all shift cost onto the installer. Fasteners do the same: wrong thread pitch, soft bolts that round off, and missing well nuts or grommets force a parts chase in the middle of a job.
Panel gap consistency
Consistent gaps between the upper, side and tail panels are the visible proof of fitment quality, and they are also a labor indicator. Gaps that pinch on one side and open on the other mean repeated trial fitting, shimming and readjustment. On a set with three or four misaligned panels, the technician effectively assembles the bike twice.
What a poor fit actually costs in hours
| Fitment problem | Typical rework required | Added labor |
|---|---|---|
| Hole misalignment of 3-6 mm | Re-drill or elongate painted panels | 0.5 – 1.5 h |
| Missing or mis-angled tabs | Fabricate or bend brackets | 1 – 3 h |
| Wrong or soft fasteners | Source hardware, chase threads | 0.3 – 1 h |
| Uneven panel gaps | Shim, elongate, repeated trial fit | 1 – 2 h |
| Trim and mounting point mismatch | Trim ABS, seal, touch up edges | 1 – 2 h |
Across a full set, that commonly adds three to seven hours. At an independent-shop rate of USD 90 to 150 per hour, the cheap set can end up costing more than the premium one before the bike leaves the bay.
Assessing fitment risk before you order
- Confirm the set is tooled for your exact model year and generation, not a nearby year with “minor modification required” in the notes.
- Ask whether holes are pre-drilled and whether the mounting kit is included, since missing hardware is a hidden line item.
- Request photos of the actual production set fitted to a bike, not a render or a mock-up.
- Check whether the supplier lists parts by generation. Catalogs organized that way, such as these Ducati fairings sorted by model and year, remove most of the guesswork.
- For volume buying, order one set and time the install before committing to a batch.
Documenting fitment problems for a supplier
A claim without evidence gets negotiated down. Build a file as the job runs: photographs of each misaligned hole with a steel rule in frame, gap measurements at the same reference points on both sides, the model, year and VIN, and the technician’s hours logged against each rework step. Note whether the issue is a defect or an installation assumption. Suppliers who sell Honda fairings across multiple model generations and BMW S1000RR fairings for the major model runs can usually identify a bad mold batch quickly when the evidence is specific.
Apply the same discipline to Yamaha kits in a mixed fleet: one documented install tells you whether the whole production run is worth buying. Fitment is measurable, so measure it before you pay for it in labor.

Figure: The repair-or-replace decision path, mapped as a single sequence of abstract steps.
Supplier Reliability, Lead Times and Inventory for Repeat Buyers
When you place the same order four or five times a year, the questions change. It stops being about one transaction and becomes about whether a supplier can keep the same catalog, the same paint code and the same answers on file for your next batch. The claims below are the supplier’s, not independently audited, so test them on a first order.
Catalog breadth across models and years
Summit Fairings states that its catalog runs to more than 3,000 styles and covers almost all motorcycle models, including older year ranges that many suppliers have dropped. For a shop servicing a mixed fleet, that would mean one purchase order instead of four, and one point of contact when a fitment question comes up. The Aprilia RS4 2011-2014 fairing range is a fair sample of how tightly models are split by year.
Individual panels or full sets
Both are offered. Crash repair usually needs one side panel, a nose or a belly pan, while a rebuild or resale prep calls for a complete kit. Because individual panels sit alongside full aftermarket fairing sets in the same catalog, a single cracked panel does not force a whole body kit.
Packaging and freight protection
Painted panels are the fragile part of any shipment: the paint is the product. According to the supplier, panels are wrapped individually, cushioned with foam layer by layer, and corner-reinforced so edges do not take load in transit. If you receive freight regularly, you already know what one scuffed panel costs in rework and reputation.
Restocking speed and paint batch matching
Repeat orders depend on color consistency. The supplier says batch records are kept against previous orders, so a second or third run of the same scheme stays visually consistent with the first, and that lead times are quoted per model rather than as one blanket estimate. Ask for both in writing on the first order and compare against the second delivery.
The value of quick technical answers
Fitment questions are the ones that stall a job: whether a 2008 tail section fits a 2007 subframe, or which bracket a specific kit needs. Summit Fairings says questions are answered within six hours, which, if it holds, keeps a bike on the lift instead of parked waiting on an email.
| What buyers ask | How it is handled |
|---|---|
| Catalog depth | More than 3,000 styles, almost all motorcycle models |
| Price positioning | 10-40% below other sites |
| Response time | Any question answered within six hours |
| Panel options | Individual panels and complete sets |
| Order consistency | Paint batch matching for repeat orders |
Those figures are supplier claims – the kind worth checking against your own first invoice rather than taking on trust. If you are planning a restock or confirming availability for a specific model year, the current catalog and lead times are at summitfairings.com.
Where the Money Actually Goes
A fairing replacement is rarely just a parts bill. The chart below shows one illustrative split across the five lines that turn up on most invoices.
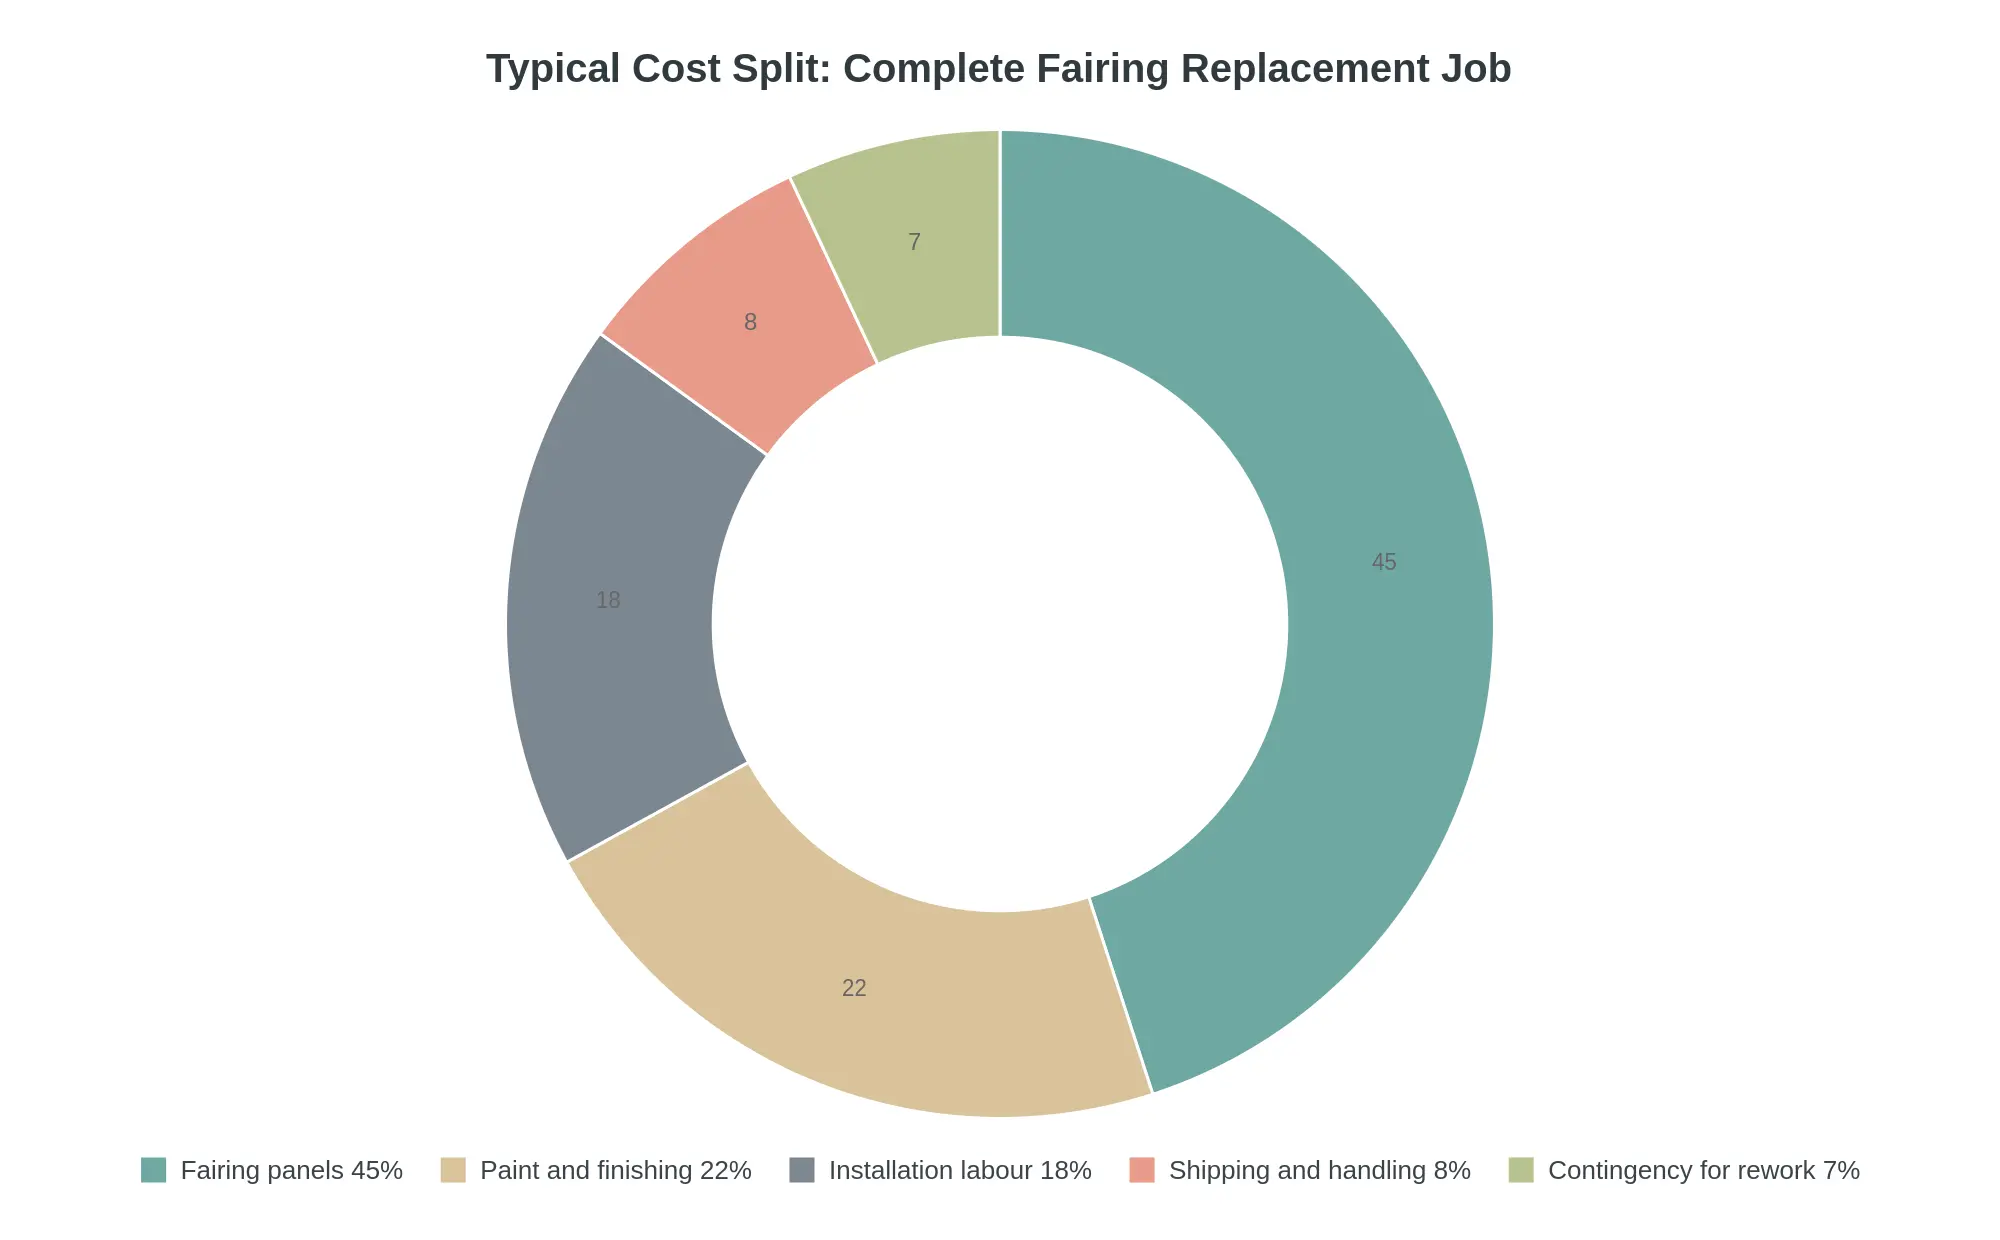
Panels are 45% of a typical job. The rest – paint, labor, shipping and a rework cushion – moves depending on whether you start with ABS or fiberglass and how clean the fitment is out of the box.
How These Figures Were Assembled
The ranges in this article are planning estimates for faired middleweight sport models, not quotations. They sit within what dealer parts lists, aftermarket listings and independent-shop labor rates show at the time of writing. No laboratory impact testing was carried out, and the cost index in the chart is a relative shape built for comparison, not a measured price series. Model year, region, tax, freight and exchange rate will move every figure. Where a number is an estimate, the text says so; where a claim comes from the supplier, it is attributed.
Frequently Asked Questions: Yamaha Fairings and Replacement Costs
Are aftermarket fairing sets as impact resistant as Yamaha original fairings?
Not automatically. A well-made set in the same ABS grade, with comparable wall thickness and sound tab design, can come close in low-speed drops and everyday contact. The difference shows up in high-energy crashes, where original panels tend to spread stress more evenly through better tooling and reinforcement. Suppliers rarely publish comparable test data, so treat material grade, measured thickness and mounting hardware as the practical proxies.
Does a lower replacement cost always signal weaker panels?
No. A lower price more often reflects production scale, distribution model and dealer markup than a weaker panel. Many aftermarket sets use the same ABS grade as original equipment. Price alone tells you nothing, though: check thickness at several points, the material, and how the tabs and mounting kit are made. Very cheap sets built from thin plastic or brittle fiberglass are where a real strength concern is justified.
How closely do aftermarket sets match original fitment and mounting points?
Reputable suppliers replicate original mounting points and panel gaps closely enough for bolt-on installation without drilling. Minor tolerance differences remain, so do a test fit before final torque. Fitment quality varies by supplier, which makes model-year verification essential – you can browse the full fairing collection to compare options by bike.
How long does each option typically last under regular commercial use?
Suppliers rarely publish service-life data, and there is no common test standard behind the year ranges often quoted, so treat them with suspicion. What decides lifespan is UV exposure, cleaning chemicals, heat, vibration and the paint system. Factory paint and clear generally outlast a hand-sprayed finish, and that usually shows up first as fading, chalking or peeling rather than structural failure. In commercial use, replacement is driven more by damage events than by age.
Can impact resistance be improved through installation or reinforcement choices?
Yes. Correct torque values, rubber-mounted fasteners and accurate bracket alignment reduce point loading on both options. Reinforcement plates and frame sliders behind the panels further limit cracking. Installation quality frequently matters more than panel source on its own.
How should a buyer compare total replacement cost between the two options?
Price the whole system: panels, decals, mounting hardware, shipping and the labor hours for fitment. A low per-panel price with poor fitment costs more once adjustment time is counted. Compare cost per year of service, not invoice total.
Conclusion: Impact Resistance and Replacement Cost as the Decision Pair
Every fairing decision in this article comes back to two variables. Impact resistance decides how much damage a set absorbs and how it survives contact. Replacement cost decides what it takes, in money and downtime, to bring the bike back to a presentable state. Neither settles the purchase alone; the balance between them does.
Which way the balance tips depends on use. For high-contact, high-turnover use – machines ridden constantly, handled by many people, or exposed to frequent low-speed incidents – the balance tilts toward sets that tolerate contact and are cheap to replace, so each event stays a routine transaction rather than a capital loss. For low-contact, long-hold use – machines ridden less often, kept longer, expected to look right years after purchase – the balance tilts toward construction and finish that hold up, with replacement cost treated as a distant consideration.
The order of checks stays the same either way. Start with material and construction, because it sets the ceiling on durability. Move to fitment and labor exposure, since mounting time and rework often outweigh the panels themselves. Finish with total replacement cost across a service period, which turns the first two checks into one comparable figure. That sequence holds whether you are assessing Yamaha fairing replacement cost for one bike or across a working fleet.
For buyers who want aftermarket fairing sets at the supplier’s claimed 10-40% below other sites, summitfairings.com is worth a look – and worth testing on one order before you commit a batch.