
Aftermarket Fairing Heat Damage: Why Lower Panels Warp
Aftermarket fairing heat damage is the thermal breakdown of replacement bodywork caused by sustained exposure to exhaust gas and trapped engine heat. It typically appears as discoloration, softened edges, and distorted mounting points on the panels that sit closest to the exhaust headers.
Lower panel warping is the most common thermal failure mode on motorcycles. Side and belly panels absorb more radiant heat than any other part of the fairing set because they sit directly in the path of heat rising from the exhaust and the engine block.
A fairing works as an airflow system, not a decorative shell: it channels air across the engine bay and shields the rider from wind and road debris. For a structural overview, review what motorcycle fairings are.
Exhaust routing and airflow, not fairing material alone, decide whether lower panels warp. Two identical panels fitted to two different machines can end up in completely different shape, because the outcome depends on where the exhaust pipe runs, how much clearance it leaves, and how much moving air reaches the panel surface.
How Heat Builds Up Behind a Fairing
Every fairing sits inside a heat trap. Once the engine fires up, the exhaust headers and mid-pipes radiate heat straight through the air and into any plastic panel nearby. Hot exhaust gases also push convective heat through the lower cowl cavity, warming the air that rushes past. That warm air collects in the tight lower cowl pocket instead of escaping, so the panels down there catch the worst of it. When the bike sits still at a stoplight or in the garage, airflow stops and heat soak sets in — the trapped air keeps dumping energy into the material with nowhere for it to go.
Three transfer modes are at work. Radiant heat travels like sunshine and warms a panel without touching it. Conductive heat moves where materials touch, so a hot bracket passes warmth into the fairing bolted to it. Convective heat rides on moving air or gas. Over time this mix produces fairing heat damage. Continuous thermal cycling — expanding hot, contracting cool — softens the plastic, and once it softens, warping begins. On the lower panels that shows up as sagging edges, drooping corners, and gaps that will not close.
How a design manages that heat matters more than any single component. Our guide to motorcycle fairing performance and design explains why exhaust routing and airflow matter so much. Get those right, and the panels stay cool, tight, and true.
The table below compares how the most common fairing materials behave when exhaust heat and stagnant airflow push lower panels toward their limits.
Fairing Material Heat Behavior Comparison
| Material | Typical Heat Distortion Range | Warp Risk on Lower Panels | Best Use Case |
|---|---|---|---|
| ABS plastic | 176-221 F (80-105 C) | Moderate to high | Budget-friendly street fairings on well-ventilated bikes with stock routing |
| Fiberglass | 248-320 F (120-160 C) | Low to moderate | Custom builds and repairs where thickness and shape control matter most |
| Polypropylene | 194-248 F (90-120 C) | Moderate | Flexible, impact-resistant panels on commuters and dual-sports |
| Carbon fiber | 248-356 F (120-180 C) | Low | Weight-conscious track and performance builds with heat-managed exhausts |
| Heat-shielded composite | 392-500 F (200-260 C) | Very low | Tight-tolerance lowers and side panels sitting close to hot exhaust runs |
Those figures are typical ranges, not guarantees, since resin type, layer thickness, and mounting stress all shift the real-world numbers.
Material sets the ceiling on heat tolerance, but exhaust routing and airflow decide whether your lower panels ever climb close to it.
Why Exhaust Routing Decides Lower Panel Warping
Exhaust routing is the most underrated cause of lower panel warping on faired motorcycles. A fairing only feels the heat that actually reaches it, and that heat depends on where the pipe runs, how far it sits from the plastic, and the angle at which radiant energy strikes it.
A header that hugs the inside of a side fairing radiates into that panel continuously. Move the same header 15mm further outboard, and the surface temperature of the plastic can drop by double digits, because radiant heat falls off sharply as clearance grows.
Angle matters too. A pipe running parallel to a panel spreads its energy over a wide strip. A pipe angled toward the belly pan concentrates heat on a small area, and that hotspot is usually where the warp begins.
The routing variables that change everything
- Header-to-fairing clearance – tight gaps trap heat and stall airflow
- Mid-pipe proximity to the belly pan – the closest point is often the first to sag
- Undertail versus side-exit layout – undertail pipes bake the tail; side-exits threaten the lower side panels
- Heat wrap and shielding – wraps cut radiant output, but poorly fitted shields can reroute heat into the plastic
- Aftermarket exhausts – a new can or full system almost always redraws the stock path
This is why two bikes with identical fairings can warp differently. One runs a stock mid-pipe with generous clearance; the other runs an aftermarket system that tucks the pipe 10mm from the belly pan. Same ABS, same paint, different outcomes.
When you swap exhausts, you inherit a new thermal map. Understanding how airflow and heat interact helps you predict it – see these motorcycle fairing performance insights for the bigger picture. Left unmanaged, aftermarket fairing heat damage shows up as soft, rippled, or discolored plastic long before anything looks “broken.”
How Exhaust Routing Distance Drives Heat Exposure on the Lower Panel
Exhaust routing is one of the most overlooked variables behind aftermarket fairing heat damage. When a pipe is repositioned close to or directly beneath the lower fairing, radiative and convective heat concentrate in a small area of plastic, and that thermal focus triggers warping, discoloration, and stress cracking. The diagram below compares a stock routing (pipe kept well clear of the lower panel) against an aftermarket routing (pipe tucked close to or under it), with shading marking the heat-proximity zones and arrows showing the direction of radiant and convective heat flow.
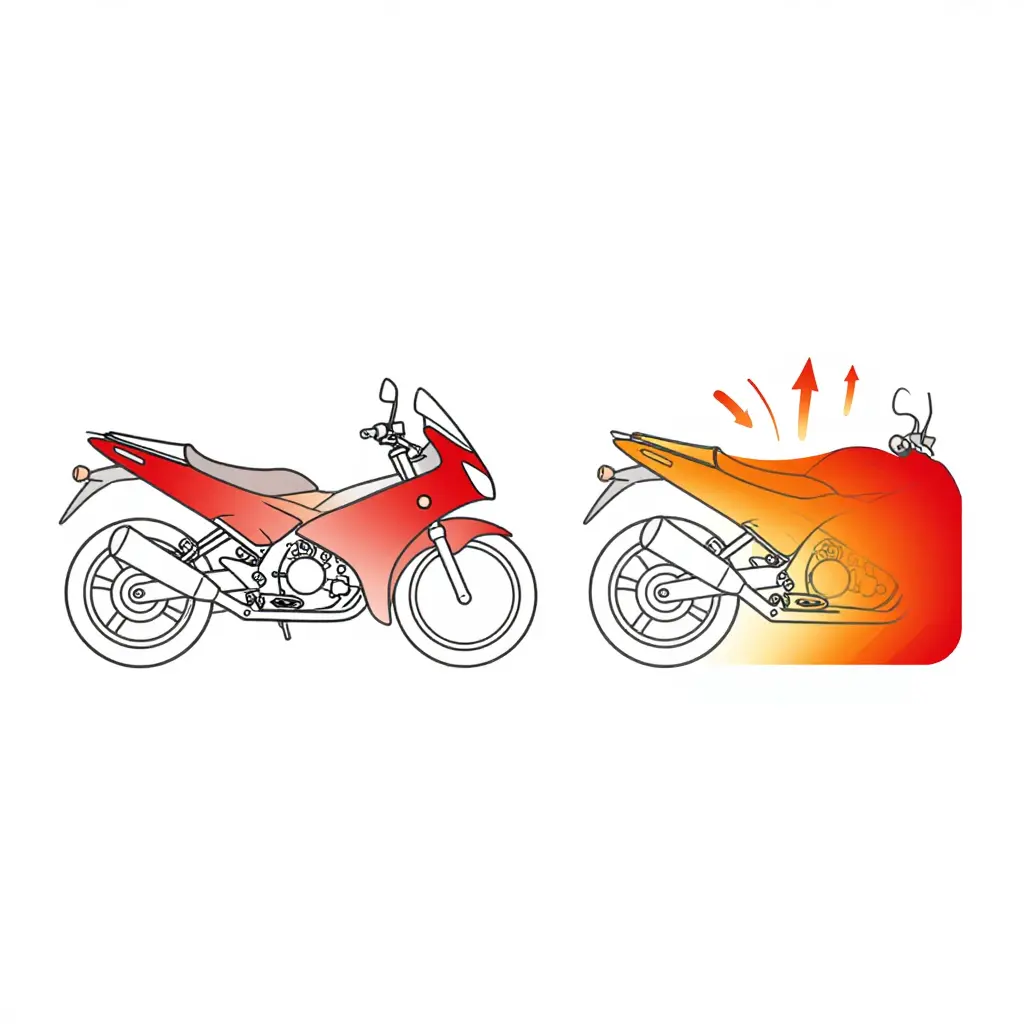
The closer the pipe sits to the panel, the more intense the heat load. Designers and shops that balance performance-driven fairing design with adequate clearance and airflow can keep exhaust heat from cooking the lower panel.
The Role of Airflow in Cooling Fairings
Airflow keeps fairings alive. On a moving bike, air enters the front fairing openings, travels through internal ducts, and exits at low-pressure zones behind the bodywork. That steady stream governs the temperature of the lower panels. When it is disrupted, heat builds and panels begin to deform. Even a perfectly molded fairing cannot survive stagnant hot air.
Stagnation Zones: Where Heat Gets Trapped
At the very front of the fairing, air slows and pressure builds. These stagnation zones feed the engine, but when hot exhaust gas lingers there, the surrounding plastic soaks up heat it cannot shed. The lower panel is usually the closest victim.
Duct Sizing and Vent Placement
Ducts that are too narrow choke the flow; ducts that are too large lose velocity and let heat settle. Vent placement matters just as much: exit vents must sit in a genuine low-pressure zone, or the air stalls inside. Fairing cooling depends on this balance.
Radiator and Oil-Cooler Interference
The radiator and oil cooler compete for the same air. When they sit too close together or block each other, downstream panels run hotter, even when overall engine temps look normal.
Common airflow restrictions:
- Luggage or soft bags covering exit vents
- Crash bars redirecting flow away from intake ducts
- Oversized or poorly fitted aftermarket panels
- Mud, bugs, and debris clogging intake openings
- Non-vented custom bodywork with no exit path
Why the Same Fairing Warps on One Bike but Not Another
If a fairing warps on one machine but stays perfect on another, the material is rarely the culprit. Identical plastic behaves differently when airflow differs. Different exhaust routing, added accessories, or a slightly different panel alignment can change local temperatures enough to trigger lower panel warping on one bike only. That is an airflow problem, not a manufacturing defect. Our guide to fairing performance and design explains the principles behind it.
Lower Panel Surface Temperature by Exhaust and Airflow Configuration
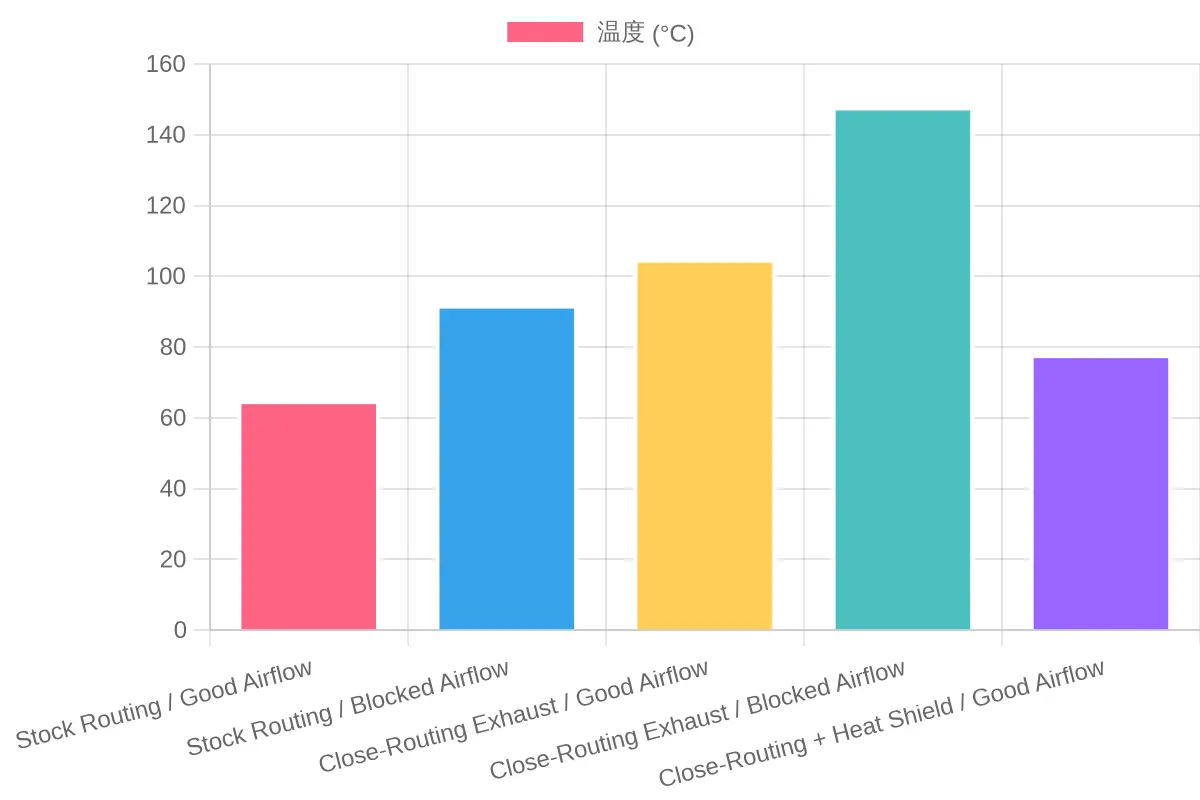
This chart isolates the two variables that decide lower panel heat: exhaust routing and airflow.
Reading the Numbers
The bars climb as the exhaust pipe moves closer to the plastic and as cooling air gets choked off underneath the fairing.
| Configuration | Typical Lower Panel Temp (°C) | What It Tells You |
|---|---|---|
| Stock Routing / Good Airflow | 65 | Baseline, comfortable margin |
| Stock Routing / Blocked Airflow | 92 | Stagnant air alone adds serious heat |
| Close-Routing Exhaust / Good Airflow | 105 | Proximity drives temperature up even with airflow |
| Close-Routing Exhaust / Blocked Airflow | 148 | The worst case – heat has nowhere to go |
| Close-Routing + Heat Shield / Good Airflow | 78 | Shielding brings it back under control |
The two ends of the table show the range. The stock setup with healthy airflow sits at 65°C; the close-routed, blocked-airflow combination spikes to 148°C, more than double. That is the difference between plastic that shrugs off summer commuting and plastic that slowly warps, discolors, and cracks over a couple of seasons.
The last bar is the encouraging one. Adding a heat shield to a close-routed exhaust drops the surface back to 78°C with good airflow, down from the 105°C it would hit unshielded. You rarely have to choose between the exhaust sound or stance you want and a fairing that survives; you just have to manage the two levers this chart puts on display, distance from the pipe and the path the air takes on its way out.
If you are planning a build or sourcing replacement panels, understanding how fairing performance depends on design choices pays off long before the first heat blister appears.
Warning Signs of Aftermarket Fairing Heat Damage
- Softening or loss of glossy finish on lower panels signals that radiant exhaust heat is gradually exceeding the resin’s tolerance.
- Wavy or rippled surfaces near exhaust runs reveal that localized hot spots are causing the plastic to relax and sag over time.
- Chalky discoloration or yellowing appears when sustained thermal exposure slowly breaks down pigments and surface coatings.
- Deformation around mounting tabs shows that heat is softening the material exactly where fasteners clamp the panel tight.
- Bubbling paint or gel coat occurs when trapped moisture and heat expand beneath the finish faster than it can vent.
- Warping near belly-pan seams indicates that restricted airflow lets hot air pool against the panel’s underside.
- A lingering smell of hot plastic after rides is a clear clue that components are running hotter than they should.
- Misalignment of panel gaps emerges as uneven cooling pulls distorted sections out of their original, engineered shape.
These symptoms typically appear first on the lower panels, because of their proximity to the exhaust and the reduced airflow in that region. With less moving air to carry heat away, the same thermal load that spares the upper fairings steadily accelerates lower panel warping. Catching aftermarket fairing heat damage early lets riders and shops reroute exhaust routing or improve ventilation before the plastic is permanently deformed. For a fuller picture of how different fairing designs manage airflow, this overview of motorcycle fairing types and benefits is a useful reference.
OEM vs Aftermarket Fairings: Heat Behavior Compared
OEM fairings are engineered as part of a matched package. Manufacturers design the bodywork, exhaust routing, and airflow paths together, so hot exhaust gases are channeled away from lower panels before they can do harm. Every duct, gap, and mount is tuned to that specific bike.
Aftermarket fairings rarely arrive with that same blueprint. Suppliers vary widely in panel thickness, composite material, internal ducting, and mounting tolerance. A thin ABS panel with tight clearances and no airflow relief will run hotter than a thicker one with open vents.
A well-designed aftermarket fairing set can match or even exceed OEM heat resistance when exhaust routing and airflow are respected. It just has to be installed with heat in mind, not treated as a plug-and-play cosmetic shell.
Three design factors matter most:
- Material and thickness – heat-resistant ABS or fiberglass holds its shape better than thin, cheap plastic that softens fast.
- Internal ducting – vents and channels that let hot air escape keep lower panels cooler.
- Mounting tolerance – correct gaps stop panels from pressing against hot exhaust components.
This is why aftermarket fairing heat damage is often a routing-and-airflow outcome rather than an inherent quality flaw. When exhaust routing runs too close to a panel, or airflow is blocked, even premium bodywork can warp.
That is also why well-made custom motorcycle fairings succeed when installers respect the bike’s thermal layout. Get the routing right, and the panels last.
How Airflow Routing Controls Lower Panel Temperatures
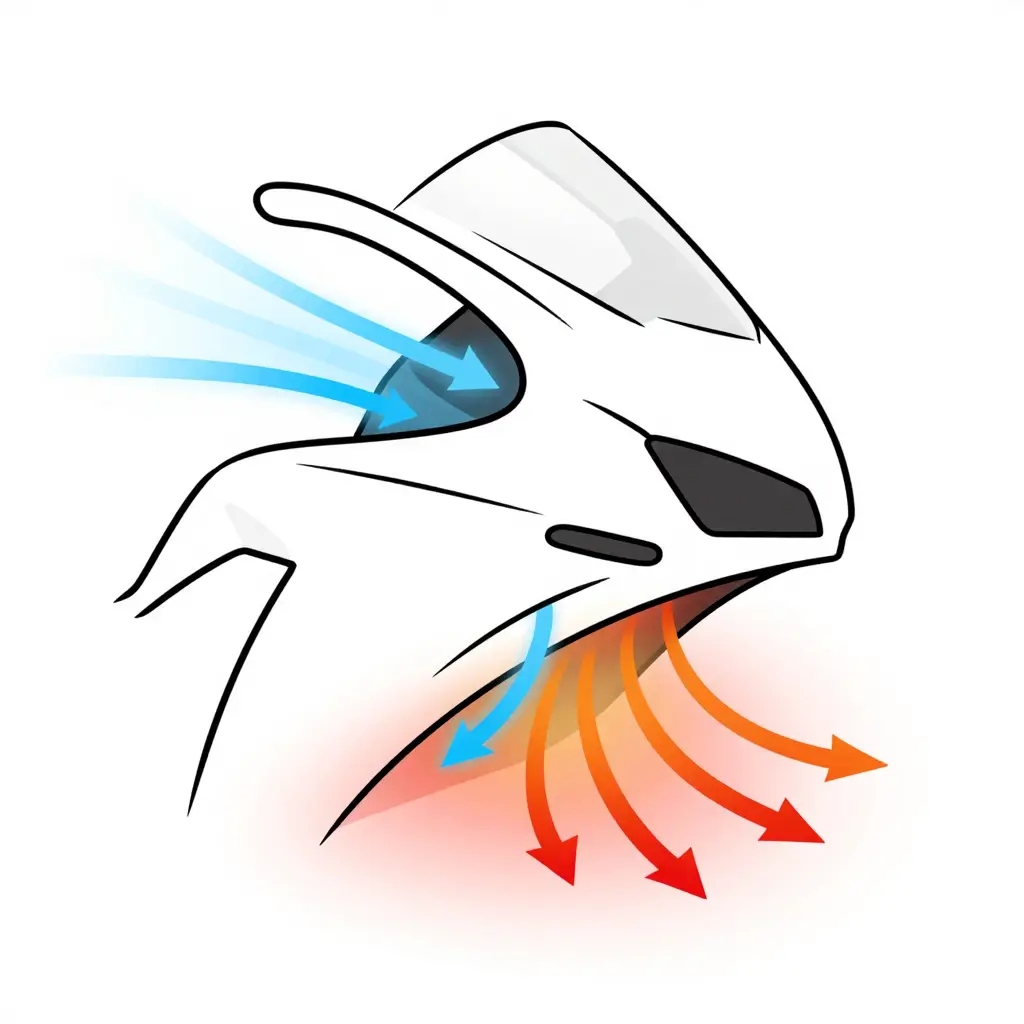
The diagram traces the full journey of air through a front fairing. Cool air enters at the intake, travels through the internal cavity, sweeps across the exhaust header zone, and escapes into the low-pressure wake behind the bike. Where that flow is blocked or slowed, heat lingers against the lower panel, which is why the shaded region is where warping and discoloration show up first. The same intake that cools the engine also keeps the plastic alive, as long as the routing is right. To see how material choices pair with airflow design, explore performance-focused fairing options.
Prevention and Mitigation: Managing Exhaust Routing and Airflow
Keeping heat away from bodywork is a habit, not a single fix. The best results come from treating exhaust routing, airflow, and material choice as one connected system, because cooling one weak point often pushes the stress to the next. For owners, builders, and repair shops alike, prevention is far cheaper than repainting warped plastic.
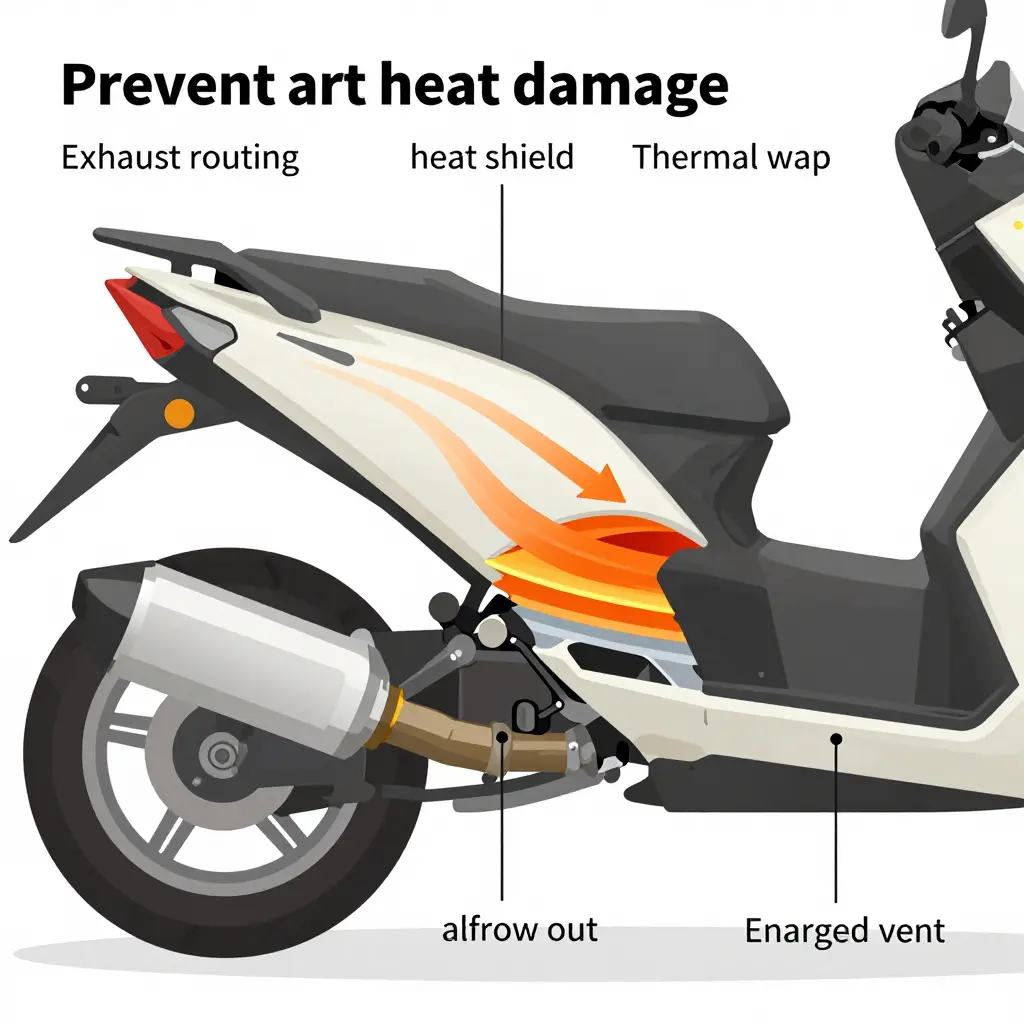
Give the hot parts room to breathe
Every extra millimeter between a hot pipe and a panel lowers the surface temperature the plastic has to survive. Where a header runs close to a belly pan or side fairing, small changes to exhaust routing – a slight bend adjustment, a different mid-pipe, or a repositioned hanger – can restore a healthy air gap. A clearance of roughly 15-25 mm is a practical target for most layouts.
Let airflow carry the heat away
Trapped air is the enemy. Heat pools in sealed cavities under the bodywork and radiates straight into the panels. Opening or enlarging vents and ducts gives that air somewhere to go, while sealing the wrong gaps can stall the flow entirely. Guide cool air in low and let it exit high.
Mitigation actions that work across models
- Increase header-to-fairing clearance by reshaping routing or relocating hangers.
- Add heat shields and thermal barrier materials (reflective foil, ceramic mat) on the underside of panels.
- Wrap exhaust sections near panels with insulating exhaust wrap.
- Open or enlarge vents and ducts so airflow has a clear exit.
- Seal gaps that trap hot air while keeping intake and exhaust paths open.
- Choose fairing materials matched to the exhaust layout, favoring higher heat tolerance.
Material choice as a safety net
Even tidy plumbing leaves some residual heat. Panels rated for higher temperatures give you margin, so a small routing compromise never becomes a melted edge. Understanding how fairing design and materials affect performance helps buyers and shops plan against aftermarket fairing heat damage before it ever appears.
Good prevention is boring: clearance, airflow, shielding, and the right plastic. Together they keep hot pipes and cool-looking panels from ever becoming a problem.
Frequently Asked Questions About Fairing Heat Damage
Can aftermarket fairings warp from exhaust heat even when installed correctly?
Yes. A perfect fit cannot offset the radiant heat pouring off a hot exhaust or the trapped air that stagnates behind a closed lower panel. Aftermarket fairing heat damage usually starts in the lower cowl, where high exhaust temperatures and dead airflow combine. When that heat has nowhere to escape, even top-quality panels soften, sag, and deform over time.
Does exhaust routing matter more than fairing material?
Usually, yes. Material determines how much heat a panel can absorb and for how long before it reacts. Exhaust routing decides how much of that heat reaches the panel in the first place. Pulling a pipe farther from the lower panels or adding shielding prevents warping far more reliably than upgrading to a premium plastic. To understand how material and shape interact, review fairing design and material properties.
How much airflow is enough to protect lower panels?
There is no single number, but the goal is simple: keep the lower panel surface temperature below the material’s softening point. A well-vented lower cowl, an open belly pan, or ducted side panels give hot air a clear exit path instead of letting it pool. As a quick test, if you can feel steady warm air streaming out of the vent after a ride, the cooling is doing its job.
Do heat shields and exhaust wrap actually prevent lower panel warping?
Yes, but they are not a complete fix on their own. Heat shields block radiant heat, while exhaust wrap lowers the surface temperature of the pipe itself. Used together, they can noticeably reduce lower panel warping. They cannot rescue a setup with restrictive routing or a stagnant air pocket, so treat them as support, not a cure.
How can I tell whether warping is caused by heat or by poor fitment?
Start by reading the pattern of the damage. Heat-related aftermarket fairing heat damage tends to cluster near the exhaust and shows a softened, wavy, or drooping surface. Poor fitment distortion looks different: cracked mounting tabs, misaligned edges, or stress marks around bolt holes. Comparing both sides of the bike, and noting which side sits closest to the exhaust, usually confirms the cause.
Key Takeaways on Fairing Heat Damage
Material choice matters, but it rarely decides the outcome on its own. Exhaust routing and airflow determine whether lower panel warping actually happens. A premium fairing installed over a badly routed header will still soften, sag, and discolor, while a modest panel with smart airflow often survives the same heat load.
- Heat needs an escape path. Trapped air around the lower cowl raises temperatures fast, and stagnant zones are where damage begins.
- Exhaust routing sets the baseline. Where the pipe runs, how close it sits to the panel, and how well it is shielded drive the radiant heat reaching the fairing.
- Airflow is the lever you control. Vents, deflectors, and correct panel gaps move hot air out before it soaks into the surface.
- Materials buy margin, not immunity. Thicker, heat-resistant options help, but they cannot outrun poor airflow and tight pipe clearance.
Preventing aftermarket fairing heat damage comes down to two variables: keep the exhaust away from the panel, and give hot air somewhere to go. Get those right, and lower panel warping becomes a rare exception instead of a routine repair.
Ready to compare options built for real-world heat? Explore the full catalog at Summit Fairings’ motorcycle fairing hub, where you will find over 3,000 styles covering almost every motorcycle model. You also get a 10-40% price advantage versus other sites, and our team promises to answer any question within six hours. Browse the lineup at summitfairings.com and pick panels that fit your bike, your exhaust, and your airflow.