
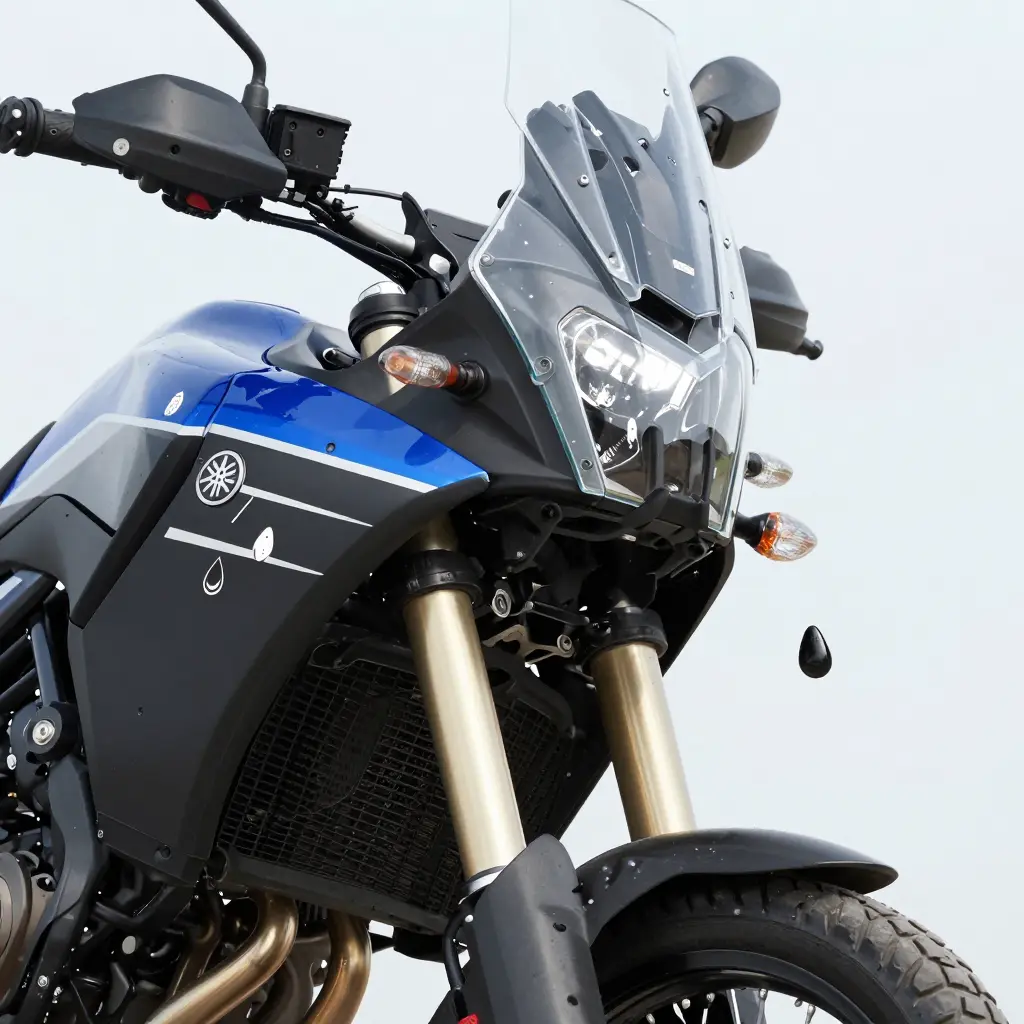
The Two Variables That Decide Repair or Replace
After a drop, the fairing on a Yamaha Tenere 700 comes down to two things: whether and where the crash bar pressed into the panel, and how much stress the mounting tabs took. Paint scuffs and surface abrasion affect appearance, but they do not tell you whether the panel can go back on the bike.
Crash bar contact is the physical record of the fall: did the bars push into the fairing, or did they hold the panels clear of the ground? Mounting tab stress is the load carried by the small locating tabs that hold each panel to its bracket. It shows up as cracking, stress whitening, or an elongated hole at the mounting point.
Those two readings describe the load path: the route impact energy took through the bodywork. Abrasion sits on the surface and can be refinished. Tab damage and bar pressure sit inside the joint, where a panel either still carries load or no longer does.
Shops, dealers, and fleets can use the same two readings on every bike, which helps keep the repair-or-replace call consistent from one technician to the next.
Crash Bar Contact: Where the Force Lands
Crash bars are meant to hit the ground before the bodywork does, and that changes the load path. On a protected bike the tube usually hits before the outer face of the panel reaches the ground, so the panel is loaded at the bar-to-panel interface instead of across its exposed skin. The stress travels inward to the mounting points, grommets, and tabs. The panel can look untouched while its fixings take most of the impact.
Read contact marks for location rather than appearance. A localized crush mark, a deformed bar-to-panel gap, a bar that has moved off its mounting plane, or a panel that no longer sits flush against the bar all show where the load concentrated. A tight crush mark at one point tells you more than a broad scuff, because it points to a specific stress path rather than surface wear. That is why panel alignment is the first thing to measure after a drop: gaps that close on one side and open on the other show whether the mounting bracket or the panel moved.
Contact alone does not justify replacement. What decides reuse is preload and stand-off alignment: does the bar still sit true, and does the panel sit evenly relative to it once the fasteners are torqued? If both hold and the tabs are sound, the panel can go back on. If the stand-off has shifted, polishing will not correct it. For anyone weighing replacement fairing options, a sound Yamaha Tenere 700 fairing repair starts with that measurement, not with a count of scratches.
Post-Drop Inspection Points
Run this motorcycle fairing inspection as soon as the bike is upright, because what you find early determines whether a repair or a full replacement is the better spend.
- Outer panel surface: cracks that run through the plastic, or deep gouges, can mean the panel has lost impact strength at that point.
- Crash bar and mounts: a bar that no longer sits parallel to the panel, or elongated bolt holes and crushed spacers at the frame or its brackets.
- Tab roots at the fastener seats: stress whitening at the root, or a tab already partly split from the panel.
- Fastener seat distortion: the seat should be flat; a dished or oval seat means the bolt head no longer sits flush.
- Adjacent panel gaps: uneven gaps to the tank that shift when you press on the panel point to a warped mount.
- Frame-side brackets: cracked welds or bent ears where the fairing bracket meets the frame.
Use the list to separate cosmetic findings, such as scuffs and paint chips, from structural ones: cracked tabs, bent brackets, and distorted seats that affect safety and resale value.
Where the load goes
A drop does not damage a fairing evenly. The crash bar touches the side panel at a few small points, and what happens next depends on how that concentrated load reaches the mounting tabs.

How to read it: the three solid zones mark where the bar presses into the panel. The arrows trace each load path inward and upward toward the mounting tabs, the points where the panel attaches to the bike. Those tabs are small, thin, and unsupported on one side, which is why they often fail before the visible skin does.
Why contact zones matter more than scratches
Riders tend to judge damage by what they can see: scuffs, cracked paint, a spiderweb spreading through the clear coat. Bar contact points tell a different story. Each zone concentrates load, and the shape of the panel around it determines whether the impact spreads over a wide area or funnels straight into a tab.
- Bar contact on a flat, supported area: force spreads outward, the panel flexes, and it usually survives with cosmetic damage only.
- Bar contact beside a tab or inner rib: force goes straight into a fastener, and the tab cracks or tears free.
- Bar contact on a curved lip: the panel folds instead of cracking, which looks worse than it is and is often easier to repair.
Three zones, three stress paths
On a Tenere with crash bars, contact often shows up in three places: low at the front where the bar crosses the belly of the panel, mid-panel at the widest point, and near the rear edge of the panel. Each one usually routes to a different tab, so the damage reads as separate problems rather than one large one. That separation is what makes a panel-by-panel call possible.
If one tab is stressed, its root is intact, and the skin around the contact zone is sound, the panel is usually a repair candidate: the structure absorbed the hit locally. If two or more tabs are involved, or the panel has visibly deformed between a contact zone and its tab, the geometry has changed, and replacement is often cheaper once labour and a second failure are counted. A panel that no longer sits on its original mounting points will rattle, gap, and keep loading the remaining tabs.
The check at the bike
Find where the bar touched, follow the line from that point to the nearest tab, and check whether the tab and the material between them are still straight. Contact marks show where the hit landed; the load path shows what it damaged.
Tab Stress: The Part That Fails Quietly
Mounting tabs are among the smallest load-bearing sections in the fairing assembly. A small footprint carries the load of a large plastic panel, so stress per unit area is high. After a drop, the panel face can look fine while the tab root works toward failure. The tab root is a stress riser, a sudden change in section where load concentrates; riders often find it is the part that breaks.
Fairing tabs usually fail without warning. Cracks spread at the root under road vibration, heat cycles, and engine vibration, and hairline damage stays hidden until a fastener pulls free. Inspect the inner side of each tab with a light before you trust the outer finish. A crack that is still small is easier to repair than one that has spread. You can browse replacement fairing panels once the inspection is done.
Not every tab is worth saving. A single clean crack away from the root is usually a straightforward repair. A root fracture that crosses the fastener seat, a deformed or elongated hole, or a tab torn from the panel body usually means replacement is the better call. A new panel restores fastener geometry and alignment; a repair preserves original material only where the tab root is intact. In practice, tab condition decides the call more often than paint does.
Before you spend money on a panel, use this matrix to sort the damage into keep, repair, or replace. Each row pairs what you can see with what it usually means underneath, so your tech can quote the job with fewer surprises. If the verdict is replacement, explore replacement fairing options and confirm the finish and lead time before the bike goes back on the road.
| Damage indicator | What it signals | Recommended action | Business impact |
|---|---|---|---|
| Cosmetic scuffing with sound tabs | Surface wear only; mounting points still solid | Repaint or polish; refit the original panel | Low: cosmetic only, minimal downtime |
| Single clean tab crack away from root | Localized stress; tab still locates the panel | Plastic-weld, reinforce, then monitor at each service | Moderate: short repair, watch for spreading |
| Tab root fracture or torn tab | Load path broken; panel cannot hold alignment | Replace the panel; repairs rarely survive vibration | High: panel loss, repeat downtime, comeback risk |
| Crash bar contact with misaligned panel stand-off | Bars pushed inward, preloading the panel constantly | Replace panel; inspect and realign crash bars | High: ongoing abrasion, safety and resale hit |
| Distorted or elongated fastener holes | Repeated movement; fasteners no longer hold torque | Replace panel; renew clips, grommets, and bolts | High: chronic loosening, water ingress, cost creep |
Caption: A triage aid for repair-or-replace calls after a drop; it flags crash bar contact early but does not replace a physical inspection.
What the Job Costs a Business
Shops and fleets rarely buy a panel on sticker price alone. What matters is the cost of getting a bike back into service, and three factors drive it. Total cost comes first: labour, parts, and downtime while a bike sits on the ramp. A panel that needs repeated adjustment adds cost without appearing on a parts invoice. Availability matters next; a cheap part three weeks out can cost more in lost rental days than a pricier one that lands in two. Then there is resale or rental readiness. An aftermarket set that aligns correctly holds panel gaps, keeps fleet presentation consistent, and protects resale value at disposal.
Where tab geometry is compromised (cracked mounting tabs, elongated holes, stress marks radiating from crash bar contact), replacing the panel is often the lower total cost, because a repair at an already stressed joint may not survive a second drop. Where the structure is intact and only the skin is scuffed, repair remains much cheaper. Add labour, downtime, and freight, and the lowest parts price often loses. Downtime is easy to underestimate, and no parts invoice shows it.
Summit Fairings advertises over 3,000 fairing styles, prices them 10-40% below other sites, and commits to answering enquiries within six hours.
For mixed fleets, browse the general catalogue or check per-model coverage such as Ducati fairings.
Repair vs Replacement by Panel Group
The chart below compares the four panel groups that usually take the hit after a drop: upper side, mid side, lower side, and nose bezel. Each has a repair bar and a replacement bar. Higher bars mean a higher cost index. The gap narrows for the mid side panel, where tab stress is more likely to be structural than cosmetic. It closes for the nose bezel, where replacement costs about the same as repair. When the repair bar approaches the replacement bar, most owners are better off buying fresh bodywork through the fairing panel collections than paying twice for a patch job.
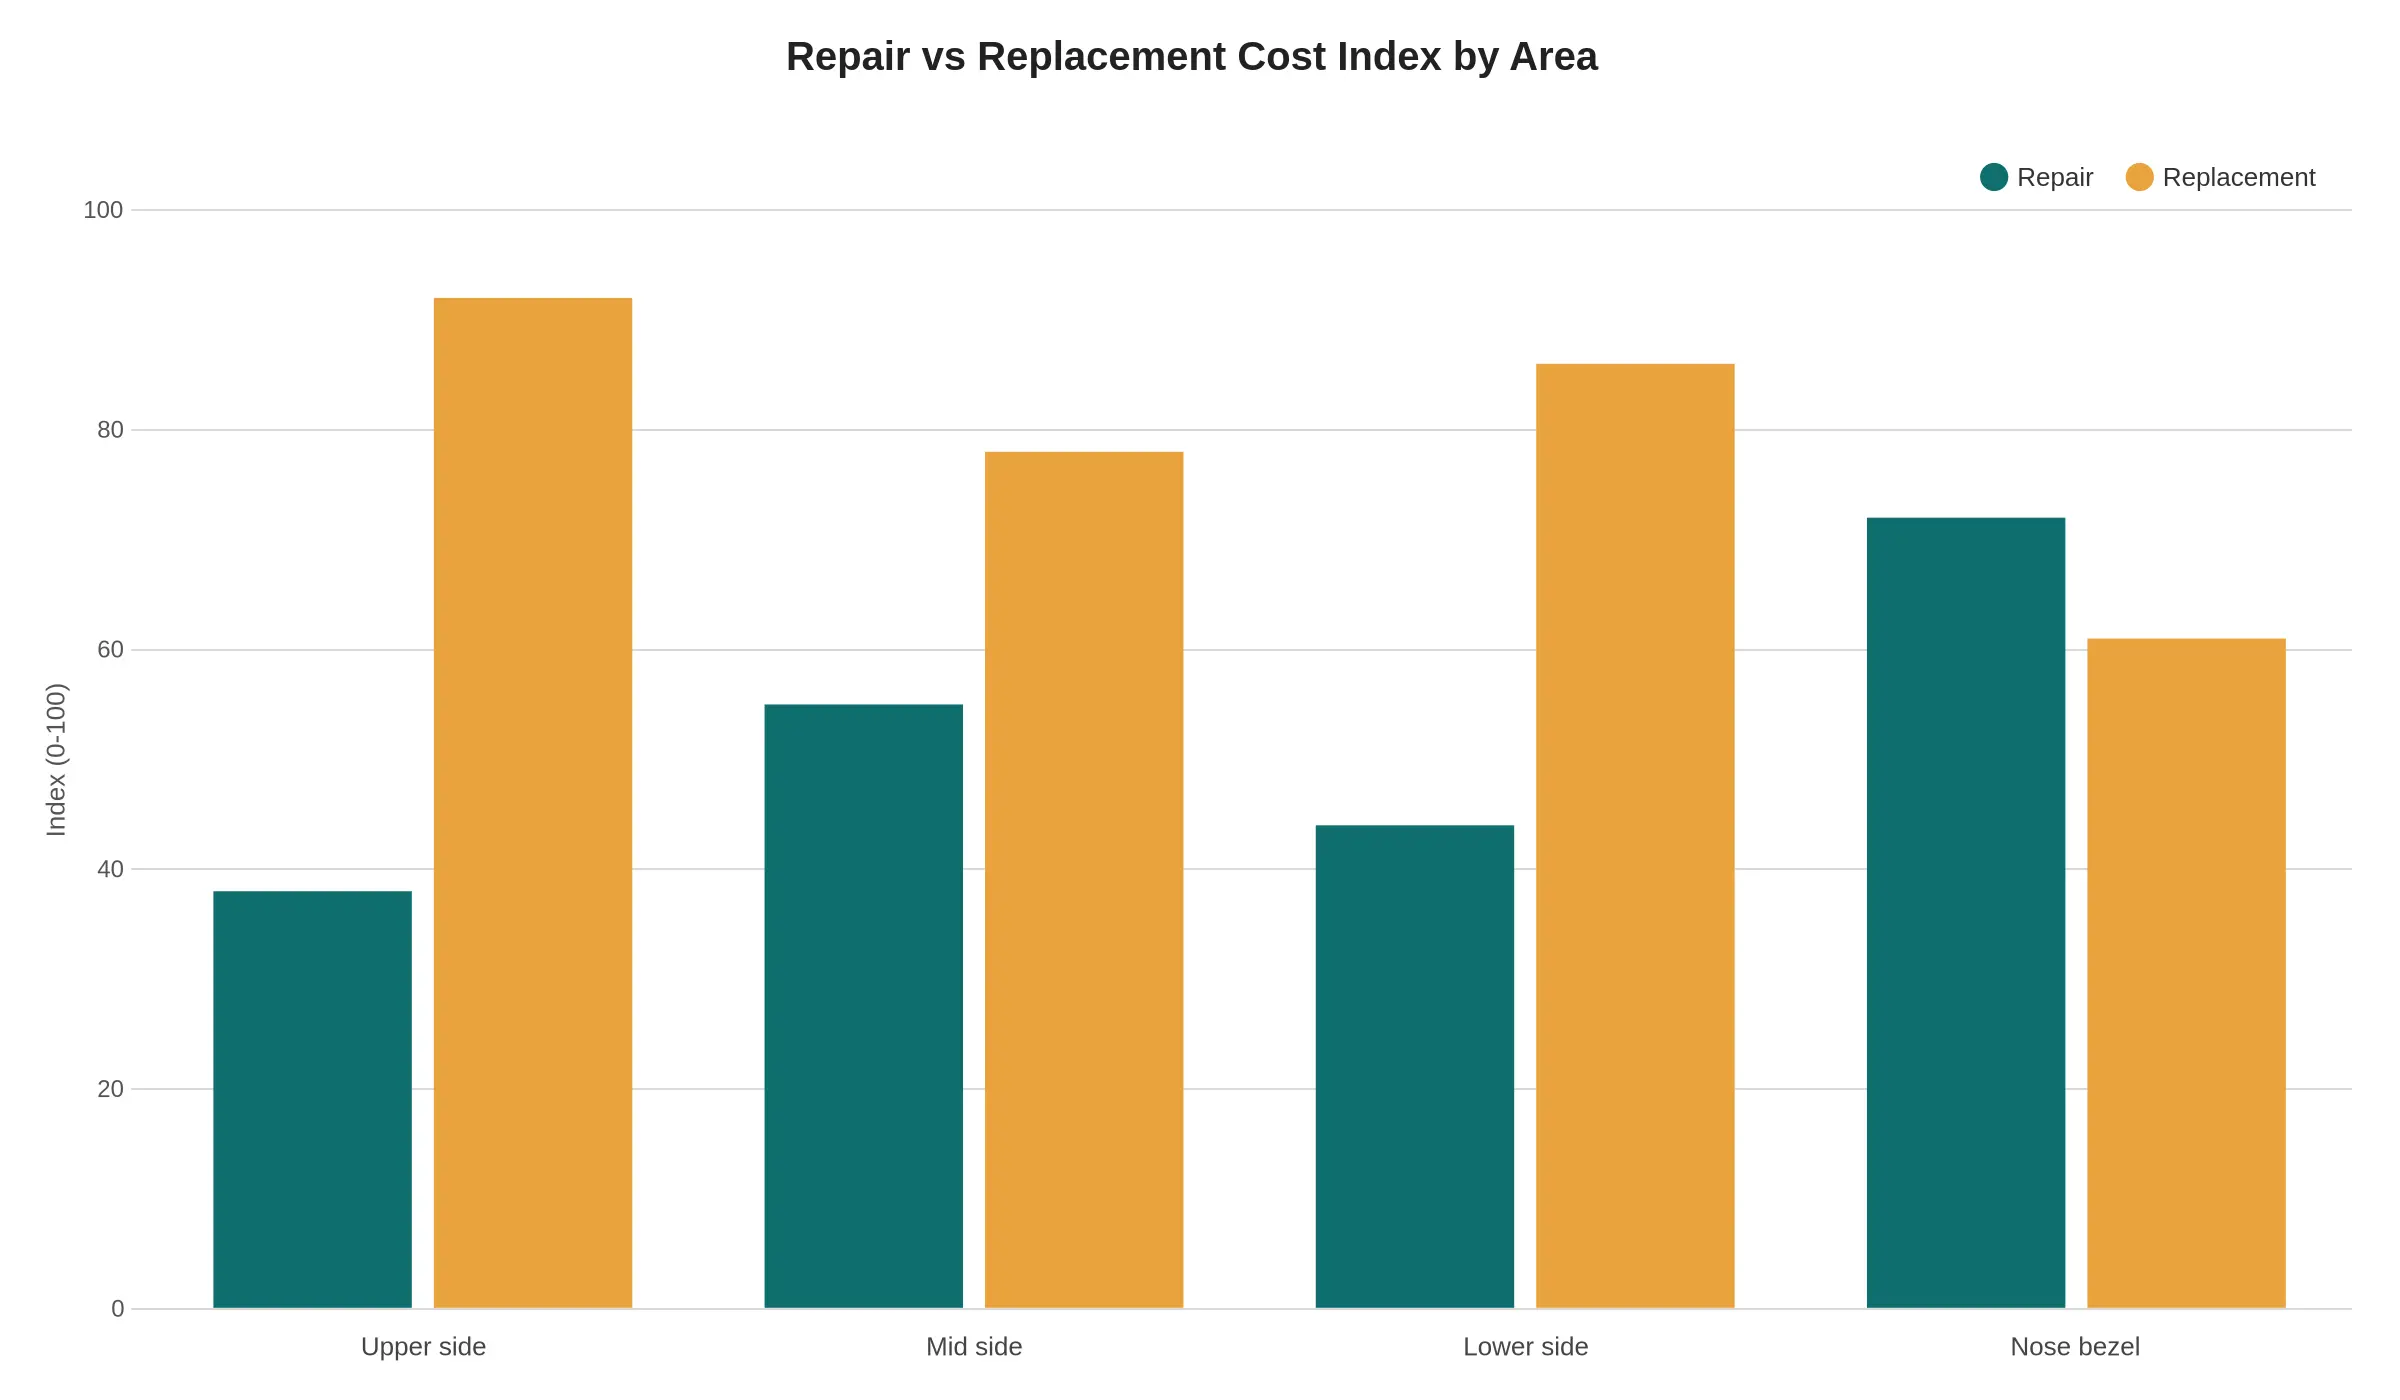
Values are representative index figures for comparing repair and replacement cost bands across panel groups, not quotes for any specific job.
Five-Step Assessment
Work through these steps in order. Each one produces a record you can hand to a manager, an insurer, or the next technician.
- Record every point where the crash bar, bar end, or lever touched the bodywork, and photograph each contact from a few angles. Output: a timestamped contact map showing which panels absorbed the impact.
- Test tab integrity at each fastener seat with a gentle flex and a close look for stress whitening or hairline cracks. Output: a pass/fail list of every fastener seat, flagging any tab that has begun to yield.
- Check panel-to-bar stand-off by measuring the gap at three points on each side and comparing left with right. Output: a gap sheet that reveals a bent bracket or a shifted mounting point before you spend money on paint.
- Compare repair and replacement total cost, including labour, paint matching, shipping, and the risk of a second failure at a stressed tab. Output: a single cost delta you can put in front of a manager or insurer.
- Confirm parts availability before committing, including that the panel is listed for the Tenere 700 and your model year. A quoted price means little if the panel takes two months to arrive and the bike sits idle. Output: a confirmed lead time and order date.
If you need a starting point for replacement pricing, browse our fairing collections to see what a full set costs before the comparison step.
Those five records turn tab stress and crash bar evidence into a documented repair-or-replace decision your team can defend.
The Decision Path
A technician’s call is a short chain of pass-or-fail checks, not a gut feeling. Each diamond below is one question in sequence: crash bar contact, then tab and mounting stress, then the structural verdict. Two exits sit on the right, and only the end of the chain sends you shopping for bodywork. If an earlier check points to replacement, you skip the rest and take that exit.

Read from the top. Each diamond either lets you continue or diverts you to an outcome. The two rectangles are the only endings: keep and repair the panel you own, or retire it and source a replacement. The order matters: a failed early check ends the process before you spend time on the rest.
Once the flow points to replacement, compare finishing options early to avoid a second round of shipping. The current fairing and bodywork listings show what is available.
Frequently Asked Questions
Can a Tenere 700 fairing with a cracked mounting tab be repaired?
It can often be repaired if the fracture is clean, the surrounding panel is undistorted, the bolt hole still lines up, and the neighbouring tabs show no stress. Plastic welding with a rod matched to the panel material, or a reinforcing patch bonded with an adhesive suited to that plastic, can hold in that case. If several tabs have failed, replace the panel.
Does crash bar contact always mean the panel needs replacement?
No. Contact usually produces scuffing, a compressed edge, or a hairline crack rather than structural failure. Check the contact point for cracking, deformation, and crushed edges. If the panel flexes and the fixings still seat correctly, refinishing may be all it needs. Replacement is necessary when the contact area has torn through or the stand-off has shifted.
How much damage can hide after a drop?
More than the outside suggests. Drop impacts can compress mounting bosses, stretch clip seats, and crack inner ribs that carry load. The only reliable way to judge repair or replace is to remove the panel and inspect every attachment point.
Is an aftermarket fairing set strong enough to work with crash bars?
It can be, if the set is moulded for the bike and fits correctly. ABS at a similar thickness can give comparable stiffness to an original panel, but clearance around the crash bars matters more than the material label. Panels with poor tolerances flex more, which speeds up tab stress.
How fast can replacement panels be sourced for a workshop or fleet?
It depends on stock, finish, and destination. Summit Fairings quotes 10-15 business days for processing, then 15-20 business days by air freight or 20-25 by ocean; custom paint requires an approval step before shipping. The company advertises over 3,000 fairing styles, prices them 10-40% below other sites, and commits to answering enquiries within six hours, so availability and lead time can be confirmed before a completion date is promised. Check the fairing panel range for current availability.
The Call, in Practice
Crash bar contact tells you where the force landed and how direct the hit was. Tab stress tells you whether the panel can still hold its geometry: hairline cracks at the mounting points mean the fairing will flex, vibrate, and eventually work loose, even when the outer skin looks fine. Those two readings produce the repair-or-replace call and help keep it consistent from one bike to the next.
A cosmetic panel that bolts back on cleanly costs far less than a replacement, while a stressed panel that returns to the shop twice eats the difference in labour. Downtime works the same way: the sooner the call is made, the sooner the bike is back in service.
Replacement bodywork is organised by make and model at summitfairings.com.