

Fitting a 2009 Yamaha FZ1 Full Fairing Kit
Two variables decide how a 2009 Yamaha FZ1 full fairing kit ends up looking: upper stay alignment and side panel clearance. Every other step in the job, from the first loose bolt to the final torque check, exists to control those two.
A complete kit for this model usually contains upper, lower and side panels, a front cowl with headlight openings, an inner dash panel, and a hardware set of grommets, well nuts and bolts. Painted sets from our Yamaha fairing collections arrive ready to assemble. The 2009 bike belongs to the second-generation FZ1 built from 2006 to 2015, which came in two forms: the naked FZ1-N and the half-faired FZ1-S Fazer, the name it carried in Europe. A full kit either replaces damaged Fazer bodywork or converts a naked bike, and both routes reuse the stock brackets and stays.
Upper stay alignment means positioning the front cowl stay so the mirror mounts, headlight housing and upper panel holes meet the frame without forcing or preloading the plastic. Side panel clearance is the distance between the side panels and fixed parts such as the exhaust headers, engine cases, radiator and front wheel, measured through the full steering and suspension range.
What a 2009 FZ1 Full Fairing Kit Contains
A full kit is a panel system rather than one moulded shell. Each part is formed to a nominal shape and indexed to shared hard points on the motorcycle, so the assembly only looks right when every piece references the same structural datum.
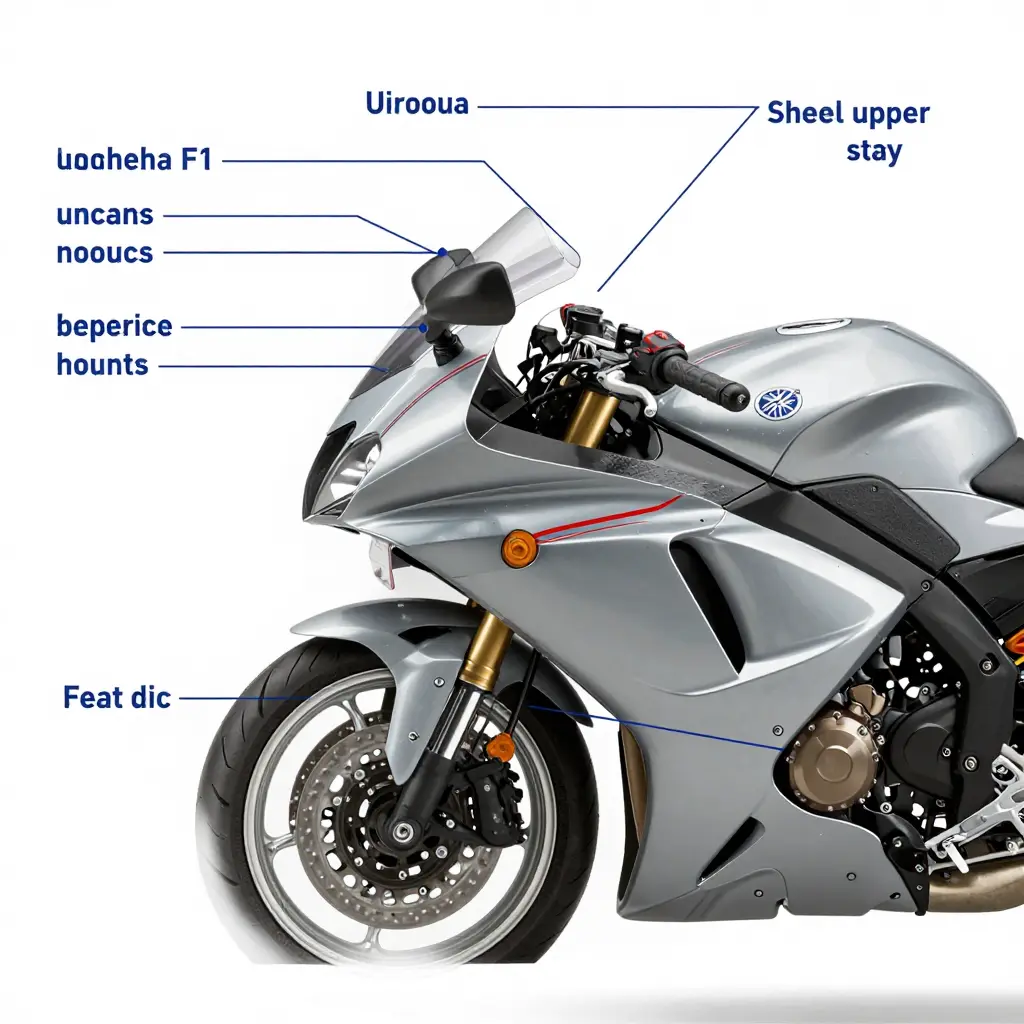
| Component | Position | Primary function |
|---|---|---|
| Nose / upper cowl | Around the headlight aperture | Defines the front profile, locates the screen and headlight opening |
| Side panels (left and right) | Flanks of the radiator and engine | Close the airflow path, bridge upper cowl to lower cowl |
| Lower cowl | Below the exhaust headers | Shields the header pipes, carries the lower body line |
| Belly pan | Under the sump | Closes the underside, completes the silhouette |
| Inner panels | Behind the nose and flanks | Shield frame and wiring, back up the outer panels |
| Hardware pack | Distributed | Supplies correct-length bolts, clips, grommets and well nuts |
The Upper Stay Carries the Front Assembly
Every panel above hangs, directly or indirectly, on the FZ1 upper stay. This steel bracket bolts to the frame in the head tube area, sits behind the headlight, and acts as the rigid spine of the front bodywork. Load reaches it from two directions: aerodynamic push plus the weight of the cowl and mirrors, and vibration coming up through the frame. The stay passes both into the frame at its main mounts instead of through the thin moulded panels, which is why panel wall thickness and bolt torque can stay modest while the assembly holds steady at speed. Check it before you fit anything: a bent bracket moves every downstream reference at once, and no slotted hole in the hardware pack will bring symmetric gaps back.
Its jobs are mechanical, not cosmetic:
- Mirror and cowl mounts. Tapped bosses position the mirror stalks and pick up the upper cowl at matched left and right points, so mirrors and bodywork share one hard reference.
- Headlight positioning. The stay sets the headlight carrier in all three axes, which keeps the lamp square in the cowl aperture and beam aim inside its adjustment range.
- Impact absorption. The bracket is built to deflect before the frame and its bosses deform. It is the sacrificial member when the front end takes a hit.
- Centreline and repeatability. One bracket defines the machine centreline, so clearance to the fork legs and radiator shroud repeats on both sides, and gap widths carry over between kits and between bikes.
- Routing anchor. Clips on the stay hold the harness, brake lines and sensor leads clear of the steering sweep.
Why the Upper Stay Is a Three-Axis Job
When a 2009 FZ1 kit refuses to sit flush, the stay is usually the culprit rather than the panels. That stamped bracket carries the mirror mounts and the nose of the fairing, and it can be out of true in three directions at once. Move it on one axis and the other two shift with it, which is why chasing a single rubbing side panel with a persuader bar usually makes the fit worse.
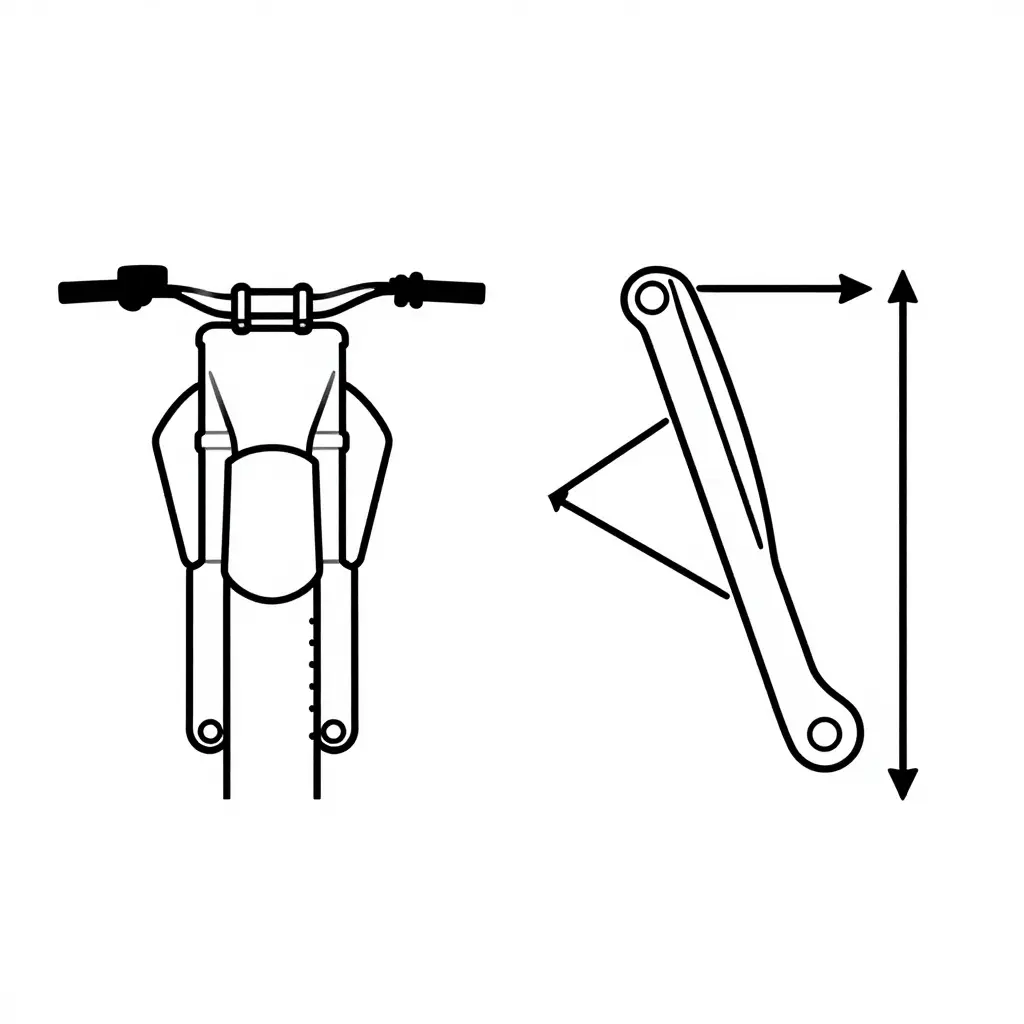
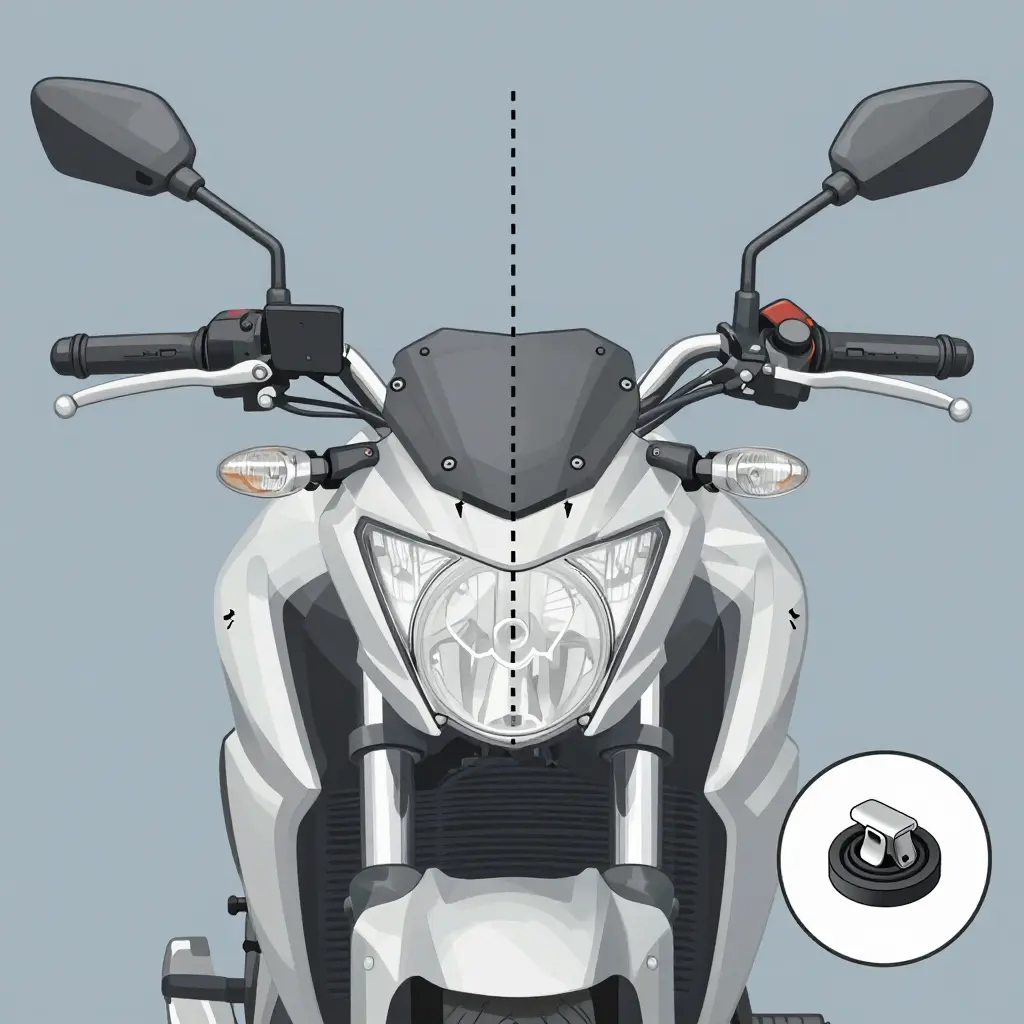
The left schematic is the front view, your left-right offset: the axis that decides whether the side panels sit evenly either side of the radiator. The right is the starboard view, carrying the other two at once, fore-aft tilt and vertical height. Read both and you have the setup sheet before you pick up a wrench.
The three axes at a glance
| Axis | View | What it moves | Typical symptom when off | Practical correction |
|---|---|---|---|---|
| Left-right offset | Front | Nose centred between the fork legs | One side panel tight, the opposite side gapped | Loosen the stay mounts and shim or slide the bracket until the mirror gaps match |
| Fore-aft tilt | Starboard | Nose position toward or away from the tank | Leading edge contacts the tank cover, or a wide gap at the top seam | Rotate the stay on its mounting bolts a few degrees and re-check |
| Vertical height | Starboard | Height of the nose and mirror mounts | Side panels ride high over the mid-panel, or sit low and foul the ducts | Raise or lower the stay, then re-torque and re-test the panel overlap |
Work the axes in order, not all at once
- Vertical height first. Get the nose to the right altitude so the mid-panel overlaps line up.
- Then fore-aft tilt. Small rotations here change the gap at the tank cover dramatically, so adjust in millimetres rather than hand-span swings.
- Left-right offset last. Height and tilt both shift apparent centring, so centre the nose at the end.
Snug the fasteners, fit the side panels dry, then check both sides before final torque. Torque the stay down first and you have locked in whatever error you started with.
Checking side panel clearance
With the stay set on all three axes, run a finger gap around the trailing edge of each side panel, past the frame spar and along the radiator shroud. You want an even band, not a contact point. If the gap closes on one side only, go back to left-right offset; if it closes at the top, revisit fore-aft tilt. A kit that fits properly needs no force anywhere, so if you are leaning on a panel to seat it, the stay is still off. Replacement panels can be checked against the original geometry in our custom Yamaha fairings range, where the mounting points are laid out on a properly formed set.
One habit worth keeping: photograph the stay from the front and the starboard side once it is aligned. Ten seconds, and you have a reference to come back to after any service that involves dropping the nose.
Aligning the Upper Stay on a 2009 Yamaha FZ1 Before Final Panel Installation
Order matters more than force in this job. Start with every fixing loose enough to allow movement, establish geometry from the frame outward, and lock nothing down until the headlight aperture and the side panel gaps both look right. Torque early and you spend the afternoon chasing a gap you created somewhere else, because every adjustment on the FZ1 bracket shifts its neighbours.
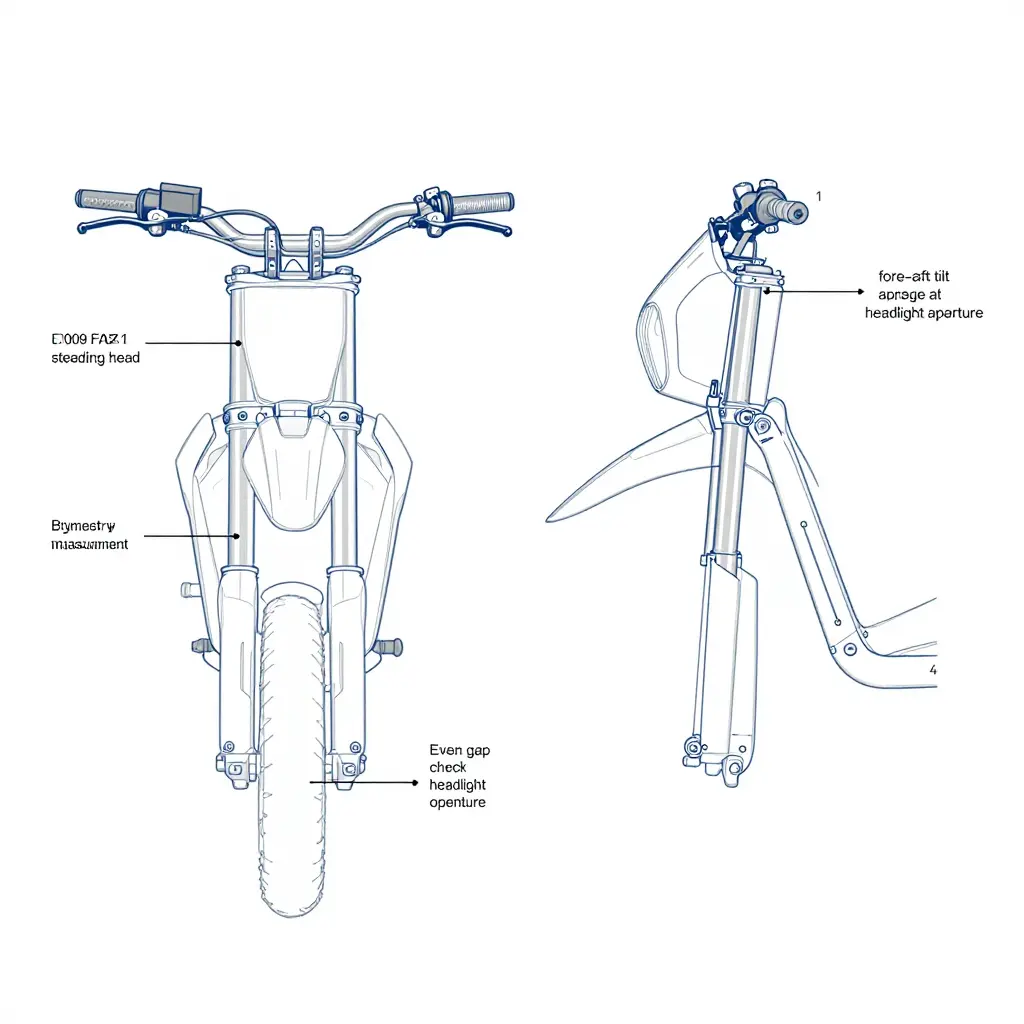
Step-by-Step Procedure
- Loosen the mounting hardware. Free the stay fixings and the frame-side fasteners so the bracket shifts by hand but still holds its own weight. Check thread size, grade and torque against the service manual rather than memory, and never substitute hardware of unknown origin.
- Support the front assembly. Strap or stand under the nose so no panel weight hangs on the stay. A loaded bracket reads low, and you end up aligning to a sag that disappears when you let go.
- Reference the frame datum points. Measure from the steering head and the upper frame spars to the stay on both sides, and write the numbers down before touching an adjuster.
- Set left-right symmetry. Equalise the stay-to-spar distances so the bracket sits on the centreline. Every gap downstream depends on this one.
- Then fore-aft tilt. Bring the mounting face to the rake the manual specifies. Tilt decides how far forward the headlight sits, which decides how much room the side panels have against the tank and radiator shroud.
- Confirm headlight aperture alignment. Fit the headlight loosely and check the reveal around the whole opening. Even at top, bottom and both flanks before any torque.
- Torque in sequence. Work in stages and a cross pattern, bringing the fixings up evenly. Use only the value listed for your model year and that specific fastener.
- Re-check the gaps after torque. Measure symmetry and clearance again, because clamping loads pull a stay a millimetre or two. If a gap closed up, loosen, reset, repeat. Do not force the panel.
What Counts as an Acceptable Tolerance
Alignment is acceptable when the left and right readings match closely, the headlight reveal stays consistent around the perimeter, and panel-to-tank and panel-to-radiator clearances stay even enough that nothing touches through full steering lock and suspension travel. Exact numbers belong to the service manual for the 2009 model, so verify them there and record what you measured. If the stay repeats the same readings after torque and nothing binds at any fixing, the panels can go on.
| Check | What to Compare | Where the Number Comes From |
|---|---|---|
| Left-right symmetry | Stay-to-spar distance, both sides | Service manual specification |
| Fore-aft tilt | Mounting face angle to frame datum | Service manual specification |
| Headlight aperture | Reveal consistency around opening | Even visual gap after torque |
| Panel clearance | Side panel to tank and radiator | Full lock and travel check |
| Fastener torque | Staged cross-pattern sequence | Verified service manual value |
Fastener and Clearance Reference for the 2009 FZ1
On a 2009 Yamaha FZ1, a poor fairing fit almost never starts at the fairing. It starts at the upper stay, the bracket that hangs off the steering head and carries the upper cowl, the mirrors and the leading edge of both side panels. Two millimetres of misalignment there compounds rearward: the right side panel leans into the exhaust shield, the panels pinch against the frame spar near the rider’s knee, and the mirror bases stop sitting flush. The panels get blamed; the fasteners and gaps tell the real story.
The table below is built around measurement rather than opinion. A feeler gauge does not care how the bike looks in a photo, and a thread-depth check does not care how tight a bolt feels. Work it as a checklist on a full kit install: check each point cold with the fairing loosely assembled, then torque in sequence once every gap reads even.
Upper Stay Fasteners and Panel Clearance Reference – 2009 Yamaha FZ1
| Component / Fastener or Contact Point | Location on the Motorcycle | Check Method | Acceptance Criterion |
|---|---|---|---|
| Upper stay main mounting bolts (2x, M10) | Steering head / frame boss, behind the upper cowl | Thread depth check with a depth gauge before final torque; torque wrench after | Full thread engagement with no more than 1 mm of shank showing; torque value taken from the 2009 service manual, not from a generic M10 chart |
| Upper stay cross-brace bolts (M6) | Top of the stay, under the upper cowl centre | Feeler gauge at each bracket joint; visual check for an even gap | No gap wider than 1 mm, and no more than 0.5 mm variance left-to-right across the brace |
| Upper cowl mounting bolts (4x, M5) | Upper cowl flanks, at the stay arm tabs | Feeler gauge between cowl edge and stay tab; thread depth by hand-tight turn count | Gap of 0.5-1.5 mm, even along the tab; fasteners thread in at least 3 full turns by hand before any tool is used |
| Side panel upper clips (push-type, per side) | Upper edge of each side panel where it meets the air duct and upper cowl | Audible click confirmation, gentle pull test, then feeler gauge along the seam | Clip fully seated with no lift under light pull; seam gap of 1.0-1.5 mm held evenly for the full length of the joint |
| Inner panel fasteners (quick-release / shoulder bolts) | Inner fairing panel to stay bracket, both sides | Hand-thread check first, then thread depth and shoulder seating | Threads engage cleanly with no cross-threading; shoulder bottoms fully with no visible gap under the fastener head |
| Mirror mount bolts (2 per side) | Mirror base to upper cowl bracket | Feeler gauge under the mirror base; push test for rocking | Base sits flush with a maximum 1 mm gap; no movement or rocking when moderate pressure is applied |
| Contact area 1 – right side panel to exhaust heat shield (tightest) | Right side panel, lower-to-mid region above the collector | Feeler gauge at the narrowest point, engine cold | Minimum 5 mm cold clearance at the tightest point |
| Contact area 2 – side panel to frame spar / engine case cover (tightest) | Both sides, near the rider’s knee cut-out | Feeler gauge along the full spar length | Minimum 8 mm clearance with the suspension at rest |
| Contact area 3 – inner panel to radiator shroud and coolant hose (tightest) | Front inner panel, behind the nose | Feeler gauge where the panel passes the hose and shroud edge | Minimum 6 mm clearance; no contact when the bars are turned lock to lock |
| Side panel lower tab to belly pan joint | Lower side panel, rear of the belly pan seam | Feeler gauge plus visual check for an even gap | Gap held within 1 mm side to side, with no tab preload or bowing |
Writer’s note: every figure in this table is a working range for shop use, not a published specification. Confirm torque values, thread depths and minimum clearances against the 2009 Yamaha FZ1 service manual before the bike leaves the bench; published specs vary by market and revision.
How to Read the Numbers on the Bike
Work top-down. Set the upper stay first and lock it, because everything else inherits its position. Hang the upper cowl and side panels finger-tight, slide a feeler gauge into each contact area, adjust, then torque. If a side panel needs more than about 3 mm of persuasion to clear the exhaust shield, either the stay is misaligned or the panel is a poor mould, and forcing the bolt will crack gelcoat a few months later.
For shops fitting aftermarket bodywork, the clip and fastener specs double as a quality check on the parts. Panels that need shimming at the clips but measure correct at the stay are usually a moulding problem rather than an install problem, which is worth knowing before you promise a customer a same-day turnaround. Keep this table near the lift.
Side Panel Clearance Analysis: Where the Gap Comes From
Clearance on a full kit is not one measurement. It is what is left over after four interfaces have each taken their share, so read the stack in order and the diagnosis gets simple.
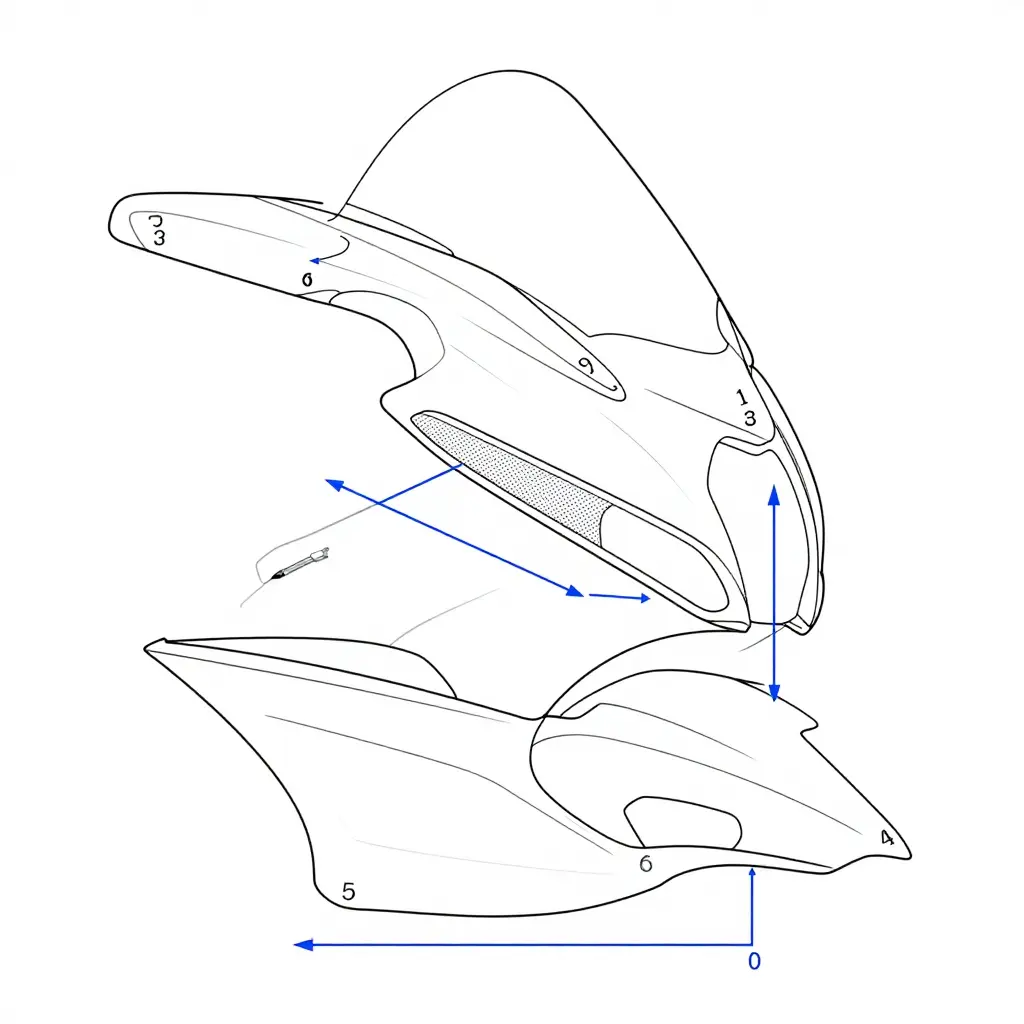
The contact sequence runs top down. The upper cowl locates on the stay first and sets the lateral datum for everything below it. The side panel then hangs off the upper cowl’s lower flange and the inner panel’s outer tabs. The lower cowl closes the chain by pulling the side panel’s bottom edge inward. Each junction consumes a fixed amount of clearance, so a fault introduced at the top never corrects itself at the bottom; it only redistributes.
The inner panel is a spacer, not a cosmetic part. Its moulded standoffs sit between the shell and the frame rails, and their depth sets the nominal side panel clearance. Because the inner panel bolts up before the outer skins, tightening it while the upper cowl is off-centre preloads one side and releases the other. Seat it with the upper cowl loosely hung and centred.
Panel thickness and clip seating both push the skin outward. A shell at 2.5 mm against one at 3.5 mm moves the visible surface roughly one-to-one at the fastener and progressively less toward the trailing edge. Just as common: a clip half-seated in its square hole holds the panel 1 to 2 mm proud, so the cowl gap opens evenly along one seam and looks like a bent bracket. Push every clip until it clicks, then confirm with a feeler gauge rather than your eyes.
A one-sided stay error reads as a taper. About 3 mm of lateral error at the upper stay mirror mount gives clearance to one side and takes it from the other, leaving a cowl gap that is narrow at the top and wide at the bottom on one flank, and the mirror of that on the other. Measure at three heights on both sides before touching a panel.
| Check point | Where to measure | Tool | Pass condition |
|---|---|---|---|
| A | Upper cowl to side panel seam, top | Feeler gauge | Even left to right within 1 mm |
| B | Side panel to frame rail, mid height | Feeler gauge | Match factory nominal, no contact |
| C | Side panel to lower cowl seam, bottom | Feeler gauge | Gap tapers evenly, no pinch |
| D | Clip engagement, all square holes | Visual plus push test | Fully seated, zero proud height |
If points A and C disagree by more than about 2 mm side to side, the panels are not the problem and shimming them only pushes the error downward. Work through the alignment procedure, then re-measure the stack from the top.
For replacement shells, compare wall thickness across the options in our Yamaha fairing collections.
Where the Tolerances Land
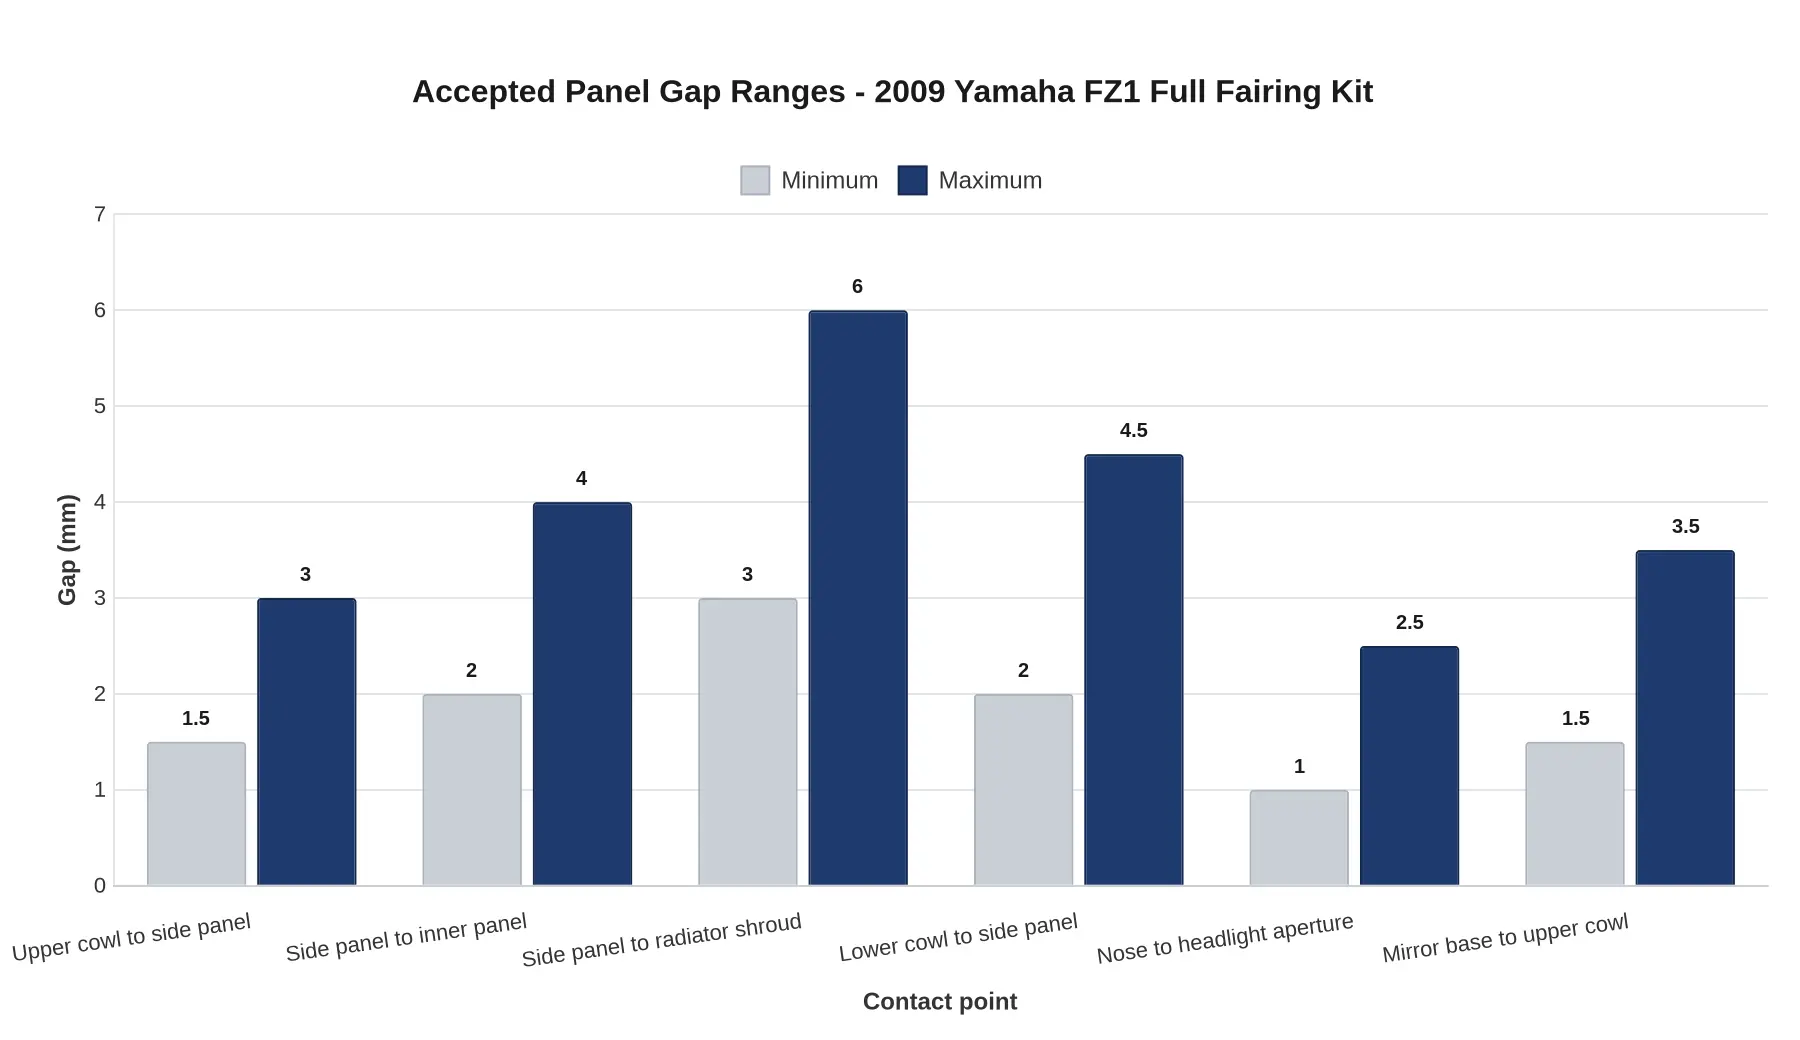
Once the side panel sits correctly against the inner panel, the next question is what “right” looks like in numbers. The chart plots accepted gap ranges at six contact points on a 2009 FZ1 full kit, from the tight nose-to-headlight aperture joint to the looser radiator shroud area, which has to breathe as the engine heats up.
Why a ruler beats a trained eye
Look at the spread. Nose-to-headlight is a 1.0 to 2.5 mm window; the radiator shroud zone runs 3.0 to 6.0 mm. The same gap you would accept at one point is a defect at another, and eyeballing cannot separate them, because 1.5 mm and 3.0 mm read identically on black ABS under shop lighting, especially with fresh paint throwing highlights back at you.
Measurement also settles the arguments that cost shops money:
- Vibration rub. A gap under 1.0 mm at the mirror base rubs through paint.
- Assembly order drift. Torque the stay, then force the side panel, and the gaps redistribute while the nose aperture closes up.
- Warranty conversations. A written range turns “it doesn’t fit” into a number you can compare against a spec sheet.
Work through the six points in order and record each reading. Anything inside the bar is a pass; anything outside either end tells you which fastener or stay adjustment needs another look before you tighten anything for good.
Diagnosing Interference and Fitment Faults After a 2009 FZ1 Fairing Kit Install
When panels refuse to line up after a fairing kit install, they get inspected last and blamed first. On the FZ1 that instinct works backwards. The upper stay is the skeleton the nose hangs from, so a stay that is bent, twisted or bolted off-centre moves every gap with it. Clip seating is the second suspect: a clip resting on top of its grommet instead of inside it holds a panel a few millimetres proud, enough to leave rub marks and a tight spot somewhere else on the bike. Work the symptoms before you touch a panel edge.
- Wide gap on one flank: suspect upper stay alignment before a short or warped panel. A stay pulled to one side pushes the nose off-centre and opens the gap on the opposite flank. Loosen the stay mounts, centre the nose on the headlight and steering stem, snug the bolts evenly, then re-check before tightening any panel fastener.
- Side panel touching the engine case: look for a missing spacer or grommet, a bracket fitted on the wrong side, or a fastener over-tightened until the panel is drawn inward. Restore side panel clearance with the correct spacer, confirm an even gap at the tightest point near the case, and tighten in stages.
- Nose fouling the headlight aperture: usually the stay sits too low or too far rearward, or the headlight is not seated in its mounts. Reseat the headlight, then adjust the stay fore and aft. Shim only enough to even the gap, and never trim the fairing to make room.
- Lower cowl sitting unevenly: often one side is engaged in its clip and the other is not, or bolt lengths are mixed between positions. Loosen everything, start all fasteners by hand, align the cowl to the belly line, then torque in a cross pattern.
- Vibration from loose inner panels: check clips that never clicked, hardened or missing grommets, and cracked tabs behind the dash. Press each clip until it seats, replace worn grommets, and add thin foam where panels meet.
A Simple Diagnostic Order
Start at the stay, move to the clips, then check fastener lengths, and only then question the panels. Measure the same two gap widths before and after each adjustment; that tells you immediately whether the stay moved the right way. In a shop, the habit turns a vague “it doesn’t fit” into a documented, repeatable fix and cuts comeback visits. If you are comparing replacement sets, our custom Yamaha fairings are listed by model so you can match fitment before the first bolt goes in.
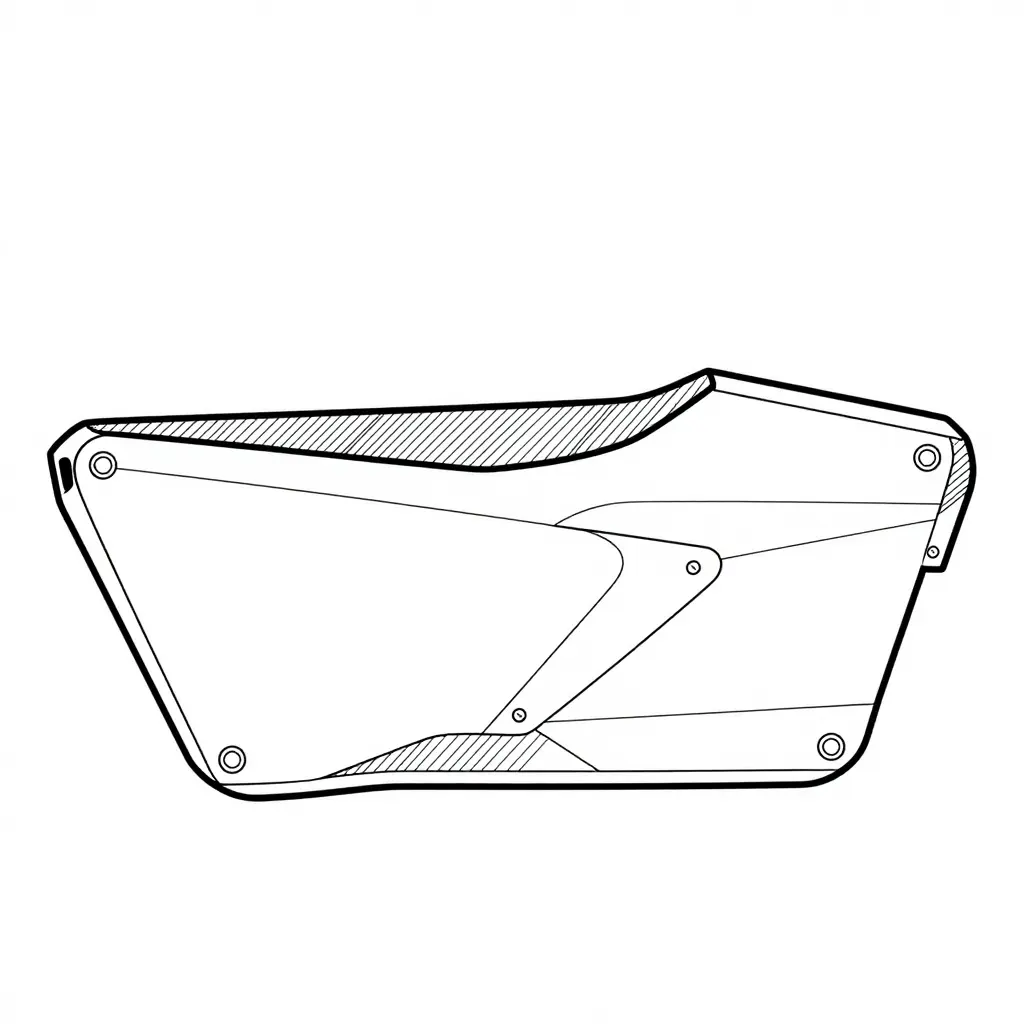
Contact-check reference: the circles mark every fastener location on the side panel, and the hatched bands mark the three strips that must not touch anything, along the top edge, the inner panel interface and the lower cowl junction. Trace each band with a fingertip or a strip of paper after tightening.
Where Post-Install Faults Originate
Post-Install Fitment Faults by Origin – 2009 Yamaha FZ1 Full Fairing Kit
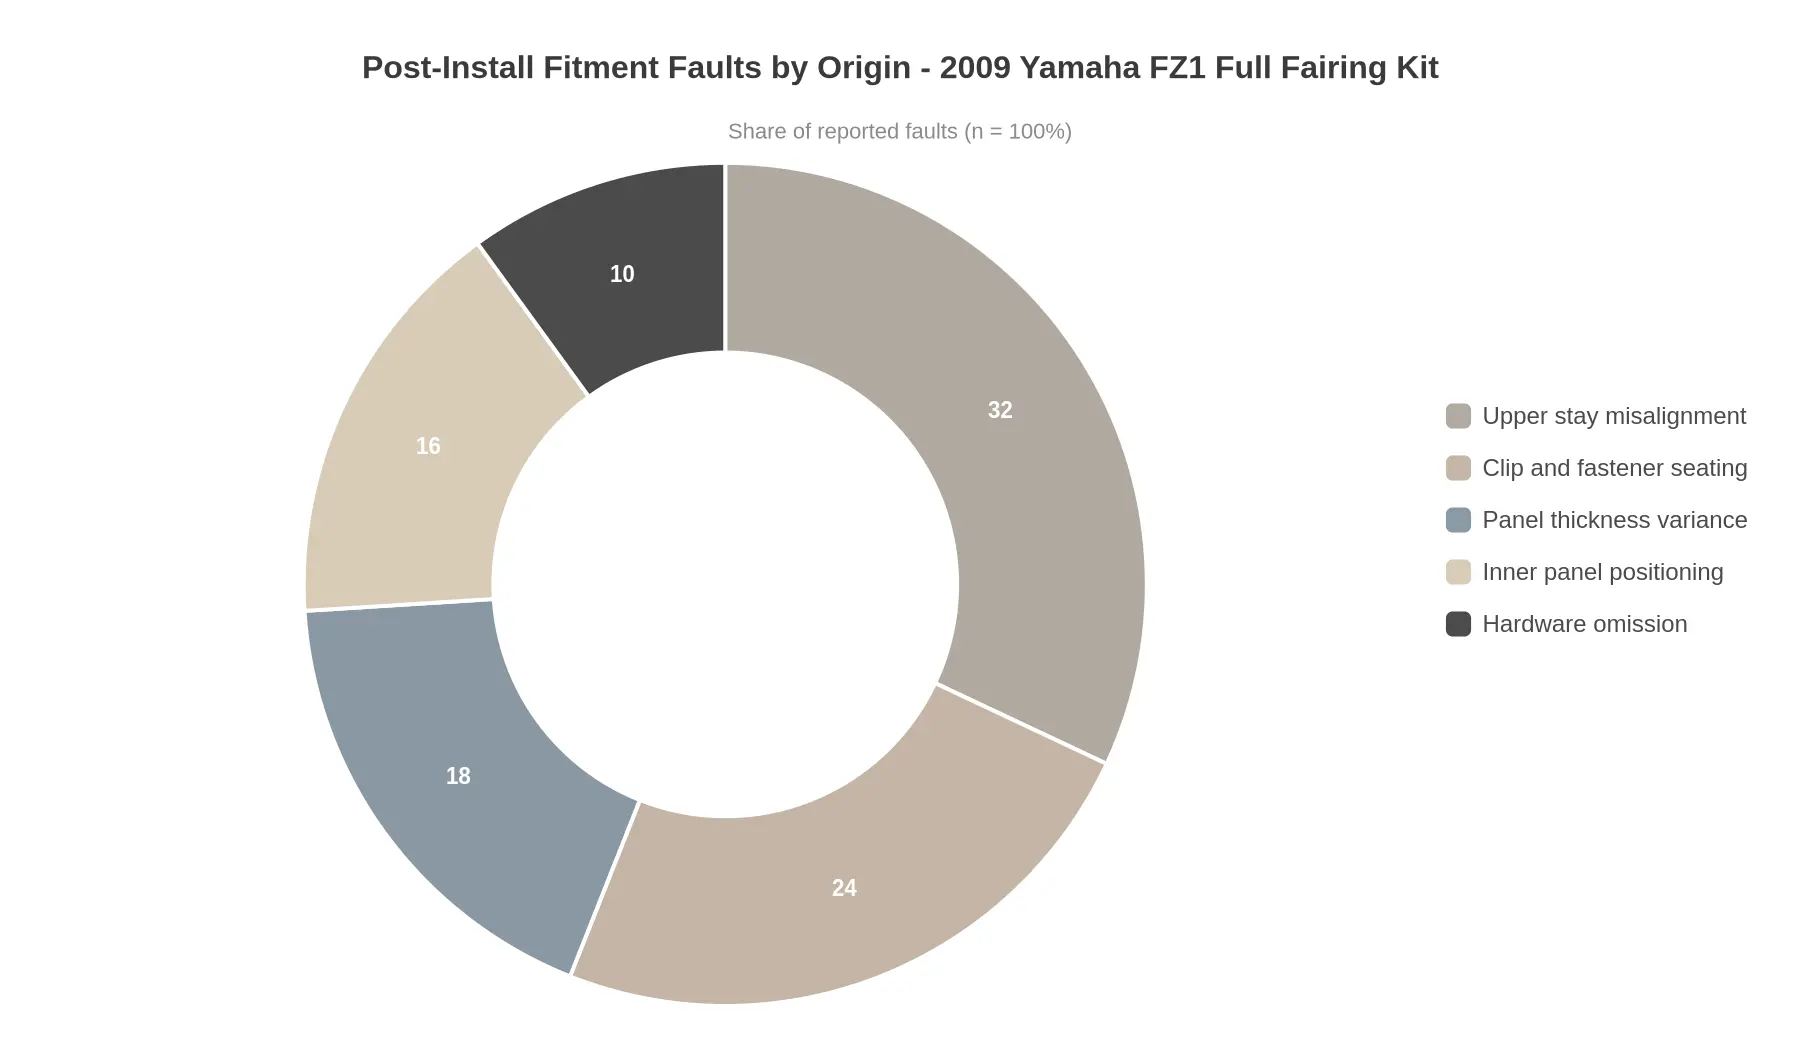
Figure: share of reported fitment faults by origin category. The split is an estimate for planning purposes, not a published survey.
Start from the largest slice, because that is where one fix buys the most. Upper stay misalignment at 32% means roughly one in three fitment complaints is a bracket problem wearing a bodywork costume. The next two, clip and fastener seating at 24% and panel thickness variance at 18%, are usually downstream of the same stay: a bracket that pulls the side panels off their clamp line pops clips and makes a good mould look thin or warped at the seam. Inner panel positioning at 16% and hardware omission at 10% are the cheapest faults to fix and the easiest to overlook, so keep them in the same inspection instead of treating them as separate problems. Check the stay and the supplied hardware kit before unpacking any panel and you have covered 42% of the list. If the plastic itself is still in question, compare stock against a known-good set of custom Yamaha fairings before blaming thickness.
Sourcing and QC: Evaluating a 2009 Yamaha FZ1 Full Fairing Kit Supplier
If you stock, resell or install bodywork, a full kit is a labour commitment with a margin attached rather than a part purchase. Yamaha built the second-generation FZ1 as a naked bike and as a half-faired Fazer, and offered a full-fairing GT version in Europe, with the fairing sold separately for converting existing bikes. An aftermarket full kit still has to index off the same frame and stay hard points as the factory bodywork, and every extra panel in the set, from the belly pan to the inner dash, adds another alignment point to check. That makes supplier vetting a purchasing decision and an operations decision at the same time.
Start with material specification and thickness consistency
Ask for the ABS specification in writing before you discuss price: polymer grade, whether the shell is straight ABS or an ABS/PC blend, and nominal thickness per part (upper, side panels, belly pan, tail). Then ask how thickness is verified across a production batch rather than on a hero sample. A supplier who tracks it will send measurements from a random pull of panels; one who cannot is quoting you a photograph.
Thin or inconsistent walls are where margin disappears. A side panel that flexes under its own weight at the mounting tab cracks at that tab within a season of road use, and the return lands on your counter, not the supplier’s. For a first order, take two or three kits from the same batch and compare wall thickness and paint build side by side. Consistency is the signal; one good sample is not.
Confirm the upper stay and pre-drilled mounting holes match OEM reference
Ask directly whether the mounting holes on the upper and side panels are pre-drilled to OEM reference geometry, or pilot-drilled and left for the installer to open up. Pre-drilled means the kit indexes off the frame and stay the way factory panels do. Pilot-drilled means every hole becomes a judgement call in your bay, and enlarged holes are how vibration cracks, mirror shake and headlight gaps start.
Request photographs of the stay contact points against a rule, plus duct and side panel clearance at full lock; a short video of a kit mounted on a donor bike if one exists. A supplier working from real tooling can usually show this. Our custom Yamaha fairings are listed by model line, so you can confirm a kit corresponds to 2006-2015 FZ1 bodywork before committing.
What is in the box
Hardware omission is the most common hidden cost. Confirm the clip and fastener kit is included and that grommets, well nuts, spacers, bolts and heat shielding are counted per kit rather than listed as “available separately.” Missing fasteners turn a two-hour install into a parts-run install, and on a resale unit that time is yours.
| QC checkpoint | What to request from the supplier | Why it protects your margin |
|---|---|---|
| Panel thickness | Part-by-part spec plus batch sample readings | Fewer stress cracks and returns |
| Upper stay fit | Pre-drilled to OEM reference, photo evidence | No drilling, no enlarged holes |
| Hole alignment | Test-fit report on a donor bike | Install time stays predictable |
| Side panel clearance | Clearance noted at full lock and at exhaust | Avoids rub-through claims |
| Hardware | Counted fastener and clip kit per set | No extra part cost per unit |
| Finish | Paint build and colour reference matched | No re-shoot before resale |
Treat a documented fitment check as inventory protection
Before a kit goes on a customer bike or onto the sales floor, mount it to a donor bike or jig, photograph each mount point, log the holes that needed no adjustment, and record clearances at the radiator, engine cases, exhaust and full steering lock. A per-kit sheet with photos catches a bad set before it reaches a buyer and gives a retail customer written evidence of what was verified. It is also your defence when someone claims a fitment problem.
Landed cost versus install hours
A kit bought well under market price improves your margin only if the panels drop in without rework. If your tech spends a morning slotting holes or chasing fasteners, the labour line eats the pricing advantage and then some, and the second kit from the same batch behaves the same way. Compare landed cost plus install hours, not landed cost alone. A supplier who sends a test-fit record and a fastener count expects the kit to install straight; one who will not is telling you something too.
For shops running several model lines, the same checklist works across our custom fairings ranges and applies to whatever else sits on the shelf alongside the FZ1 sets.
Frequently Asked Questions About FZ1 Fairing Fitment
Does the kit reuse the factory upper stay?
Yes. A 2009 FZ1 full fairing kit is designed to mount on the original factory upper stay, so no new bracket or fabrication is needed. The stay remains the structural anchor for the nose and instrument area, and reputable kits ship hardware that mates to the stock tabs. Only bikes with aftermarket or crash-repaired front ends usually need a replacement stay.
How much upper stay adjustment is normal?
Expect a small correction, typically 2 to 5 mm at the bracket. Loosen the stay bolts, shift the bracket until the nose panels sit evenly on both sides, then torque to spec. Past roughly 10 mm you are looking at a bent stay or a panel set that should be returned rather than forced.
Do side panel clearance issues mean the panel is defective?
No. Tight clearance is almost always a mounting sequence problem rather than a defective moulding. Panels that rub the radiator shroud or frame spar usually need the stay nudged while the fasteners stay finger-tight until every piece is loosely in position. Cracks, warped edges or holes drilled in the wrong location are what indicate a genuine defect.
Do pre-drilled holes still need elongation?
Sometimes. Paint thickness, accessories and production tolerances each shift hole positions by a fraction of a millimetre. Open the hole with a round file rather than a drill bit, and touch up the bare edge with paint. Most installs need zero or one hole opened slightly, never a full redrill.
What information does a supplier need to resolve a fitment question?
Model year, order number, the exact panel name and photos of the problem area, so the supplier can diagnose in a single reply. Clear shots of the stay alignment and the clearance gaps are worth more than any written description.
The Install Sequence That Protects Fit
The order of operations decides whether the kit looks factory or forced. Keep the sequence intact and the panels cooperate.
- Verify the stay against frame references first: bend, twist and correct standoff, before a panel is offered up.
- Set all three axes (vertical, lateral, fore-aft) so the nose sits square to the headlight and the cockpit line stays level.
- Seat clips and inner panels next, engaging each fastener by hand and letting the plastic find its position rather than pulling it into place.
- Measure gaps at the side panels and belly pan with one gauge, then compare left to right.
- Torque to spec in a cross pattern and re-check the gaps, because final tightening is where alignment drifts.
A fairing under stress shows it eventually: paint cracking along a clip line, a rubbed edge where the side panel meets the frame, a buzz that no amount of tightening silences. Aligned panels hold their finish, and clean factory gaps make a bike easier to sell. The same reasoning applies to sourcing. Judge suppliers on whether they publish stay tolerances, include the hardware that makes the sequence possible, and answer fitment questions with specifics instead of reassurance. That decides how smoothly the next install goes far more than any line item on a quote.