

Track Legality Is a Specification Question, Not a Style Question
For the 2008 Yamaha R6 race fairings, technical inspection turns on two specifications: how much fluid the belly pan will hold, and how the headlight apertures have been closed off. Paint, decals and panel gaps do not enter into it. A set can look flawless and fail; a plain grey set can pass without a second look.
Scrutineers work from written requirements rather than taste. They pour a known volume into the assembled lower, they look at what has been done with the headlight recess, and they compare the result with a number printed in a rulebook. That is why two suppliers selling visually identical panels can land on opposite sides of the same rule, and why a spec sheet is worth more to a buyer than a photo gallery.
Capacity is a number you can ask for. Aperture treatment is a condition you can inspect. Both can be checked and recorded long before the bike reaches a paddock. What follows covers what each requirement asks for, how the measurement is actually taken at scrutineering, and how a buyer or a shop can confirm compliance across a supplier’s custom fairings before ordering.
Belly Pan Capacity Requirements: Closed Container, Not an Open Lower
An R6 belly pan has to work as a closed container. An open or vented lower lets oil, coolant or fuel run straight onto the track; a sealed pan with a continuous floor, joined side walls and a raised rear lip holds the fluid long enough for marshals to reach it. The difference sits in the moulding, not in the finish.
Fluid containment and the sealed-pan geometry
Fluid containment matters when a line fails, a cooler cracks, or fuel spills during a refuel. A vented lower, a louvered panel or a fairing with an open bottom does none of that: it moves air and debris but has nothing to hold liquid. A compliant pan closes the underside, joins the side panels to the floor and ends at a lip or bulkhead that sets the overflow height. Everything below that lip is usable volume; anything above it is meant to spill in a controlled direction instead of pooling against the engine.
Drain plugs and seams are where pans leak, so they need sealing as part of the build. An unsealed oil drain access hole, a split seam or pop-riveted joints that were never bonded will pass fluid before it ever reaches the lip. Sealant, closed-cell gaskets and correctly torqued fasteners belong to the capacity claim, not to the finishing work you get to later.
How belly pan capacity is measured
Belly pan capacity is poured, not calculated. With the pan mounted at its normal installed angle, the inspector fills the assembled lower until fluid reaches the overflow lip and reads the volume that stayed in. Measured on a bench, flat or upside down, the lip height changes and the number no longer describes the part on the bike.
Three mistakes distort the figure: measuring off the bike, where the lip sits level instead of at ride angle; quoting total shell volume instead of the volume below the lip; and pouring with drain plugs, seams or sensor grommets left open, so fluid runs out and the usable figure comes back short.
Ride-height and the pass/fail problem
A pan that passes at one ride height and fails at another usually has a geometry problem, not a volume problem. Ride height changes the installed angle of the lower, which changes where the overflow lip sits relative to the ground and the forward bulkhead. Raise the rear and the lip tilts, fluid reaches the overflow point sooner, and a pan that met the minimum at stock height can come up short. Lowering the bike can reverse it, and correcting the geometry later can take the capacity away again. Verify at the ride height you actually race, with the suspension set and the pan fully assembled. A measurement taken at any other attitude is not a specification, and a scrutineer is entitled to repeat the pour in race trim.
If you are building an R6 for inspection, start from bodywork designed as sealed race bodywork instead of converted street plastics. Our custom race fairings list closed-lower options.
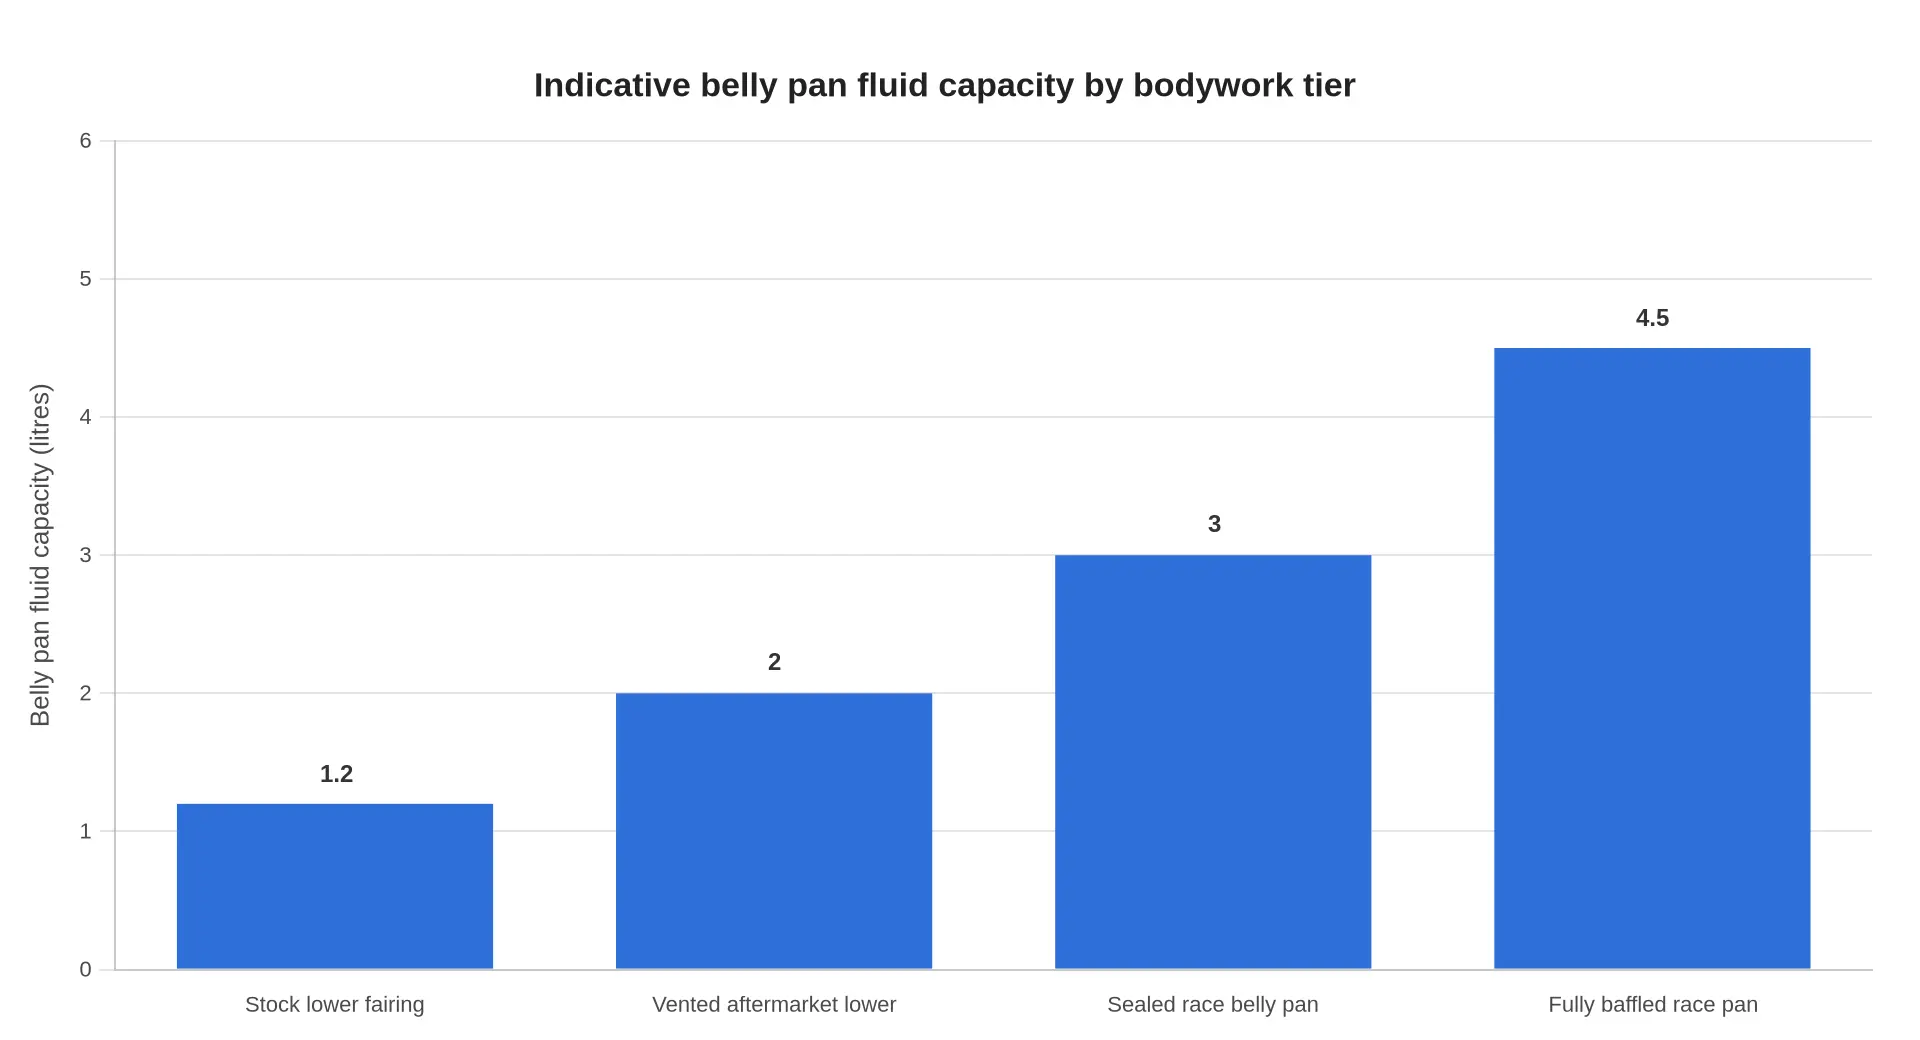
Indicative capacity runs from about 1.2 litres on a stock lower fairing to roughly 4.5 litres on a fully baffled race pan. Each step up in containment adds usable volume; how much of it you need is set by the minimum your series writes down.
Caption: Values are indicative reference figures only, intended for early planning when sizing a lower fairing. Always confirm the minimum capacity written into the applicable rulebook or class technical regulations before a scrutineer does it for you.
Reading the bars in practice
On a 2008 R6 track build, the gap between a vented aftermarket lower and a sealed race pan is the gap between a tray that holds a spilled sump and one that spreads it along the racing line.
- Stock lower fairing (about 1.2 L): shaped for airflow and looks. Fine on a showroom bike, rarely enough on its own for racing.
- Vented aftermarket lower (about 2.0 L): deeper, with drainage points, but the vents let fluid out under load unless you add a tray or a dam.
- Sealed race belly pan (about 3.0 L): closed sides, capped rear, built to catch rather than drain. This is the usual club-racing minimum.
- Fully baffled race pan (about 4.5 L): foam or internal walls slow the slosh and keep fluid away from the rear tyre under braking and direction changes.
Still choosing a shell? Compare construction and mounting across the range before you commit: race-ready fairings and accessories shows how the different lower sections are built.
Why capacity alone is not the whole story
A bigger pan only helps if it seals and if the fluid stays in it when the bike is leaned over. A 4.5 litre pan with a gap at the rear wheel is worse than a 3 litre pan that sits properly against the frame and exhaust. Check the join line at the rear, the clearance around the header pipes, whether the drain plug is still reachable on race day, and how much ground clearance the deeper pan costs you over kerbs. A closed pan also needs its own breather or drain, or servicing turns into a fight with a hose clamp.
Headlight Cutout Treatment: Why the Hole Still Has to Be Solved
The headlights come out of a 2008 R6 in about ten minutes. Closing the holes they leave behind is what decides the inspection. The apertures are moulded into the nose, so they stay part of the panel while the lamps, reflectors and lenses sit in a box on the bench. Treat that area as unfinished bodywork rather than a gap you cover on the morning of a track day.
The three ways an aperture gets handled
An open cutout is the moulded opening left as it came. Wiring and relays sit behind it, and on a windy circuit debris, water and rubber marbles go straight into the loom. It is the cheapest route and the one scrutineers question most often.
A blanked aperture keeps the opening and closes it with a block-off plate, bonded in with structural adhesive or fastened with rivnuts and bolts. The plate should follow the shape of the recess rather than bridging it flat. Most riders buying custom race fairings either order the blank pre-moulded or cut one from aluminium or fibreglass sheet.
The third route is a nose moulded without a cutout. Nothing to blank, nothing to leak, and the cleanest answer for a dedicated track bike. The trade-off is that you cannot put a lamp back in for a road-biased track day.
What scrutineers are actually checking
Debris ingress can foul wiring or block the air path. A road-spec lens can break in a crash, and glass fragments on a racing surface are a real hazard. The nose is also a structural surface: a large open aperture interrupts the panel, so a solid or closed nose keeps the bodywork working as one shell instead of a frame around a hole.
Tape answers none of that. It softens with heat, lifts at speed, adds nothing structural, and hides damage rather than showing it. Inspectors read tape as an unfinished job.
The 2008 R6 ram-air relationship
The 2008 R6 opens its central ram-air duct in the nose, with the intake mouth sitting between the two headlight positions. A flat plate bolted across the whole recess shrouds that mouth and costs intake pressure at exactly the speeds where pressure matters. Shape the plate around the recess and clear of the duct lip, keep the mouth fully open, and check with a torch that the intake is unobstructed before the panel goes on the bike.
Acceptance criteria
- Solid closure: the plate is bonded or mechanically fastened and cannot be pulled free by hand or by airflow at speed.
- Clear duct: the ram-air mouth is fully open, with the plate edge sitting proud of the intake lip rather than across it.
- No loose material: no lens fragments, wiring or trimmed fibreglass can enter the airstream, and every cut edge is finished and sealed.
Get those three right and the R6 race bodywork reads as a finished conversion instead of a road fairing with parts missing.
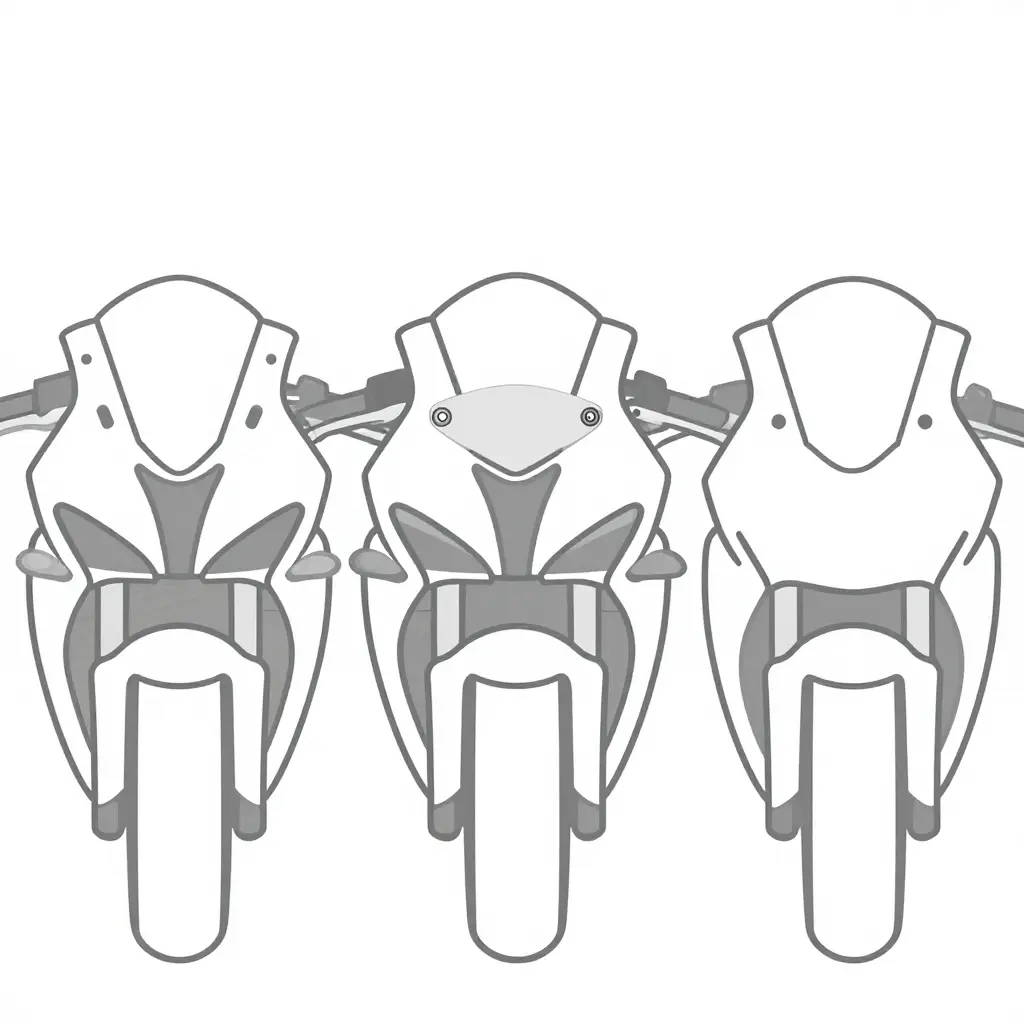
Schematic: three ways to close a headlight aperture – open cutout, cutout plus blanking panel, moulded solid nose.
Pre-Event Bodywork Check
Eight items account for most of what inspectors return to on race fairings. Each line states what is examined and what counts as a pass. Owners sourcing replacement panels as custom fairings can run the same list as an incoming check before the bodywork reaches the paddock.
- Pan seam sealing – every belly pan seam is checked for continuous sealant with no gaps, voids or lifted edges, so no fluid can escape.
- Drain plug presence – the sump drain plug and its safety wire are checked as fitted and secure, with the plug still reachable through the pan.
- Overflow lip condition – the catch lip around the pan perimeter is checked for continuity and cracks, so any overflow is retained rather than shed.
- Belly pan capacity confirmation – capacity is checked against the minimum in your class rulebook, which commonly falls between three and five litres, and passes when a measured fill of that volume is retained without spill.
- Headlight aperture blanking – the headlight cutouts are checked for solid blanking plates or covers, with no open aperture left facing forward.
- Fastener type and torque security – every fairing fastener is checked for correct type and specified torque, with no missing clips, spacers or thread damage.
- Panel edge and mounting hole condition – panel edges and mounting holes are checked for cracks, elongation and distortion, and pass when holes remain round and panels sit flush.
- Lower fairing ground clearance at full compression – the lower fairing is checked with the suspension fully compressed, and passes when class-mandated clearance is kept from the ground and front tyre.
Log each pass on a dated sheet, and repeat the pan checks after any fluid change: a pan that passed on Friday can fail on Sunday once a plug has been out and reseated.
| Configuration | Belly pan type | Headlight cutout | Fluid capacity posture | Typical scrutineering outcome | Best use case (shops and resellers) |
|---|---|---|---|---|---|
| Stock OEM bodywork | Open OEM pan, no tray | Open cutout, light fitted | No retention volume; fluid drains straight through | Frequently rejected as race bodywork | Street resale, casual track days |
| Aftermarket street fairings | Decorative lower shroud, shallow depth | Retained, fully open | Depends entirely on pan depth | Case-by-case, at inspector discretion | Retail display, dual-purpose builds |
| Sealed race fairings | Sealed belly pan, drain plug | Blanked with flat plate | Meets most club minimums | Usually passes, plug checked | Club racing, track-day fleets |
| Race fairings, baffled pan, blanked aperture | Baffled pan, foam, sealed tray | Fully blanked, no aperture | Exceeds typical minimums, verified by pour | Passes first time, few questions | Race teams, premium rental fleets |
Four common 2008 Yamaha R6 bodywork setups compared on the two factors scrutineers check first, worth reviewing alongside comparable custom fairings before a bulk order.
Mounting, Fitment and Measurement Stability
Race fairings fitment is proven on the bike, not in a catalogue. Hang the panels on the actual machine, torque the hardware to spec and measure gaps with the bike on a stand at ride height, before paint, decals or inspection. Run the checks below in the order a scrutineer will.
Why a sagging rear lip costs you capacity
A rear lip that sags loses usable capacity because the effective floor of the pan rises relative to the drain plug and the oil-retention line. Scrutineers measure what the pan holds once it is installed, so a pan that droops under its own weight can fail even with the right number from the bench. Sag is almost always mounting rather than moulding: the rear of the pan is carrying load instead of hanging neutral.
How fasteners and brackets shift your seam gaps
Dzus fasteners and rubber-mounted brackets introduce float where a rigid bolt would pull a panel tight. Rubber isolators let panels settle a millimetre or two under vibration, so a gap that looked right in the workshop can open after the first heat cycle. On 2008 Yamaha R6 race fairings the side-panel seam along the Dzus row is where it shows up first.
Run these three checks in sequence and write down every number:
- Rear lip datum: measure rear lip height to a fixed reference point after fastening; any drop from the bench figure means the pan is preloaded.
- Seam gap consistency: gauge the side-panel seam at each Dzus location, cold and again after one heat cycle, and note any gap that changes.
- Headlight aperture perimeter: measure the opening at four points (top, bottom, left, right); a blanking plate needs an even, repeatable gap to seal.
Over-tightened bolts and distorted composite panels
Composite panels are thin and stiff, so an over-tightened bolt compresses the laminate, prints through the gel coat and pulls the surrounding seam out of line. The damage accumulates: stress cracks at the hole, a panel that no longer sits flat, and a gap that drifts from the number you just recorded. Torque to the manufacturer’s figure with a calibrated wrench, and use the correct shouldered fasteners instead of stacking washers to take up slack.
Aperture gaps decide whether a blanking plate can seal
A blanking plate seals only if it makes continuous, even contact around its full perimeter. If one side of the opening sits 4 mm proud and the other 1 mm, air finds the loose corner and the plate becomes a cosmetic cover over an open aperture. For track legality what counts is what the fairing does with airflow, not how tidy it looks. Shops that want a repeatable result start from panels with consistent mounting points, such as these custom fairings built to spec, then re-verify after the first session.
Measure cold, measure hot, and keep the sheet with the bike’s logbook. A pre-fit check that records rear lip height, seam gaps and aperture perimeter is what turns a parts list into a bike that passes without an argument.
Where bodywork fails scrutineering
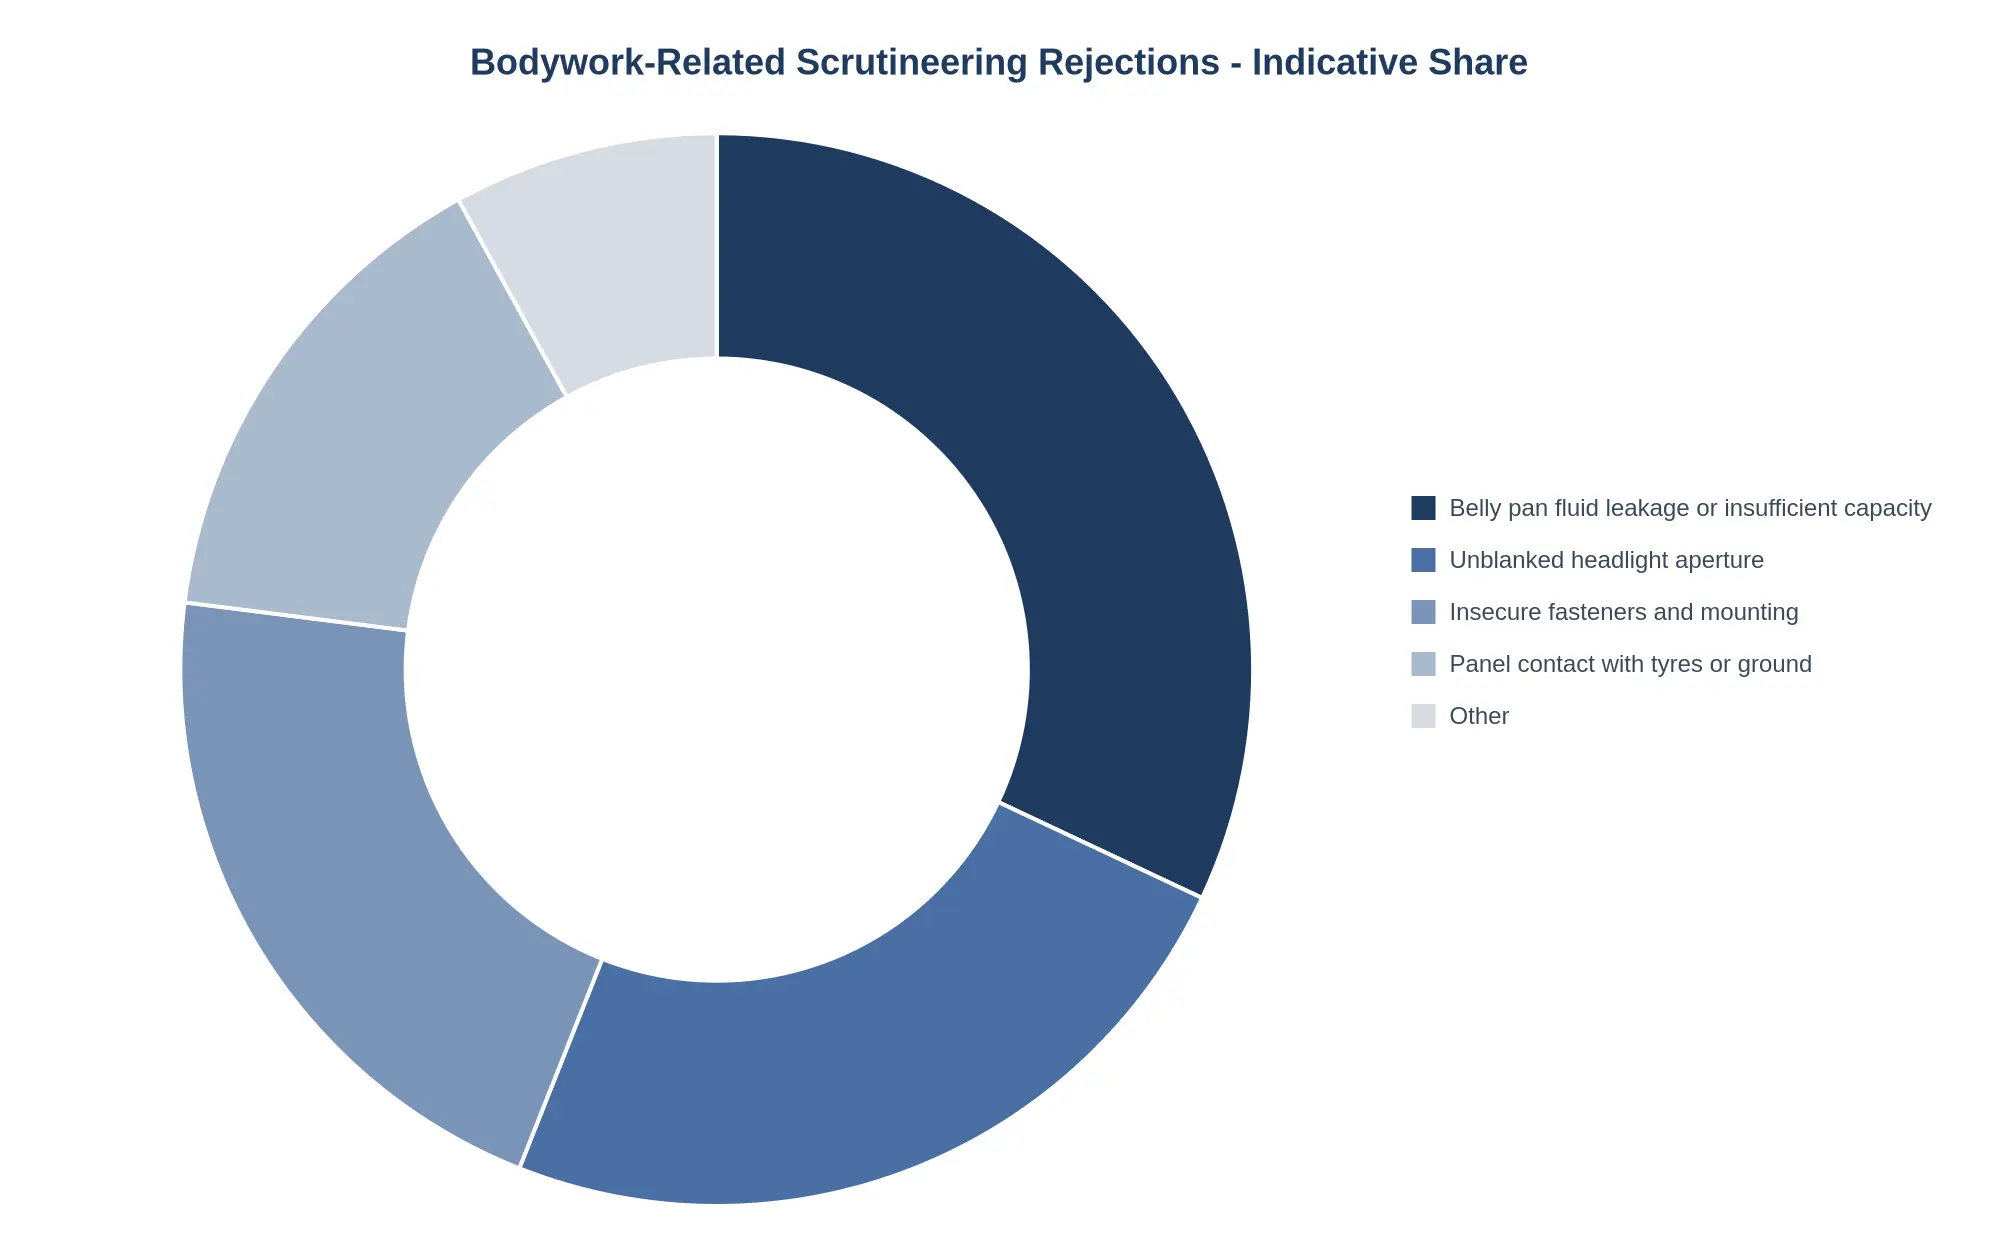
Belly pan faults (32%) and unblanked headlight apertures (24%) together account for more than half of those rejections, followed by insecure fasteners and mounting at 21%, panel contact with tyres or ground at 15%, and 8% other. The order argues for checking oil capacity, drain-plug sealing and aperture blanking before anyone spends time on paint, decals or fitment cosmetics.
Caption: Figures are indicative only and drawn from general paddock practice across club and national-level meetings; actual rejection rates vary by series, circuit and scrutineer, so always check your own regulations and supplementary rules. For a starting point on panel sets that already build in these checks, browse custom fairings.
Construction materials and compliance margin
Two things decide whether a set clears scrutineering: how much fluid the pan holds without leaking, and whether the headlight aperture can be closed cleanly. Material choice affects both, so compare fibreglass and ABS on those terms rather than on appearance.
Wall thickness, pan rigidity and seam sealing
Fibreglass race bodywork is laid up by hand, so material can go where it matters: the floor of the belly pan, the lower seam, the mounting shoulders. A pan with controlled thickness holds its shape under fluid load and does not flex away from the seam line, and a seam that stays loaded stays sealed, including at the drain plug and the joins between upper and lower sections. ABS is moulded to a wall section fixed by the tool: every part in a batch behaves the same way, but a thin area cannot be thickened locally without bonded reinforcement.
Deeper pans without distortion
Depth is easier in composite. A laminate builds up over the mould in layers, so a deeper draw simply means more material and the corners keep their section. ABS relies on the sheet flowing into the mould, and a deeper draw stretches it at the corners, which shows up as thinning and moulded-in stress that can pull the pan out of shape once it is warm and loaded. Deep ABS pans are more likely to need heat forming or a multi-piece approach.
Heat deflection near the exhaust and headlight
The lower right-hand panel sits close to the header pipes, and the headlight recess picks up heat from lamps and wiring. ABS softens at a lower temperature and depends on airflow and a reflective shield to keep its shape. Glass-reinforced laminates hold stiffness higher, though resin can still scorch under direct radiant heat. Either material needs a standoff and a heat barrier in those zones, and on a race bike the exhaust side is where the margin gets tested first.
Moulded-in blanking plates
A headlight cutout has to satisfy a scrutineer. Separately fitted plates depend on brackets, tape, sealant or fasteners, and each of those is somewhere the plate can sit proud, leave a gap or work loose between sessions. A plate moulded into the panel removes the assembly step: the same shell closes the aperture, the same way on every set, and there is nothing to refit after a crash repair.
| Property | Fibreglass composite | ABS |
|---|---|---|
| Wall thickness | Built up locally where load and sealing matter | Fixed by the tool, uniform across a batch |
| Belly pan depth | Extra depth added as material; corners keep section | Deeper draws thin at the corners |
| Seam behaviour | Stiff pan keeps the seam loaded and sealed | Relies on clip fit and sealant |
| Heat deflection | Holds stiffness to a higher temperature | Softens earlier; needs shielding |
| Headlight blanking | Can be moulded into the shell | Often a separately inserted plate |
| Repair | Local laminate repair possible | Patch or replacement panel |
Where to look next
If you are preparing a 2008 Yamaha R6, the custom fairings catalogue lists the R6 race fairings options with belly pan depth and headlight arrangement set out per set, and the related model collections cover other machines if your race programme runs more than one bike. Compare wall sections and blanking arrangements against your series rules before committing to a material; the compliance margin sits in those details, not on the outside of the panel.
Belly Pan Cross-Section at a Glance
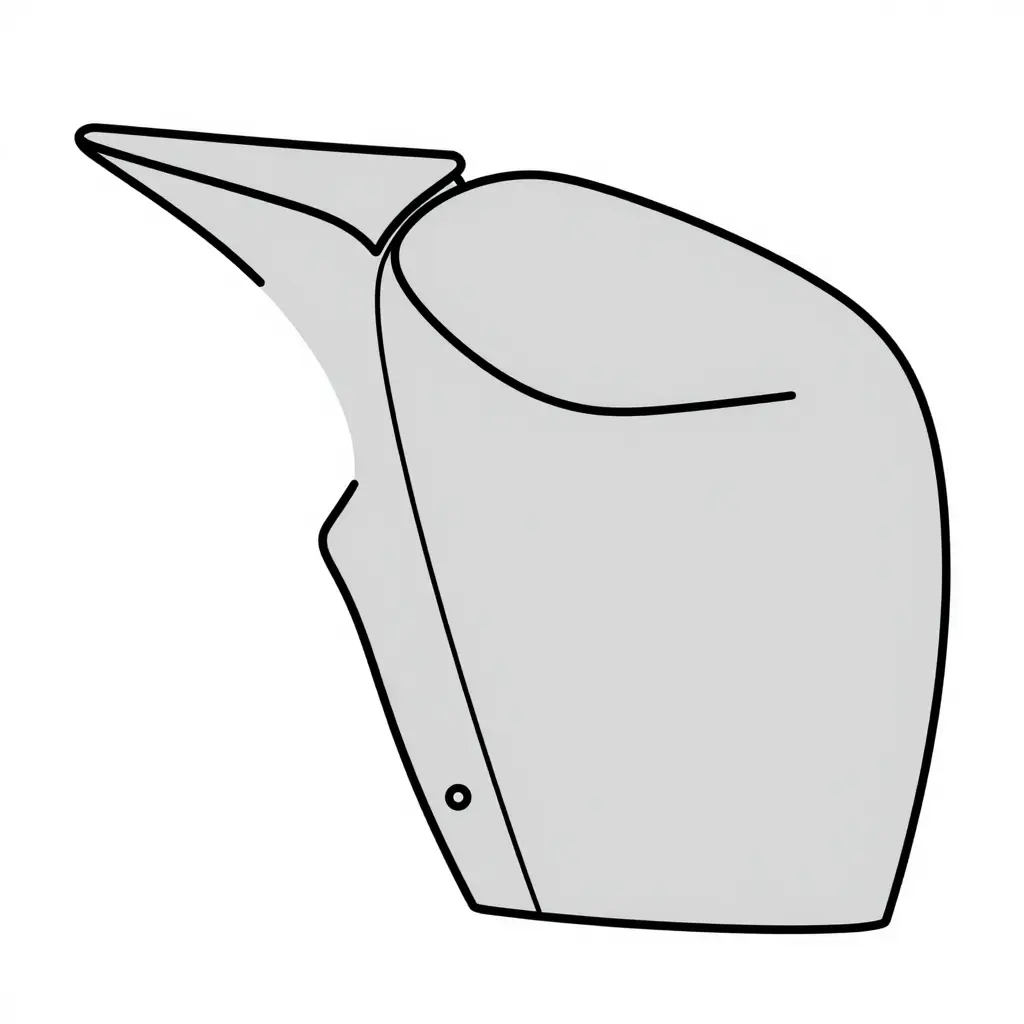
Tyre warmers and lap times come later. At technical inspection the question is where the oil ends up when the engine lets go, and the drawing below shows the geometry that answers it: no branding, no hardware clutter, just the shapes that decide whether the bike passes.
Reading the Shape
- Pan floor – the wide, flat base that carries the fluid volume. On a 2008 R6 it needs to hold roughly the oil and coolant the engine can dump in one failure, which is why race pans sit deeper than the stock lower fairing.
- Overflow lip – the raised step at the rear edge, acting as a simple dam: fluid sloshes backward under braking, hits the lip and stays in instead of trailing out behind the rear wheel.
- Drain plug at the lowest point – gravity does the work. One low point means the pan empties completely at the end of a session, so no old oil carries into the next one.
- Sealed seam to the side panel – the joint where pan meets flank. A gapped or riveted-only seam defeats the whole containment principle, because liquid finds the gap faster than it finds the plug.
| Geometry feature | What it controls | What to check on delivery |
|---|---|---|
| Pan floor depth | Total fluid capacity | Flat base, no stress cracks |
| Overflow lip | Retention under braking | Continuous, unbroken height |
| Drain plug | Clean servicing | Sits at the true low point |
| Sealed seam | Leak path elimination | Tight fit, sealed joint |
Why the Cross-Section Beats the Spec Sheet
A capacity figure tells you volume. The cross-section tells you whether that volume stays where it was poured. A wide, shallow pan can quote the same litres as a narrow, deep one and still spill in the first hard braking zone, because lip height and low-point placement do the work. That is why the drawing is worth more than the spec line when you compare track bodywork, and the same logic applies when you browse custom fairings for any build.
Flat floor, defined lip, a single low drain, a seam that closes fully against the side panel: if the shape in front of you has those, containment is visible without a single dimension on the page.
Documentation and Supplier Verification: Proving Compliance Before and After Purchase
Most failed inspections do not begin at the track. They begin in an email thread where nobody asked for a number. If you are buying 2008 Yamaha R6 race fairings for a race team, a track-day rental fleet or a resale build, treat the paperwork as part of the product. A set that fits beautifully but cannot be proven legal is a set that stays in the van.
Four verification steps worth doing every time
- Request capacity figures in writing from the supplier. Ask for the belly pan’s fluid capacity in litres, along with any oil-containment claim and the conditions it was tested under. A number on a spec sheet beats a verbal “yeah, it holds a lot.”
- Confirm whether the headlight cutout is moulded closed or needs a separate plate. A race-moulded front cowl with a sealed headlight cutout behaves very differently from a street shell that requires a bolt-on blanking panel. Get the answer before you order, and get it as a model-specific statement rather than a general one.
- Keep the fitting hardware list with the invoice. Fastener sizes, bracket part numbers, spacer thicknesses and torque values belong in the same file as the purchase record. Six months later, when a second bike needs the same setup, that page saves an entire afternoon of guessing.
- Record post-fit measurements. Note ride height, panel-to-header clearance, mount bolt torque and how the belly pan sits relative to the exhaust. Photograph the finished install from three angles. Those notes let you repeat an identical setup across multiple bikes instead of re-engineering it each time.
Why the paper trail pays for itself
Documented figures shorten the conversation at the technical bay. Instead of a technician pouring into your belly pan while a queue builds behind you, you hand over a capacity figure and a photo set. Questions get answered in seconds and protest risk drops. Fewer failed entries also means fewer refunded entry fees and fewer wasted travel days.
Buying from one supplier makes that repeatable. Our custom fairings collection carries model-specific sets for a wide range of machines, so every bike in a lineup can be built to the same verified spec: verify once, document it, repeat it.
FAQ: Belly Pan Capacity, Headlight Cutout, and Track Legality
Is sealed race bodywork required for track days or only for racing?
It is required for racing and rarely for track days. Most organizers only ask for secure panels with no sharp edges; full sealing becomes part of the check once you enter a race class or timed competition.
Can a street fairing with a taped headlight recess pass scrutiny?
Often at a track day, rarely at race inspection. Officials want a rigid blanking plate over the headlight cutout so no lens fragments can reach the racing surface.
How much belly pan capacity is typically expected?
Club and national rulebooks commonly ask for somewhere between three and five litres. The figure that applies to you is the one written into your series’ regulations, measured with the pan fitted and drain plugs closed. An R6 belly pan that comes up short fails scrutineering.
Does a blanked headlight aperture affect airflow to the airbox?
The aperture itself does not feed the airbox. On the 2008 R6 the ram-air duct mouth sits between the headlights, separate from the lamp openings, so blanking the lights leaves intake pressure alone. What does affect it is a plate that bridges the whole recess and covers the duct mouth. Shape the plate to the recess and the duct keeps its flow.
Are replacement race fairings for the 2008 Yamaha R6 sold with blanking plates?
Usually not. Plates are bought or fabricated separately, and even custom race fairings rarely include them, so confirm before ordering.
Closing Summary: Two Specifications, One Verification Routine
Belly pan capacity is a containment specification: the pan has to hold the required volume under race conditions, which is a property of the part and has nothing to do with paint or fitment. Headlight aperture treatment is an aperture specification: whether you blank it, tape it or buy a solid nose, the surface presented to the scrutineer has to be closed.
Both are verified the same way: measure the volume and the opening, confirm that nothing passes through the aperture and nothing escapes the pan, then file the numbers so an inspector can trace the specification back to the part on the bike.
Supplier Information
Summit Fairings, trading at summitfairings.com, stocks over 3,000 styles covering almost all motorcycle models, and states that its prices run 10-40 percent lower than other sites. The business commits to answering customer questions within six hours. Model-specific listings are in the full fairing catalogue, and custom fairing options cover non-standard apertures and pan configurations.