
Three Interfaces That Decide Seat Cowl Fit
Three parts of the tail decide whether a rear seat cowl bolts straight on: the taillight housing, the grab rail brackets, and the cowl’s own mounting geometry. Between them they set the clearances, bolt points, and anchors a replacement panel has to match. Get those numbers right and the cowl drops into place; get one wrong and it will foul, gap, or need cutting. Seat cowl fit is a specification problem before it is a styling choice.
Mismatch any one of the three and the symptoms are familiar: a gap along the tail, mounting holes that will not line up, a cowl pressing on the taillight lens, or brackets that refuse to seat. The measurements below apply to stock, OEM-replacement, and aftermarket fairings alike, so you can check a part against your own bike before you pay for it.
Three terms recur throughout, and they are worth pinning down first:
- Taillight housing: The structural enclosure at the rear of the motorcycle that holds the taillight assembly. Its shape, depth, and mounting flange dictate the space available behind the seat cowl.
- Grab rail bracket: The metal or composite mounting bracket that secures the passenger grab rails to the subframe. Its position and bolt pattern frequently interfere with or anchor the seat cowl.
- Seat cowl: The removable cover that replaces or sits over the pillion seat area, closing the tail for a single-seat profile. Its mounting geometry must align with both the taillight housing and the grab rail brackets.
If you are comparing replacement options, an aftermarket motorcycle fairings guide shows how these parts are catalogued across current models. The sections below take one interface at a time and give you the dimensions and bolt-pattern checks that matter.
The Taillight Housing as a Fitment Variable
The taillight housing is the pod that carries the brake and tail lamp and bolts to the subframe or tail section. Because it is fixed to the frame, it becomes a datum point for everything behind it: rear motorcycle fairings and the cowl must clear it without rubbing, contacting the lens, or trapping a fastener. Treat the housing as the fixed envelope and the cowl as the shell that has to wrap around it.
Four measurements set how much room you have to work with:
- Housing width and height – overall outer dimensions of the lamp pod, measured across the widest shell point.
- Mounting bolt spacing – center-to-center distance between the housing’s fastening points, taken horizontally and vertically.
- Rearward projection (standoff distance) – how far the housing extends behind the subframe or tail rail.
- Panel depth – the offset from the mounting flange plane to the housing’s rearmost surface.
Bolt spacing is where most attempts fail first. A housing drilled on a 90 mm horizontal by 45 mm vertical pattern will not take a cowl molded for a 100 mm by 50 mm layout unless you slot the holes or add adapter plates. Standoff distance decides the rest of seat cowl fit: too little gap and the cowl presses on the lens housing, too much and the panel floats with a visible seam.
OEM and aftermarket housings differ here. An OEM unit holds tolerances tied to a single model year. An aftermarket motorcycle fairings mold often covers several years or trims at once, and that consolidation shifts projection and bolt spacing. The result is a cowl that fouls the housing or holes that do not line up. Measure the housing on your bike, at the flange, before you order.
Grab Rail Brackets and Seat Cowl Fit
Grab rail brackets bolt to the subframe or tail section and carry the passenger grab rail. Their position, angle, and height set every attachment point around them, which is why they often decide whether a seat cowl drops on without cutting, shimming, or drilling.
Start with bolt hole alignment. The cowl’s rear mounting tabs have to meet the bracket’s captive nuts or through-holes within a tight tolerance – usually only a couple of millimeters. Change the centerline, spacing, or thread pitch and the cowl will not seat, however well the rest of the panel is molded.
Height matters just as much. A taller bracket lifts the grab rail and can push the seat cowl up until it fouls the taillight housing or opens a visible gap along the seat line. A shorter bracket lets the cowl sit lower, but the panel may then contact the rail itself.
Whether the bike has a grab rail at all changes the shape you need. A cowl for a rail-less tail assumes nothing stands above the tail; a cowl for a railed bike is molded with reliefs so the grip passes through or sits flush. A dedicated motorcycle fairing bolt kit supplies fasteners that match these mounting points instead of leaving you to guess.
Integrated Grab Rail vs Separately Bolted Bracket
Where the grab rail is integrated, the rail and its mounting bosses are cast or molded into the tail piece as one unit. Clearance is fixed, so a replacement cowl has to reproduce the exact relief cutouts or it will not fit. Where the bracket is separately bolted, it unbolts from the tail, and you can swap or shim it to tune height and alignment. Seat cowl fit is more adaptable on those bikes, but it also varies more between model years and trim levels – part of what makes choosing rear motorcycle fairings harder than it looks.
Bracket-Related Fitment Variables
- Mounting point location on the subframe or tail
- Bolt hole spacing, centerline, and thread pitch
- Bracket height and vertical offset
- Grab rail presence or absence
- Integrated versus separately bolted bracket design
- Cowl relief cutouts for the rail
- Taillight housing interference above the tail
When all of these match your specific motorcycle, the cowl bolts on cleanly. When one is off, plan on modifying something or sourcing a different rear fairing assembly.
Rear Fairing Fitment Compatibility: Taillight Housing and Grab Rail Bracket Matrix
The table below predicts seat cowl outcomes from two variables: how deep the taillight housing sits below the tail line, and how the grab rail bracket is mounted. Find your combination and read across for the likely result and any modification required to achieve a clean install.
| Component Configuration | Taillight Housing Type | Grab Rail Bracket Style | Seat Cowl Fit Result | Required Modification |
|---|---|---|---|---|
| OEM tail light | Shallow housing | Integrated, cast-in | Direct fit, no gaps | None |
| Aftermarket LED tail | Deep housing | Bolt-on bracket | Interference at cowl base | Trim cowl base flange 3-5 mm |
| Tail light deleted | Shallow housing | No grab rail | Clean, flush install | None |
| OEM tail light | Deep housing | Bolt-on bracket | Gap at side panel seam | Add 6 mm spacer kit |
| Aftermarket LED tail | Deep housing | Integrated, cast-in | Housing contacts cowl underside | Relocate housing 8 mm rearward |
| Tail light deleted | Deep housing | No grab rail | Cowl overhangs taillight recess | Fit shorter cowl or delete bracket |
| OEM integrated tail | Shallow housing | Integrated, cast-in | Direct fit, minor shim | 2 mm alignment shim |
| Aftermarket LED tail | Shallow housing | No grab rail | Direct fit, slight standoff | 3 mm rubber washer set |
The pattern: shallow housings with integrated or absent grab rails give the cleanest seat cowl fit, while deep housings and bolt-on brackets cause most of the interference and seam gaps. Before you drill or trim anything, confirm the bracket hardware matches your frame, and check our guide to the correct motorcycle fairing bolt kit for the fasteners and spacers that keep alignment true.
Seat Cowl Fit and Geometry
Two fixed points on the tail locate the seat cowl fit: the taillight housing and the grab rail brackets. The cowl is dimensioned from those datum planes, so their position decides everything downstream. The housing sets the rearward and vertical reference; the brackets set lateral and fore-aft position.
Contact points come first. The cowl rests on the taillight housing shroud at the rear and on the grab rail bracket mounting ears at the sides. These are the primary location contacts, and distortion at either one shifts the cowl immediately.
Panel gap is the second constraint. A correctly seated cowl holds a uniform gap against the tail and the adjacent rear motorcycle fairings, typically 1.5 to 3 mm. A gap that tapers or wanders means one reference point is out of position.
Fastener alignment is the third. Holes through the cowl, housing, and brackets should meet without force. If a bolt needs levering or a hole needs elongating, the assembly is loaded and will not sit flush. Consistent hardware from a quality motorcycle fairing bolt kit removes one variable from that check.
Fitment Stack-Up
Stack-up is every tolerance in the chain added together, from frame mounting tabs to aftermarket cowl dimensions. A 2 mm deviation at the taillight housing pushes the cowl rearward and opens a gap or causes interference. A bent grab rail bracket shifts it laterally. Each error is small on its own; together they decide the final outcome:
- Direct bolt-on – stack-up stays within tolerance; all contact points and fasteners align without adjustment.
- Minor rework required – slotting, shimming, or trimming restores alignment; gaps remain achievable.
- Incompatible – deviation is too large for safe correction; a different cowl or bracket set is needed.
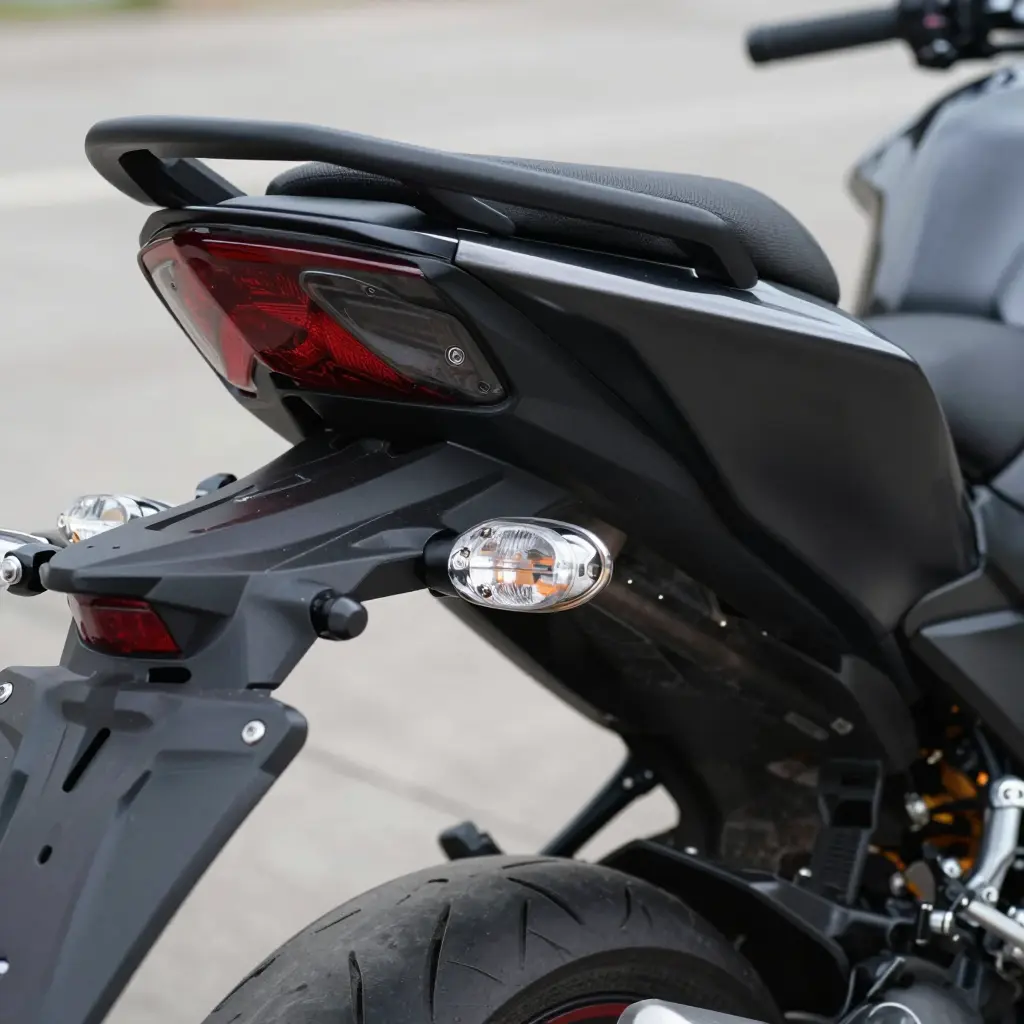
The three interfaces relate in a fixed pattern. The taillight housing sits at the rearmost centerline point; the two grab rail bracket mounts sit symmetrically ahead of it on the left and right flanks; the seat cowl attachment zone spans the overlap where those surfaces converge. Read front to rear and the grab rail brackets act as the mid-anchor, while the taillight housing and the cowl edge share a common reference line. When you compare an aftermarket panel with an OEM unit, that alignment – not the paint or the shape – is what decides fitment.
Measurement and Verification Procedure
Before you commit to a set of rear motorcycle fairings, spend ten minutes with a tape measure, a straight edge, and a notebook. A two-millimeter mismatch at the mounts is enough to throw an entire tail section out of alignment, so checking specifications up front is cheaper than a return.
The labeled diagram above shows each reference point you need to capture.
Step 1: Record the Four Key Measurements
Work from the rear forward and log every value on your own bike before shopping:
- Bolt spacing – the center-to-center distance between the mounting bolts on the existing tail.
- Taillight housing depth – the distance from the rear face of the seat to the deepest point of the lens cavity.
- Grab rail bracket height – the vertical distance from the bracket base to the centerline of its mounting bolt.
- Cowl length – the run from the front seam to the rear tip of the cowl.
Step 2: Compare Against Supplier Specifications
Match each recorded value to the published numbers:
| Measurement | Where to measure | Acceptable tolerance |
|---|---|---|
| Bolt spacing | Center-to-center of mounting bolts | plus or minus 1 mm |
| Taillight housing depth | Seat rear face to deepest point of lens cavity | plus or minus 2 mm |
| Grab rail bracket height | Bracket base to bolt centerline | plus or minus 2 mm |
| Cowl length | Front seam to rear tip | plus or minus 3 mm |
Step 3: Confirm Overall Fitment
Cross-check the taillight housing clearance, the grab rail brackets alignment, and overall seat cowl fit against the supplier’s stated motorcycle fairing fitment notes. A part that lists a different mounting pattern or housing profile for your model year will rarely bolt on cleanly.
The specification data here comes from a broad aftermarket parts catalog, so treat published numbers as a baseline and verify them against your own measurements. If you want a deeper walkthrough of how to read these specs, this aftermarket motorcycle fairings guide breaks down the process step by step.
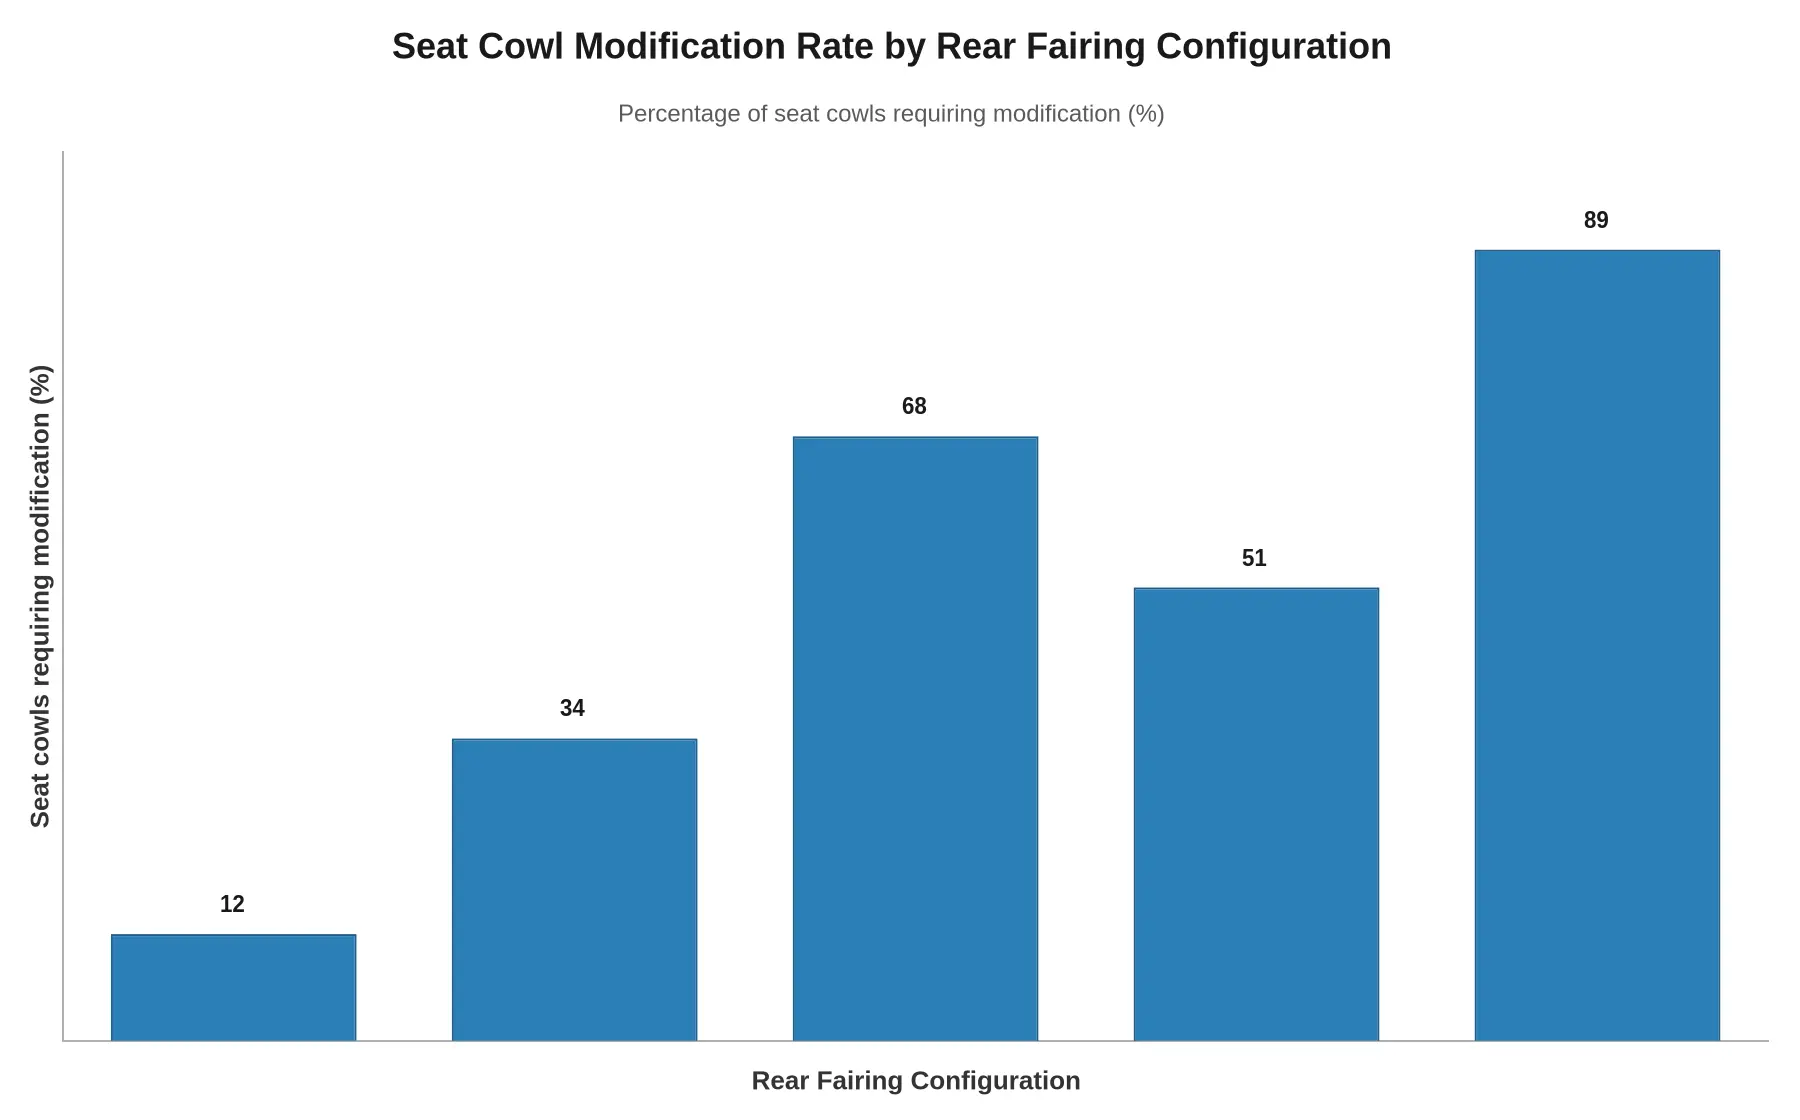
Figure 1. Seat cowl modification rate by rear fairing configuration.
The chart above puts most of the variation on the tail-end interface rather than the cowl itself. With a shallow taillight housing and grab rail brackets integrated as a single OEM assembly, only ~12% of seat cowls need trimming, shimming, or re-drilling; the geometry is already keyed to a factory reference point. Fit a mismatched bracket and that figure climbs to ~89%, because bolt-hole spacing and standoff depth no longer align with the cowl’s mounting plane. Aftermarket housings (51%) and no-grab-rail setups (68%) sit in the middle, where undocumented offsets take extra fabrication to bridge. For builders sourcing replacement rear motorcycle fairings, the practical takeaway is simple: confirm the housing depth and bracket pattern first, because predictable seat cowl fit comes down to matching that interface, not the cowl’s outward shape.
Rear Fairing & Seat Cowl Fitment Verification Checklist
Before you commit to an install, run through these steps to confirm your rear motorcycle fairings and seat cowl are mechanically compatible with your bike’s subframe and lighting assembly.
- Confirm the taillight housing model. Match the OEM part number stamped on your taillight housing against the fairing listing – housings vary in depth, lens profile, and mounting tab count across model years.
- Measure grab rail bracket bolt spacing. Using calipers, record the center-to-center distance between the grab rail brackets’ mounting holes and compare it to the fairing’s pre-drilled points; a variance of even 3 mm can block a flush seat cowl fit.
- Check cowl-to-housing clearance. Mock-fit the cowl with the taillight installed and verify a minimum 5 mm air gap around the taillight housing to prevent stress cracks and vibration rub.
- Validate fastener hardware. Confirm thread pitch, bolt length, and shoulder type against your bike’s specification, and source a correct motorcycle fairing bolt kit rather than reusing worn or mismatched fasteners.
- Torque and test-fit. Snug all bolts to the manufacturer’s torque spec in a cross pattern, then cycle the seat cowl on and off twice to confirm repeatable alignment.
When every measurement matches, your rear motorcycle fairings seat cleanly with no drilling, shimming, or on-the-fly modification.
FAQ: Rear Motorcycle Fairing Fitment
Will a seat cowl from one motorcycle model fit a different model?
Generally, no. A seat cowl is molded around a specific subframe width, taillight housing depth, and grab rail bracket layout, and even closely related models usually differ by several millimeters at the mounting tabs. Interchange works only when the tail sections share identical part numbers or you have confirmed dimensions. Cross-reference the OEM part number and measure your subframe before purchasing.
Do grab rail brackets need to be removed to install a seat cowl?
It depends on the cowl design. Many aftermarket seat cowls are cut to clear the factory grab rail brackets, so the rails stay bolted to the subframe. Others are shaped for a clean race tail and require the brackets to be unbolted and stored, since the cowl occupies that mounting space. Check whether your specific cowl is listed as “grab rail compatible” before ordering.
How does taillight housing depth affect seat cowl clearance?
The taillight housing projects a set distance rearward from the subframe, and the cowl’s interior cavity must exceed that depth for a clean fit. If the housing sits too deep, the cowl will not seat flush and will sit proud of the tail, leaving visible gaps. Measuring the housing depth against the cowl’s internal clearance is the single most reliable way to predict fitment.
Do aftermarket rear fairings match OEM mounting points?
Quality aftermarket rear fairings are molded to replicate OEM mounting points, including bolt spacing, tab locations, and clip positions, so they bolt on without modification. Lower-grade pieces often require slotting or trimming because their tabs drift from the original coordinates. Review our aftermarket motorcycle fairings guide to confirm which options hold factory tolerances.
Can I keep the passenger seat with a seat cowl installed?
Usually not, because a seat cowl replaces the rear seat and covers that area as a single unit. Some two-piece designs allow you to swap between the cowl and the passenger pad, but the cowl itself does not function as a seat. Confirm whether your cowl is a full replacement or a bolt-on cover.
What should I verify before buying a rear fairing or seat cowl?
Confirm three specifications: taillight housing depth, grab rail bracket spacing, and subframe mounting tab coordinates. Matching these values against the product listing prevents the most common fitment failures. When in doubt, request the manufacturer’s dimensional drawings rather than relying on model names alone.
Matching Taillight Housing and Grab Rail Brackets to Your Seat Cowl
Three components decide how rear motorcycle fairings fit your tail. The taillight housing sets the rear cutout profile and mounting depth, which fixes where the fascia must clear the lens and wiring harness. The grab rail brackets set the lateral anchor points and overall tail width; vary their spacing or angle and the cowl’s leading edge no longer meets the passenger seat pan, which throws off seat cowl fit. The third, the cowl’s own mounting geometry and bolster shape, has to correspond precisely to those two hard points so the panels sit flush instead of fighting the frame.
Because those variables interact, accurate specification matching is the difference between a direct bolt-on and hours of re-drilling, shimming, and trimming. Confirm your year, model, and sub-variant before ordering, and verify that the replacement’s taillight housing and grab rail brackets match your OEM reference points. For the broader anatomy, this primer on what a motorcycle fairing actually is explains how each rear panel contributes to the whole assembly.
A wide range of styles is available to suit different tail designs and rider preferences, and pricing remains competitive across the range. For a practical comparison of reputable options and how to evaluate them, see this guide to the best aftermarket motorcycle fairings. When a specification is unclear, knowledgeable staff answer questions quickly so you can confirm compatibility before committing. Get the taillight housing, grab rail brackets, and seat cowl geometry aligned on paper first, and your rear motorcycle fairings will bolt on cleanly the first time.
Quick Reference: Fitment Variables and Their Effect
| Fitment Variable | Determines | Check Before Ordering |
|---|---|---|
| Taillight housing | Rear cutout profile and mounting depth | Lens clearance and harness routing |
| Grab rail brackets | Tail width and lateral anchor points | Bracket spacing and angle vs OEM |
| Seat cowl geometry | Alignment with seat pan and bolster | Leading edge and attachment points |