
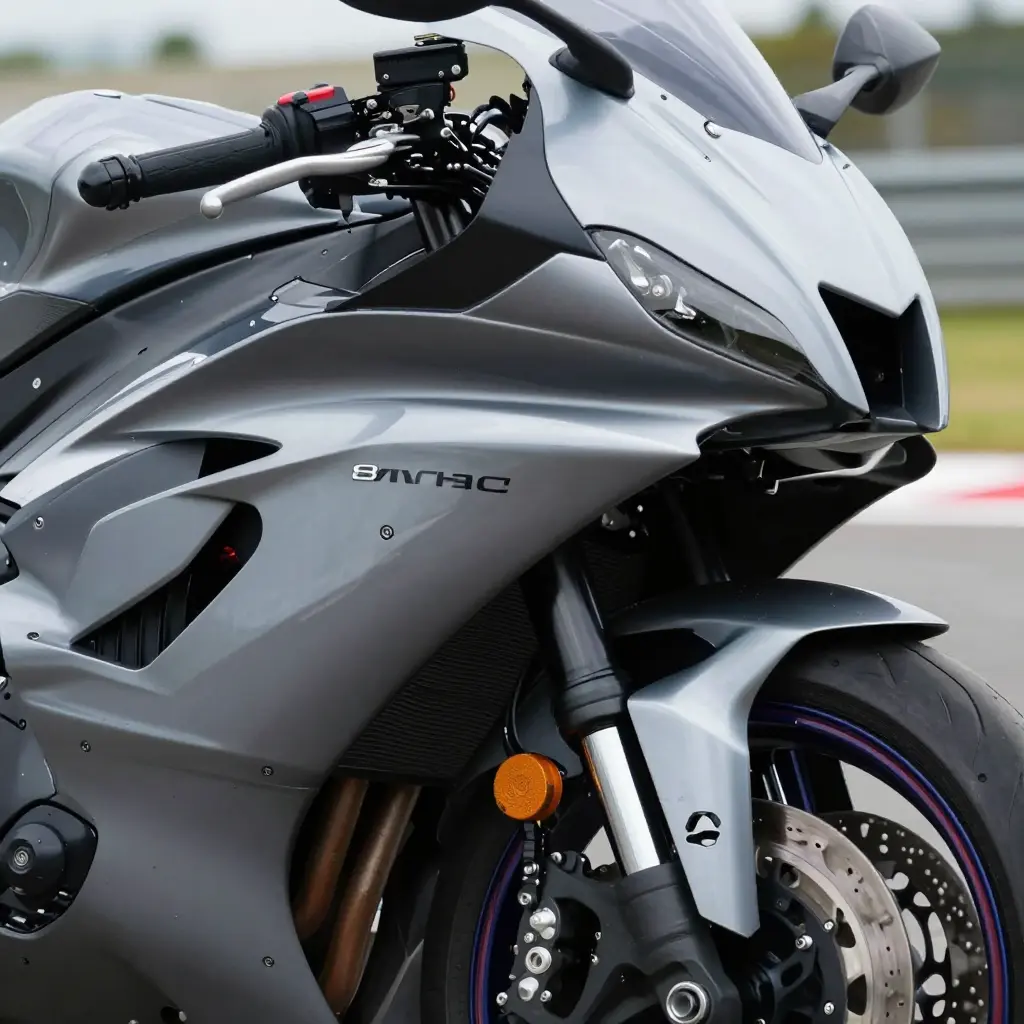
On a 2008-16 Yamaha R6, the upper fairing does not bolt directly to the frame. It attaches to a Yamaha R6 2008-16 upper fairing mount kit – the small set of stays and brackets that decides where the nose panel actually sits. Two things in that kit shape the final fit. The first is bracket geometry: the bends and angles that set how far the nose stands from the frame and at what tilt. The second is bolt hole spacing: the distance between mounting points, which decides whether the panel pulls down evenly or loads one corner harder than the rest.
The nose ties the side fairings, windshield and headlight opening together, so errors in either measurement show up quickly – uneven panel gaps, a fairing that sits proud or sunken against its neighbour, a headlight cutout that no longer frames the lamp. A kit that is bent, drilled inconsistently or dimensionally off will not align, however hard you pull on the bolts.
The notes below cover what the mount kit is made of, how bracket geometry and bolt hole spacing control panel gaps, flushness and headlight cutout alignment on the 2008-16 R6, and how owners and shops can check fit before buying. If you are comparing replacement bodywork, matching the kit to the correct panel set is part of the job.
Mount Kit Anatomy: What Actually Holds Your R6’s Nose Together
The Backbone: The Upper Fairing Bracket
On the 2008-16 R6 the upper fairing bracket, usually called the front stay, is a cast or tubular steel assembly that bolts to the frame headstock just behind the steering head. Everything hangs off it. The bodywork carries no load of its own.
Stay Arms and Mounting Tabs
Two stay arms run outward and upward from the bracket to form a Y- or T-shaped cradle. Each arm ends in a mounting tab – a flat, drilled plate whose bolt-hole spacing matches the nose panel and headlight shroud. The tabs fix the panel’s position and angle, and with them the panel gap.
Grommets, Collars and Fasteners
Each tab carries a rubber grommet seated around a metal collar. The grommet isolates vibration from the chassis, while the collar controls how far the bolt crushes the rubber so torque stays consistent. Bolts and shoulder screws pass through the Yamaha R6 fairings’ nose panel and side panel liners into those tabs.
How the Load Reaches the Frame
Weight and wind force follow a clear path: the headlight shroud, nose panel and side panels rest on the mounting tabs, the tabs feed the stay arms, the arms pass the load into the upper fairing bracket, and the bracket transfers it into the frame headstock, the strongest point on the chassis. When panels sit crooked, that is the path to check first – you realign the stay, not the plastic.
If you are replacing cracked or mismatched bodywork, start with this guide to how R6 fairings fit together in this guide. A straight, correctly torqued fairing mount kit keeps every motorcycle fairings panel referencing the same fixed points.
OEM vs Aftermarket Yamaha R6 Upper Fairing Mount Kit – Key Specs
Table 1: Spec-by-spec breakdown of an OEM vs a typical aftermarket upper fairing mount kit for the 2008-16 Yamaha R6 – and why each measurement decides how the nose panel lines up.
| Specification | OEM Mount Kit | Typical Aftermarket Kit | Why It Matters for Nose Panel Alignment |
|---|---|---|---|
| Bracket material | Stamped cold-rolled steel (SPCC) with black e-coat | Stamped steel, cast aluminium, or thin-gauge alloy, brand-dependent | Stiffer OEM steel resists flex, keeping the nose subframe square so panel gaps stay even under load |
| Bracket thickness | Roughly 1.0-1.2 mm | Roughly 0.8-1.0 mm | Thinner brackets bend under wind and vibration, letting the nose panel sag or lift away from the side panels |
| Bolt hole spacing (center-to-center) | About 108 mm center-to-center between the two main upper bolts | 100-116 mm depending on the kit | Even a 3-5 mm mismatch pulls the fairing sideways – the nose cannot sit flush and clips pop loose |
| Hole diameter tolerance | About +/-0.2 mm | About +/-1.0 mm | Oversized holes let the panel shift before torque; undersized holes refuse the bolt and force reaming |
| Mounting tab count | 6 tabs (3 per side) plus the headlight carrier | 4-6 tabs, sometimes omitting the lower stabilizer | Fewer tabs mean fewer anchor points, so the nose panel buzzes and cracks at the remaining tabs |
| Grommet type | Molded rubber well-nut grommets at OEM hardness | Universal rubber or hard plastic inserts | Softer grommets absorb vibration and let panels self-center; hard inserts transfer buzz and misalign the nose |
| Typical fit-out-of-box | Direct bolt-on, even 2-4 mm panel gaps, no drilling | Often needs slotting, spacers, or shims to line up | A warped kit can need hours of slotting and still never sit flush |
The Takeaway
Bracket geometry and bolt hole spacing decide the fit. A kit that measures within a millimeter or two of OEM drops in clean; one that drifts 5 mm off will fight you all afternoon. If you want a mount kit and fairing set that bolt up like factory, source from a supplier who checks these tolerances – see how a dedicated Yamaha R6 fairing specialist matches OEM geometry.
Why Bracket Geometry Governs Nose Panel Alignment
Every fairing panel bolts to something, and on the R6 the nose bolts to the fairing bracket – the metal skeleton that hangs off the headstock and holds the nose in place. Riders chasing uneven gaps usually blame the panel, but the panel is only following the bracket underneath it. That is why bracket geometry decides how your plastics sit.
Three geometric factors in a Yamaha R6 2008-16 upper fairing mount kit account for most of the fit.
1. Angular Offset of the Stay Arms
The two arms that reach the nose are rarely straight, by design. Their included angle sets how wide or narrow the nose sits against the fuel tank. Bend an arm inward by even a degree – easy after a tip-over – and the panel tilts, opening a gap at the tank while pinching the other side.
2. Fore-Aft Rake of the Main Bracket
Rake is the front-to-back lean of the main bracket relative to the steering axis. Get it wrong and the nose slides forward or backward. A slightly forward rake pushes the panel into the tank and side fairings; a rearward rake pulls it away and exposes seams.
3. Vertical Height of the Mounting Tabs
Tab height controls whether the nose sits high or low. Because the top tabs are the reference for the whole assembly, a bracket that is slightly out of plane – twisted as a unit – lifts one corner and drops another, and that twist becomes a diagonal panel gap.
How Errors Compound Toward the Edges
Geometry errors do not stay small. The panel acts as a lever pivoting near the headstock, so a small angular error at the center grows as you move outward: a 2 mm discrepancy at the mount can become a 10 mm gap at the outer edge of the nose.
That is why a panel can look fine against the tank yet sit far off against the side fairings. The center is nearly right; the outer edges are not.
Getting It Right
The fix is to true the bracket, not bend the fairing. Checking rake, tab height and stay angle – ideally against a known-good reference – restores the whole assembly at once. To see how these kits fit real bikes before you buy, browse Yamaha R6 fairing guides and compare with a correct setup. Get the geometry right, and nose panel alignment follows.
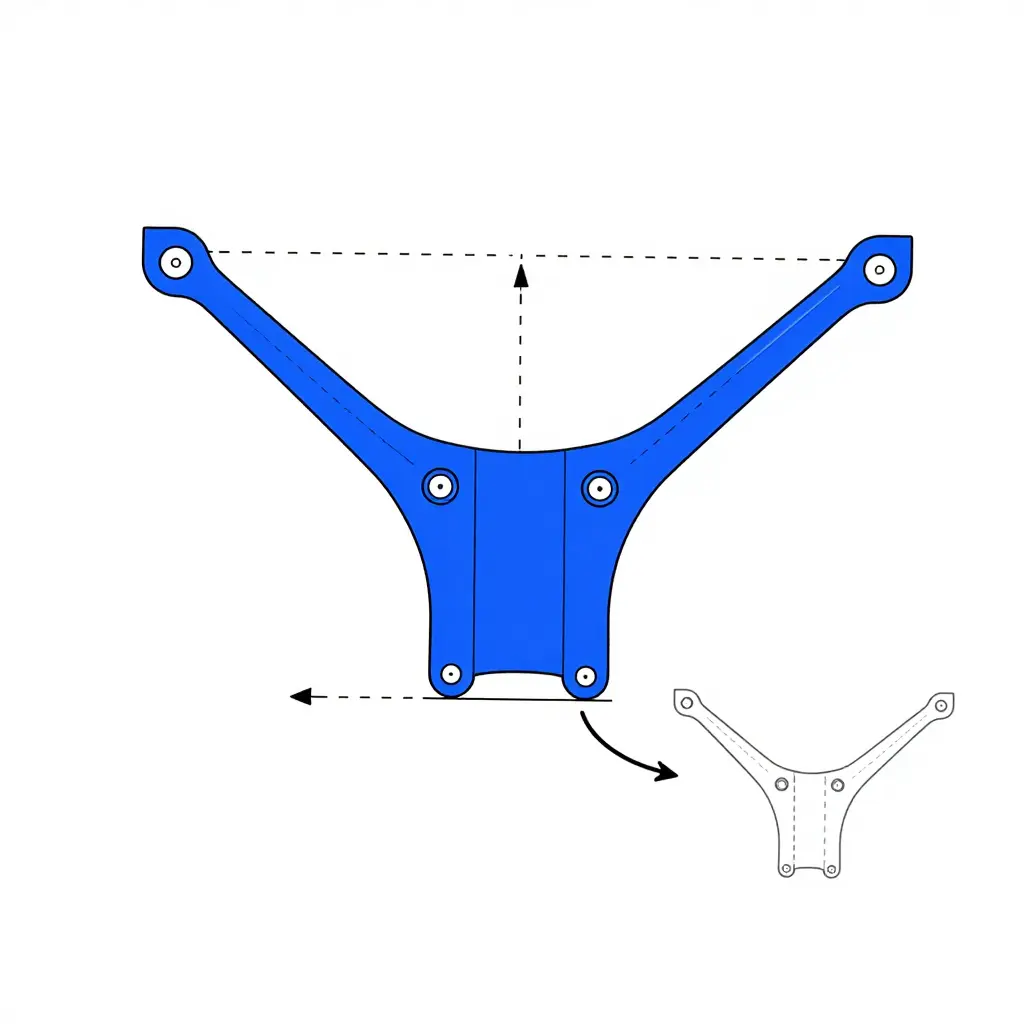
The diagram above maps the geometry that drives nose panel alignment on a 2008-16 R6. It shows the central bracket plate, the outward angles of the two stay arms, and the position of each mounting tab where the upper fairing bolts down. The side-profile inset is the useful part: the solid line is a correctly bent bracket that lets the fairing sit flush, and the dashed line shows how a few extra degrees of bend pull the nose panel out of true.
Bolt Hole Spacing: The One Measurement That Decides If Your Nose Panel Sits Flush
When an R6 nose panel will not sit flush, riders tend to reach for a mallet or blame the fairing. The usual culprit is the bracket underneath, and specifically the bolt hole spacing.
Bolt hole spacing is the center-to-center distance between the holes that pin the nose panel to the upper bracket. It is a small measurement, but it sets how the panel rotates, so it decides whether the panel sits square.
Hole Diameter vs Bolt Diameter
The R6 nose mounts with 6 mm bolts, which gives you two ways to get spacing wrong. If the bracket holes are drilled at 6.1-6.2 mm, the panel has nowhere to move and any bracket error is locked in. Drill them at 8-9 mm and the bolts slide, so the panel drifts and rotates under vibration. A snug, slightly oversized hole (around 6.5 mm) gives you just enough room to fine-tune before the hardware is torqued.
Even 1-2 mm Rotates the Whole Panel
Spacing error does not only shift the panel sideways; it rotates it. A 1 mm variance across a 200 mm bracket turns the nose by roughly 0.29 degrees. That sounds small until you measure at the tip of the nose, where the same angle becomes about 1.5 mm of visible movement. At 2 mm, the tip moves about 3 mm.
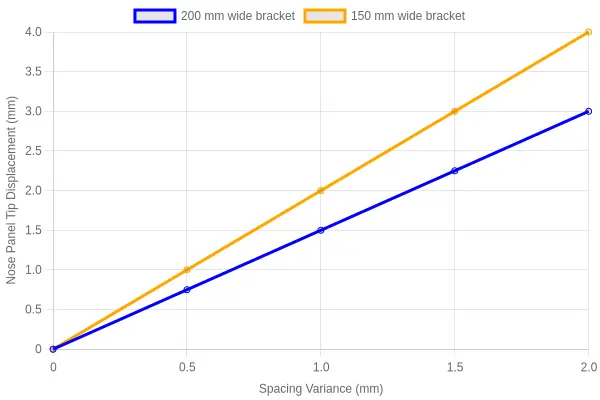
| Spacing variance | Panel rotation | Nose tip shift |
|---|---|---|
| 0.5 mm | 0.14 deg | 0.75 mm |
| 1.0 mm | 0.29 deg | 1.5 mm |
| 1.5 mm | 0.43 deg | 2.25 mm |
| 2.0 mm | 0.57 deg | 3.0 mm |
Where You Actually See It
- Headlight cutout: the beam opens up on one side and crowds the other as the shell rotates around the headlight.
- Mirror mounts: the mirror stem pulls in or out, and the base no longer sits square on the panel.
- Nose-to-side-fairing seam: one side opens into a wide panel gap while the opposite side pinches shut and works the paint.
Tolerance Stacks With Aftermarket Parts
Here an upper fairing mount kit and aftermarket motorcycle fairings can work against each other. The bracket carries its own spacing tolerance, the kit adds another, and the aftermarket panel brings a third. Add them together and a setup that measured fine becomes 2-3 mm off – enough to throw off your nose panel alignment entirely. Buy matched parts and check spacing with a caliper before you torque anything. To see how a complete kit removes some of those variables, read about the benefits of a fairing kit.
Yamaha R6 Upper Fairing Bolt Hole Spacing: Did It Really Change?
Before ordering a replacement nose panel or a complete upper fairing mount kit, lock in one number first: the center-to-center distance between the upper mounting bolts. Get that dimension wrong and the fairing fights you the whole way onto the bike. Get it right and the nose panel seats with factory alignment.
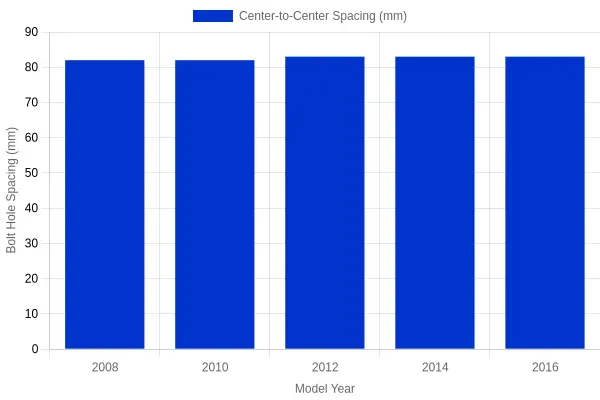
The chart below tracks that spacing across the 2008-2016 Yamaha R6 generation using representative illustrative values. The dimension barely moved.
What the Bars Are Telling You
Read left to right, the bars climb only slightly, from roughly 82 mm on the earlier 2008-2010 bikes to about 83 mm on the 2012-2016 machines. That is about a single millimeter across an entire generation, small enough to absorb with the play already built into the brackets – not something that forces a redesign of the nose assembly.
A few takeaways for owners and shops:
- The mounting points stayed put. Because spacing held steady, an upper fairing mount kit designed for the early R6 will generally work across the generation, provided the bracket geometry matches.
- Bracket shape matters as much as spacing. Two brackets can share identical hole spacing yet still misalign a panel if their bend angles or standoff heights differ.
- Watch the subframe, not just the numbers. A tweaked or aftermarket subframe can shift the effective mounting points even when the fairing itself is spot on.
If you are sourcing parts for this bike, it helps to understand how fairing fitment works across models. Our guide to Yamaha R6 motorcycle fairings walks through the details that keep everything lined up.
Bottom Line
The data shows a stable, largely unchanged bolt hole spacing across the 2008-2016 R6 generation. When your nose panel will not sit flush, the cause is almost never the spacing itself – it is the bracket geometry, the mounting hardware, or an out-of-spec subframe. Measure your spacing to confirm you are in the 82-83 mm range, then look at the brackets that hold it all together.
Before you tighten a single bolt, confirm your upper fairing mount kit is dimensionally sound. Nose panel alignment on a Yamaha R6 comes down to geometry, not force, so work through these checkpoints and measure rather than guess. If you ever need a reliable replacement starting point, browse motorcycle fairings for the Yamaha R6 before you begin.
Nose Panel Alignment Checkpoints
- Center-to-center bolt hole spacing – Measure between the mounting holes on the bracket and compare them to the headstock holes. A good result matches within about 1 mm; a poor result shows the holes offset or the bolts only entering at an angle.
- Bracket twist or out-of-plane bend – Lay the bracket on a flat surface or sight down its length. A true bracket sits flush with no rocking; a twisted one rocks, lifts a corner, or shows a visible warp.
- Tab height against the headstock – Check where the upper tabs meet the frame. Good tabs align flat and even; poor tabs sit high or low and pull the nose up or drop it out of line.
- Grommet and collar condition – Inspect the rubber grommets and metal collars. Good grommets are supple and seated with collars square; poor ones are cracked, missing, or let the panel shift.
- Panel gap against the fuel tank – With the nose fitted, check the gap at the tank. An even 3-5 mm gap is good; a tight touch, pinch, or wide gap means the bracket is off.
- Seam at the side fairing junction – Look at where the nose meets the side fairing. Aligned panels form a straight, flush seam; misalignment leaves a step, overlap, or open slit.
- Headlight cutout centering – Check the headlight opening against the lamp. A good cutout centers evenly with equal gaps all around; a poor one crowds one side or exposes the housing.
- Fastener torque in sequence – Tighten bolts in a diagonal, cross pattern to spec (a light snug on M6 hardware). Good practice seats the panel evenly; random tightening twists the bracket and shifts alignment.
Frequently Asked Questions
Will an aftermarket upper fairing mount kit fit my 2008-16 R6 without modification?
In most cases, yes, but only when the kit is engineered for the 2008-16 generation rather than a generic “Yamaha sportbike” one-size bracket. A correctly built Yamaha R6 2008-16 upper fairing mount kit is designed around the OEM attachment points, so bracket geometry mirrors the factory angles and the nose panel sits flush without drilling or slotting. If your fairings are aftermarket, expect minor shimming, because aftermarket panels rarely match OEM panel thickness exactly. Confirm the seller lists the 2008-16 model years and includes the correct mounting hardware. You can browse R6-specific fitment options and fitment notes on Summit Fairings’ Yamaha R6 page.
How do I measure bolt hole spacing correctly?
Measure center-to-center, not edge-to-edge, because panel edges vary between brands and will throw off your numbers. Use digital calipers or a steel rule with the bracket laid flat, and record both the horizontal and diagonal distances to capture true bracket geometry. Repeat each measurement twice; if the two readings differ by more than about 1 mm, recheck before ordering anything. Writing the numbers down prevents the “it looked close enough” mistake that leads to a crooked nose.
Can I bend an OEM bracket to fix geometry?
You can, but it is a short-term fix that usually causes more problems than it solves. OEM brackets are stamped steel with engineered angles, and bending them changes bolt hole spacing at the mounting ears, often cracking the powder coat and weakening the metal. If your alignment is off, the real culprit is usually a tweaked bracket or a fairing set with non-OEM hole positions, so replacing the bracket is the cleaner solution. Bent brackets also tend to spring back over time, so your gap reappears after a few rides.
Do I need to replace the kit when installing new aftermarket fairings?
Not always, but it is worth inspecting, because new panels often ship with slightly different hole locations than the originals. Reusing a worn or slightly bent OEM bracket on fresh fairings can mask the real issue and leave uneven panel gaps that you cannot close. If the bracket is straight and the bolt hole spacing matches your new panels, you can reuse it with confidence. If the spacing is off, a new kit saves hours of fighting.
How long does an alignment correction typically take?
A straightforward bracket swap or alignment adjustment usually takes 30 to 90 minutes for someone familiar with the R6 bodywork. That includes removing the old bracket, dry-fitting the panels, checking bolt hole spacing, and tightening everything in sequence. Complex cases involving stripped bolts, painted panels, or badly warped fairings can stretch the job to a few hours. If you have never removed the nose on your R6, budget extra time and take photos as you disassemble.
Conclusion
On the 2008-16 Yamaha R6, nose panel alignment comes down to two connected variables: bracket geometry and bolt hole spacing. The upper fairing mount kit is not a simple bolted part you can swap and forget. If the bracket bends or the holes sit off-center, the nose panel will pull, gap or sit unevenly, no matter how cleanly the fairing was molded. Check both together, because a straight bracket paired with the wrong spacing still produces a misaligned nose. For a wider look at fitment and selection, explore Summit Fairings’ fairing guide before ordering.
Accurate measurement and correct geometry save rework. When installing motorcycle fairings on an R6, checking the bracket and the hole spacing in the same pass avoids the loop of tightening, spotting a gap, loosening and starting over. Precision here keeps panels flush and gets the job done in one attempt.
Source your next set with confidence: Summit Fairings (summitfairings.com) carries over 3,000 fairing styles for nearly every motorcycle model at 10-40% less than other sites, with a support promise of answers within six hours.